

Testing your solar panel’s output is a crucial step in ensuring it’s operating efficiently. Whether you’re troubleshooting a potential issue or simply checking performance, knowing how to test solar panel with multimeter can save you time and money. In this step-by-step guide, we’ll walk you through the process, making it easy for beginners and DIY enthusiasts alike to get accurate readings and maintain their solar system’s health. Let’s dive in and learn how to keep your panels working at peak efficiency!
Introduction
Solar panels are an excellent way to harness renewable energy and reduce your electricity bills, but like any equipment, they need to be regularly maintained to ensure peak performance. One of the most effective ways to check the health of your solar panel system is by testing it with a multimeter. Whether you’re experiencing a drop in output or simply want to ensure everything is functioning optimally, knowing how to test a solar panel with a multimeter is a valuable skill for any DIY enthusiast.
In this step-by-step guide, we’ll walk you through the process of testing a solar panel’s voltage, current, and resistance using a multimeter. You’ll learn how to get accurate readings, understand what those readings mean, and troubleshoot any potential issues. By the end, you’ll be able to confidently assess the performance of your solar panels, keeping them running efficiently and saving you money in the long run.
Tools and Materials Needed
Before you begin testing your solar panel, it’s important to gather the right tools and materials. Here’s what you’ll need:
- Multimeter: A digital multimeter capable of measuring voltage, current, and resistance is essential for accurate solar panel testing. Make sure your multimeter has DC voltage and current settings, as solar panels produce direct current. A basic cost-effective multimeter is all you need. I was using one similar to the AstroAI Digital Multimeter Tester 2000.
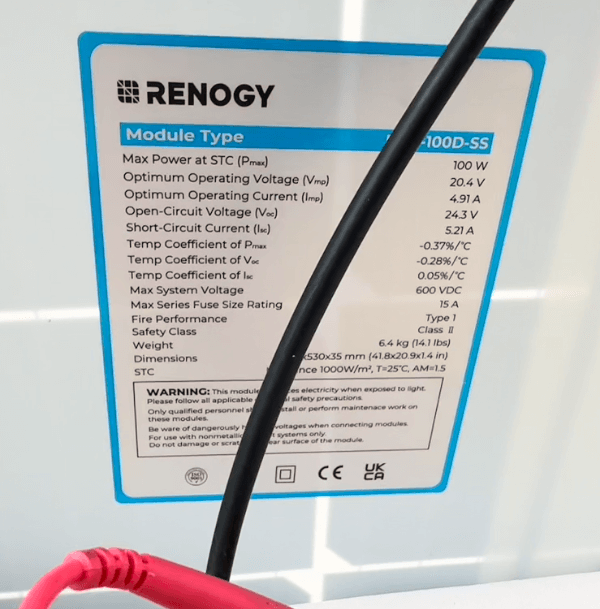
- Solar Panel: The panel you’re testing, either as part of your solar array or a standalone unit. Ensure the panel is clean and exposed to sunlight for accurate results. My solar panels were the Renogy RNG-100D-SS 100w Panels.
- Cables and Connectors: You’ll need to connect your multimeter to the solar panel’s terminals. Depending on your setup, this may require test leads or specific connectors.
- Protective Gear (Optional but Recommended):
- Insulated Gloves: For handling electrical components safely.
- Safety Glasses: To protect your eyes while working with electrical systems.
With these tools and materials ready, you’ll be well-prepared to test your solar panel’s output and ensure its performing efficiently.
Understanding the Basics of a Multimeter
Before diving into testing your solar panel, it’s important to understand how to use a multimeter. A multimeter is a versatile tool that can measure voltage, current, and resistance, making it ideal for diagnosing electrical components like solar panels.
1. Key Functions of a Multimeter
Multimeters come with a range of functions, but for testing solar panels, you’ll primarily be using the following:
- Voltage (V): Measures the electrical potential difference between two points. For solar panels, you’ll be measuring DC voltage, as solar panels produce direct current.
- Current (A): Measures the flow of electrical current. Solar panels produce current in amperes (amps), which indicates how much power is flowing.
- Resistance (Ω): Measures how much a material resists the flow of electric current. Testing resistance helps check the health of your solar panel’s internal components, wiring, and connectors.
2. Setting Up Your Multimeter for Solar Panel Testing
- Voltage Testing: Set the dial on your multimeter to the DC voltage setting (marked with a “V” and a straight line). For solar panels, a range of up to 20V DC is typically sufficient, but check your panel’s specifications for exact values.
- Current Testing: To measure current, switch your multimeter to the amperes (A) setting, ensuring you’re using the appropriate range for your panel. Some multimeters may have dedicated DC current settings.
- Resistance Testing: To check for resistance in wiring or components, turn your multimeter to the Ω (ohms) setting. This allows you to assess any potential issues like broken connections or faulty wiring.
3. Safety Precautions When Using a Multimeter
- Always test in sunlight: Ensure your solar panel is exposed to sunlight for accurate readings, as solar panels only generate electricity when exposed to light.
- Be cautious with current measurements: When measuring current, make sure your multimeter is connected in series (between the panel and the load), not directly across the terminals.
- Use insulated gloves: To avoid any accidental shocks or damage to components, consider wearing insulated gloves when testing electrical devices.
By understanding how to set up and use your multimeter, you’ll be well-prepared to test your solar panel’s performance and identify any issues.
Step-by-Step Guide to Testing a Solar Panel with a Multimeter
Now that you understand the basics of a multimeter, it’s time to test your solar panel. Follow these steps to measure voltage, current, and resistance, ensuring your solar panel is functioning optimally.
Step 1: Test Solar Panel Voltage
Testing the voltage helps you determine how much electricity your solar panel is generating. Follow these steps to measure the voltage:
- Set the Multimeter: Turn the dial on your multimeter to the DC voltage setting. Choose a range higher than your panel’s maximum voltage (usually 20V DC or higher).
- Connect the Multimeter:
- Connect the red probe to the positive terminal (usually marked with a “+”) on the solar panel.
- Connect the black probe to the negative terminal (usually marked with a “-“).
- Read the Voltage: With the panel exposed to sunlight, the multimeter will display the voltage. Compare this reading to your solar panel’s rated voltage (e.g., 18-22V for a 12V panel). If the voltage is significantly lower than expected, the panel may not be functioning properly.
DIY Pro Tip: Find a way to safely prop up your solar panel and angle it towards the sun to get direct sunlight. I used a chaise longe chair where I could angle the back of the chair.

Step 2: Test Solar Panel Current
Measuring the current allows you to see how much power the panel is generating. Here’s how to check it:
- Set the Multimeter to DC Current: Turn the dial to the DC amps (A) setting. Make sure the multimeter is capable of measuring the expected current output, which can vary based on panel size.
- Connect the Multimeter in Series:
- Disconnect the panel from any load (if connected).
- Connect the red probe of the multimeter to the positive wire coming from the panel.
- Connect the black probe to the wire that leads to your load (e.g., battery or inverter).
- Read the Current: Expose the panel to sunlight, and your multimeter will display the current output in amps. Compare the result to the panel’s rated current. If the reading is low, it could indicate shading, poor sunlight, or a faulty panel.
Step 3: Test Solar Panel Resistance
Checking the resistance of your solar panel can help identify issues with wiring or internal components.
- Set the Multimeter to Resistance (Ω): Turn the dial to the ohms (Ω) setting to measure resistance.
- Disconnect the Solar Panel: Ensure the panel is not connected to any load or sunlight source during this test.
- Measure Resistance:
- Place the red probe on the positive terminal and the black probe on the negative terminal.
- The multimeter will display a resistance reading. If the reading is extremely high or “infinity,” this could indicate a problem with the wiring or internal components, such as a broken connection.
By following these steps, you can easily assess the health of your solar panel using a multimeter. Regularly testing your panel helps ensure it’s performing efficiently, allowing you to catch any potential problems early.
Interpreting the Results
Once you’ve measured the voltage, current, and resistance of your solar panel, it’s important to understand what those readings mean. Correctly interpreting these results will help you determine whether your solar panel is functioning properly or if there are issues that need attention. Look for a label on the solar panel that provides the expected output.
Voltage Readings
- Expected Voltage: A properly functioning solar panel should produce a voltage close to its rated value. For instance, a 12V panel might show a reading between 18-22V in optimal sunlight conditions.
- Low Voltage: If the voltage is significantly lower than expected, it could indicate a few issues:
- Shading or Dirt: Ensure the panel is clean and free from any obstructions.
- Wiring Problems: Check the connections for loose or damaged wires.
- Panel Degradation: Over time, panels can lose efficiency due to wear and tear. Lower voltage could be a sign of this.
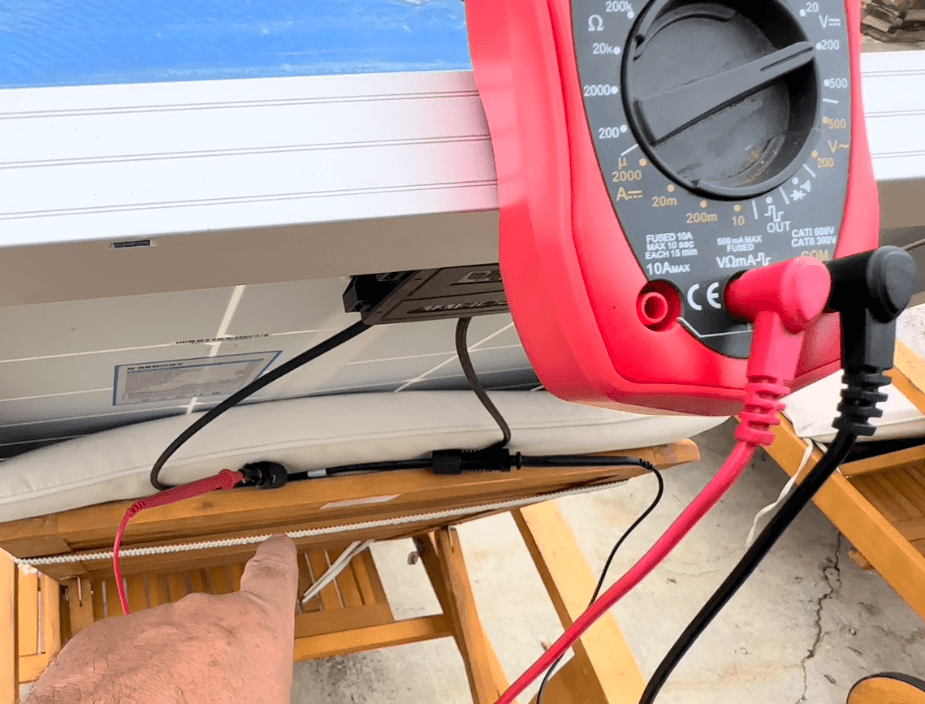
My Test Output: From the above photo you can see that the multimeter was measuring 22.9 Volts. The label on the solar panel indicated that the Open-Circuit Voltage can go to 24.3 Volts.
Current (Amps) Readings
- Expected Current: Your solar panel’s output in amps should match its rated current, which depends on the panel’s capacity and the sunlight it receives. For example, a 100W panel might output around 5-6 amps under full sun.
- Low Current: If the current reading is much lower than expected:
- Insufficient Sunlight: Ensure the panel is receiving direct sunlight.
- Shading: Even partial shading can dramatically reduce current output.
- Panel Malfunction: Internal damage or deterioration can reduce the panel’s ability to produce current.
- Wiring or Connection Faults: Loose or faulty connections can prevent the proper flow of current.
Resistance (Ω) Readings
- Expected Resistance: Solar panels generally have low resistance when tested with a multimeter. Very high resistance indicates a problem.
- High Resistance: If you get a high or infinite resistance reading:
- Broken Connections: There may be a break in the internal wiring or connectors.
- Panel Degradation: Over time, internal components can wear out, leading to higher resistance.
Identifying Potential Issues
- Low Voltage & Low Current: If both voltage and current readings are low, this could be a sign of shading, a dirty panel, or a faulty panel. Check for debris, clean the panel, and ensure it’s receiving ample sunlight.
- Low Voltage & Normal Current: This could indicate wiring issues or a connection problem. Inspect cables and connectors to ensure they are functioning properly.
- Normal Voltage & Low Current: If the voltage is normal but the current is low, it might point to a problem with the load or poor sunlight. Recheck the conditions and connections.
- High Resistance: High resistance readings indicate an issue with the internal wiring or connectors. It may be necessary to inspect the panel more closely for damage.
By regularly testing your solar panel and accurately interpreting the results, you can ensure your system is running efficiently and troubleshoot problems before they become serious.
Troubleshooting Common Issues
After testing your solar panel with a multimeter, you may encounter issues that can affect its performance. Here are some common problems and troubleshooting tips to help you resolve them.
1. Low Voltage Output
If your multimeter shows a voltage reading lower than expected, try the following steps to troubleshoot:
- Check for Obstructions: Ensure there’s no shading from nearby trees, buildings, or objects. Even partial shading can drastically reduce a solar panel’s voltage.
- Clean the Panel: Dirt, dust, and debris can block sunlight from reaching the solar cells. Clean the surface of your solar panel using a soft cloth and water to remove any grime.
- Inspect the Wiring: Loose or corroded wiring connections can cause voltage drops. Examine all connections for signs of wear, corrosion, or damage, and tighten or replace them as needed.
- Test in Full Sunlight: Make sure you’re testing the panel in bright, direct sunlight. Overcast skies or poor sunlight conditions can cause low voltage readings.
2. Low Current Output
A low current reading can result in insufficient power generation. If your solar panel is producing less current than expected, consider these fixes:
- Ensure Full Sun Exposure: Ensure the solar panel is positioned for optimal sunlight. Panels should face the sun directly and be free from any shadows.
- Check for Faulty Connectors: Test all connectors for proper contact. Damaged connectors or poor solder joints can restrict current flow.
- Test Solar Panel’s Condition: Over time, solar cells degrade, which reduces current output. If the panel is old, it might be experiencing reduced efficiency.
- Examine the Charge Controller: If the panel is part of a system connected to a charge controller, test the controller to ensure it is functioning properly and not limiting current output.
3. High Resistance
High resistance indicates a potential issue with the internal wiring or components. Here’s how to troubleshoot:
- Check for Broken Connections: Inspect the panel for visible damage, such as broken wires or solder joints inside the junction box. Repair or replace damaged connections to restore the flow of current.
- Inspect for Wear and Tear: Over time, solar panels can suffer from wear, especially if exposed to harsh weather conditions. Look for signs of aging like cracks or corrosion, which can increase resistance.
- Replace Damaged Components: If a specific section of the panel or its wiring is faulty, you may need to replace it to restore functionality.
4. No Voltage or Current
If your multimeter reads zero for both voltage and current, it indicates a more serious issue:
- Test the Multimeter: First, ensure your multimeter is working correctly by testing it on another electrical device. If the multimeter works fine, proceed to the panel.
- Check for a Broken Circuit: A complete loss of power could be due to a broken circuit within the solar panel or its connections. Inspect the wiring for breaks or disconnects.
- Examine the Diode: Most solar panels have a diode to prevent reverse current flow. If the diode fails, it can stop the panel from producing any power. If possible, test the diode and replace it if faulty.
5. Inconsistent Readings
If your multimeter gives inconsistent or fluctuating readings, this may indicate an issue with your testing setup or the panel:
- Check for Loose Connections: Ensure that the multimeter probes are making secure contact with the solar panel’s terminals. Loose or shaky connections can cause inconsistent readings.
- Test Under Stable Sunlight: Changes in sunlight (e.g., clouds passing overhead) can cause fluctuations in voltage and current. Test the panel in consistent sunlight for reliable readings.
- Multimeter Calibration: Make sure your multimeter is properly calibrated. If it’s an older or cheaper model, it may give inaccurate readings over time. Consider recalibrating or using a more reliable device.
6. Panel Not Charging Battery
If your solar panel is not charging the battery as expected, follow these troubleshooting steps:
- Test the Battery: The issue may lie with the battery, not the panel. Test the battery with a multimeter to ensure it’s functioning and holding a charge.
- Check the Charge Controller: If your panel is connected to a charge controller, ensure the controller is configured correctly and not malfunctioning.
- Verify Panel Sizing: Make sure your solar panel is appropriately sized for your battery bank. A small panel may not provide enough power to charge a large battery effectively.
By following these troubleshooting steps, you can identify and resolve common issues that affect the performance of your solar panel. Regular testing and maintenance will help keep your system running efficiently and effectively.
Tips for Accurate Testing
To ensure you get the most accurate results when testing your solar panel with a multimeter, consider the following tips:
1. Ensure Proper Calibration
- Calibrate Your Multimeter: Before beginning any tests, make sure your multimeter is properly calibrated. Check the manufacturer’s instructions or calibration guide for details.
2. Use the Right Settings
- Select the Correct Measurement Mode: Ensure your multimeter is set to the appropriate mode (voltage, current, or resistance) for each test. Incorrect settings can lead to inaccurate readings or damage to the multimeter.
- Choose the Proper Range: Set the multimeter to a range that exceeds the expected value for each measurement to ensure accurate readings and prevent overload.
3. Test in Ideal Conditions
- Full Sunlight: Test the solar panel under full sunlight conditions to get accurate voltage and current readings. Avoid testing during cloudy or overcast conditions.
- Clean Surface: Ensure the solar panel’s surface is clean and free from dirt or debris to avoid obstructed readings.
4. Secure Connections
- Firm Probe Contact: Make sure the multimeter probes are securely connected to the solar panel terminals. Loose or intermittent connections can lead to unreliable results.
- Inspect Wires and Connectors: Ensure all testing cables and connectors are in good condition and free from wear or damage.
5. Follow Safety Precautions
- Handle with Care: Always handle the multimeter and solar panel with care to avoid accidental shorts or damage.
- Use Insulated Gloves: When working with electrical equipment, wearing insulated gloves can help prevent accidental shocks.
6. Record and Compare Results
Compare with Specifications: Compare your measurements with the solar panel’s rated specifications to assess performance and identify any discrepancies.
Document Readings: Keep a record of your voltage, current, and resistance readings for future reference and comparison.
Conclusion
Testing your solar panel with a multimeter is a crucial step in maintaining and optimizing your solar energy system. By understanding how to measure voltage, current, and resistance, and by interpreting the results accurately, you can ensure your solar panel is operating at its best. Regular testing helps you catch potential issues early, allowing you to address problems before they become significant.
Following the steps outlined in this guide, along with the tips for accurate testing and troubleshooting common issues, will empower you to confidently assess the health of your solar panel system. With proper care and maintenance, you can enjoy the benefits of renewable energy and make the most out of your solar investment.
Keep your solar panel in top shape by performing routine checks and staying informed about its performance. With these skills and knowledge, you’ll be well-equipped to manage and optimize your solar energy system efficiently.


Leave a Reply