So, you’re ready to upgrade your RV’s power system with the incredible efficiency and longevity of lithium batteries? That’s fantastic! But you’ve probably discovered one common hurdle: these powerful new batteries often don’t fit snugly into your old battery compartment. Stock trays are designed for smaller lead-acid batteries, leaving you without a secure or safe spot for your shiny new lithium powerhouses. That’s exactly why learning how to build a custom RV battery tray is a game-changer. In this post, we’ll walk you through the steps to create a sturdy, perfectly sized tray that will keep your new lithium batteries secure, no matter where your adventures take you.
These are the steps I used to install two new lithium batteries inside my 2021 Jayco Precept 34G. This article should also serve as a guide for building a custom RV battery tray for other RVs and battery choices.
The Sizing Challenge: Why Stock Trays Just Won’t Cut It
With all these benefits, it’s no wonder RVers are flocking to lithium. However, the path isn’t always a simple “drop-in” replacement. Here’s where the sizing challenge comes in:
- Different Dimensions: While some lithium batteries are designed to mimic standard lead-acid “group” sizes (like Group 24, 27, or 31), many popular lithium batteries, especially those with higher capacities, have different physical dimensions. They might be taller, wider, or a unique shape, making them incompatible with existing battery boxes or trays.
- Optimizing Space: Even if a lithium battery could technically fit, a generic tray might not optimize the limited space available in your RV. A custom tray allows you to utilize every inch efficiently, especially if you’re installing multiple batteries.
- Secure Fit is Crucial: RVs experience constant vibrations, bumps, and jostling on the road. A battery that isn’t securely held in place can shift, causing damage to the battery terminals, cables, or even the battery itself. An ill-fitting tray is a safety hazard and a recipe for premature battery failure.
- Ventilation and Protection: While LiFePO4 batteries don’t off-gas like lead-acid, proper ventilation is still important, especially if they include internal heating elements for cold-weather charging. A custom tray can be designed to allow for optimal airflow and protect your investment from road debris or accidental impact.
In short, a custom RV battery tray isn’t just about making your new lithium batteries fit; it’s about creating a safe, secure, and optimized home for your RV’s most crucial power component, ensuring you get the full benefit and lifespan out of your significant upgrade.
Planning Your Custom RV Battery Tray
Before you even think about cutting materials, the most crucial step in creating your custom RV battery tray is meticulous planning. This isn’t just about making something fit; it’s about designing a safe, durable, and functional home for your valuable lithium batteries. Skimp on the planning, and you’ll likely end up with wasted materials or, worse, a less-than-safe installation.
Measurements Are Key: Measure Twice, Cut Once!
This old adage is especially true when building something custom. Grab your tape measure and a notebook, and get ready to take precise dimensions.
- Measure Your New Lithium Batteries: Start with the stars of the show. Accurately measure the length, width, and height of each of your new lithium batteries. If you’re planning to install multiple batteries, arrange them in the configuration you intend to use (e.g., side-by-side, end-to-end) and measure the total footprint. Don’t forget to account for any terminal protectors or bus bars if they add to the overall dimensions.
- Measure the Available Space in Your RV: Next, head to where your new battery tray will live. This could be your existing battery compartment, a storage bay, or even under a bench or bed. Measure the maximum length, width, and height of the space. Consider any obstructions like wheel wells, plumbing, wiring harnesses, or structural elements that might limit your design.
- Account for Ventilation and Wiring Clearance: Even though LiFePO4 batteries don’t off-gas like lead-acid, some ventilation is still a good idea, especially if your batteries have internal heaters for cold weather charging. Ensure you leave a small amount of clearance (e.g., 1/4 to 1/2 inch) around the batteries for air circulation. Critically, also consider where your battery cables will connect. You’ll need enough overhead clearance for the terminals and for bending thick gauge wires without straining them.
Material Selection: Choose Wisely for Longevity
The material you choose for your custom RV battery tray will dictate its durability, weight, and ease of construction. Here are the most common and recommended options:
- Recommended Options:
- Marine-Grade Plywood (Treated for Moisture): This is a popular choice for DIYers due to its ease of workability. Marine-grade plywood is designed to resist moisture and rot. If using standard plywood, ensure it’s exterior grade and apply multiple coats of marine-grade paint or sealant to protect it from the elements, especially if exposed to the outside.
- Aluminum Angle/Sheet: Lightweight, corrosion-resistant, and strong, aluminum is an excellent material for battery trays. It can be cut with appropriate saws and joined with rivets or bolts. If you have welding capabilities, aluminum can create a very robust and professional-looking tray.
- Mild Steel (Powder-Coated for Rust Prevention): Steel offers superior strength and rigidity. However, it’s heavier than aluminum and must be properly treated (e.g., powder-coated, galvanized, or painted with rust-inhibiting primer and paint) to prevent corrosion, especially in an outdoor or damp RV environment. Welding is typically required for strong joints.
- Materials to Avoid:
- Untreated Wood: Standard untreated plywood or lumber will quickly degrade from moisture and vibrations, compromising the safety of your battery installation.
- Untreated Steel: Unless you’re meticulous about painting every surface and edge, bare or poorly treated steel will rust quickly, weakening the tray and potentially staining your RV.
Design Considerations: Form Meets Function
With your measurements and material in mind, it’s time to sketch out your design. Don’t worry about being an artist; simple diagrams are fine!
- How Many Batteries Will It Hold? Design the tray to precisely fit the number of lithium batteries you’re installing. Avoid making it too large, which wastes space, or too small, which creates issues.
- Will It Be Open-Top or Enclosed? Most DIY battery trays are open-top “boxes” or platforms with sides. This provides easy access and good ventilation. An enclosed design might be necessary if the tray is in a very exposed location, but ensure you plan for adequate ventilation within the enclosure.
- How Will It Be Secured to the RV? This is critical for safety. Your tray needs to be bolted firmly to the RV’s chassis, a strong frame member, or a very robust floor structure. Consider using through-bolts with large washers and lock nuts for maximum security. Screws alone are generally not sufficient for heavy batteries.
- Drainage Holes (if applicable): If your battery tray is in an area exposed to the elements or prone to collecting moisture (like an exterior compartment), drill small drainage holes in the bottom to prevent water from pooling.
- Ventilation: Even though LiFePO4 batteries are sealed, proper airflow helps dissipate any heat, especially during charging or discharge cycles in hot climates. Ensure your design allows for air movement around the batteries.
By dedicating sufficient time to this planning phase, you’ll be well on your way to building a safe, secure, and perfectly sized custom RV battery tray for your new lithium power system.
Tools and Materials You’ll Need
With your custom RV battery tray design sketched out and your measurements locked in, it’s time to gather your arsenal. Having the right tools and materials on hand before you start will make the building process smoother, safer, and more efficient. Think of it like a chef prepping their ingredients – you don’t want to be halfway through cooking only to realize you’re missing something crucial!
Tools for the Job
The specific tools will vary slightly based on the material you choose (wood, aluminum, or steel), but here’s a general list of what you’ll likely need:
- Measuring Tape & Marking Tools: A reliable tape measure, a pencil or marker, and a straightedge are indispensable for accurate cuts.
- Cutting Tools:
- For Wood: A circular saw or jigsaw is ideal for straight and curved cuts. A miter saw is great for precise cross-cuts if you’re building a box-style tray.
- For Aluminum/Steel: A hacksaw or metal-cutting blade on a circular saw/grinder can work for thinner materials. For thicker stock, you might need a metal chop saw, an angle grinder with cut-off wheels, or specialized metal snips.
- Drilling Tools:
- Drill (Corded or Cordless): Essential for pre-drilling holes for screws, bolts, and mounting points.
- Drill Bits: A good set of wood bits and metal bits (cobalt or titanium for harder metals) will be necessary.
- Fastening Tools:
- Screwdriver/Impact Driver: For driving screws if you’re working with wood.
- Wrenches/Socket Set: For tightening nuts and bolts.
- Clamps: Various sizes of wood clamps or C-clamps are incredibly helpful for holding pieces in place while you drill and fasten them.
- Optional for Metal: A rivet gun (for aluminum), or a welder (MIG or TIG for steel or aluminum, depending on your skill and equipment) for the strongest joints.
- Safety Gear: Never skip this!
- Safety Glasses: Protect your eyes from flying debris.
- Work Gloves: Protect your hands from splinters, sharp edges, and cuts.
- Hearing Protection: Especially when using power saws or grinders.
- Dust Mask/Respirator: When cutting wood or grinding metal.
Materials for Your Custom Tray
This is where your design decisions really come into play. Ensure you’ve calculated the dimensions of each piece you’ll need before purchasing. It’s always a good idea to buy a little extra material, just in case of a miscut.
- Primary Material (Choose One Based on Your Plan):
- Marine-Grade Plywood: Available at most lumber yards or home improvement stores. Look for thicknesses like 1/2 inch (12mm) or 3/4 inch (19mm) for good rigidity.
- Aluminum Angle or Sheet: You can find this at metal supply shops. Common thicknesses for angle might be 1/8 inch or 3/16 inch. Sheet aluminum can be 1/16 inch or 1/8 inch depending on the required strength.
- Mild Steel Angle or Sheet: Also found at metal supply shops. Thicknesses similar to aluminum. Remember, it must be treated to prevent rust.
- Fasteners:
- For Wood: Exterior-grade wood screws or deck screws (stainless steel is best for corrosion resistance).
- For All Materials: Stainless steel bolts, nuts, and washers are highly recommended for connecting sections and, most importantly, for securing the tray to your RV. Stainless steel resists corrosion, which is vital in an RV environment. Use appropriate sizes for your material thickness.
- Corner Braces/Angles (Optional but Recommended): Small metal corner brackets can significantly reinforce plywood trays.
- Protective Coatings:
- For Wood: Marine-grade primer and paint or a high-quality wood sealant/urethane to protect against moisture.
- For Steel: Rust-inhibiting primer followed by a durable topcoat paint (or consider having it professionally powder-coated).
- Non-Slip Material (Highly Recommended): A piece of rubber matting, an old yoga mat, or even heavy-duty drawer liner for the bottom of the tray. This prevents your batteries from sliding around and adds a layer of shock absorption.
- Battery Hold-Downs: This is critical!
- Nylon Battery Straps: Heavy-duty straps with buckles are a simple and effective way to secure batteries.
- J-Hooks or Threaded Rods: Can be used with a crossbar and wing nuts to clamp batteries down.
- Custom Metal Clamps: If you’re fabricating with metal, you might design your own clamping system.
Gathering these items before you begin will ensure a smooth workflow and help you build a robust and safe custom RV battery tray ready for years of adventure!
Step-by-Step Construction Guide
Now that your planning is complete and your tools and materials are laid out, it’s time for the exciting part: bringing your custom RV battery tray to life! Take your time with each step, prioritize safety, and remember that precision now will pay dividends in a sturdy, long-lasting tray.
Safety First!
Before you make your first cut or drill your first hole, put on your safety glasses, gloves, and any other appropriate personal protective equipment (PPE). Power tools can be dangerous if not handled correctly.
Removing Existing Battery Tray
You may need to remove an existing battery tray in order to make room for your new tray. In my situation I had a battery tray that fit two golf cart sized batteries. My two new lithium batteries were much larger and would not fit in the existing battery tray. The prior battery tray was welded to the frame, so I ended up using an oscillating tool to slowly break apart the welding joints. This was a slow process and required a number of blades, but I eventually freed up the old battery tray!
Cutting the Pieces
Accuracy here is paramount. Measure twice, cut once!
- Mark Your Material: Using your meticulously taken measurements and your design sketch, carefully mark all the dimensions onto your chosen material (plywood, aluminum, or steel). Use a straightedge and a pencil or marker to ensure your lines are perfectly straight.
- Cut the Base: This is the foundation of your tray. Cut the piece for the bottom of the tray to your determined length and width, ensuring it can comfortably accommodate your batteries with a small margin for clearance.
- Cut the Sides and Ends: Next, cut the pieces that will form the walls of your tray.
- For a Simple Box: You’ll typically need two longer side pieces and two shorter end pieces. Ensure their height is sufficient to support and contain your batteries, ideally coming up at least two-thirds of the way, or even to the top for maximum security.
- For Angle Iron/Frame Construction: Cut your angle pieces to form the perimeter of the base, and then vertical uprights as needed for the sides and hold-down points.
- Deburr (for Metal): If you’re working with aluminum or steel, use a file or an angle grinder with a deburring wheel to smooth any sharp edges left by cutting. This prevents cuts during handling and makes for a cleaner finish.
Assembling the Tray
This is where your flat pieces become a three-dimensional tray. Use clamps generously to hold pieces in place while you fasten them.
- Attach the Sides to the Base:
- For Wood: Apply wood glue to the edges that will join, then securely screw the side pieces to the base. Use pilot holes to prevent splitting the wood. For added strength, you can use small metal L-brackets on the inside corners.
- For Aluminum/Steel (Riveting/Bolting): Align the side pieces with the base. Drill pilot holes through both pieces, then either secure them with rivets (for aluminum) or stainless steel bolts and nuts. Use washers under bolt heads and nuts for better load distribution.
- For Steel (Welding): If you have welding expertise, this is the strongest method. Clamp the pieces in place and weld all seams. Grind down any rough welds for a smooth finish.
- Join the Ends: Once the long sides are attached, repeat the process for the end pieces, creating a complete box structure. Ensure all corners are square and joints are tight.
- Reinforce Joints (Optional but Recommended):
- For wooden trays, consider adding corner braces on the exterior or interior for extra rigidity, especially if your batteries are heavy.
- For metal trays, strategically placed gussets (small triangular pieces of metal) at corners can significantly increase strength.
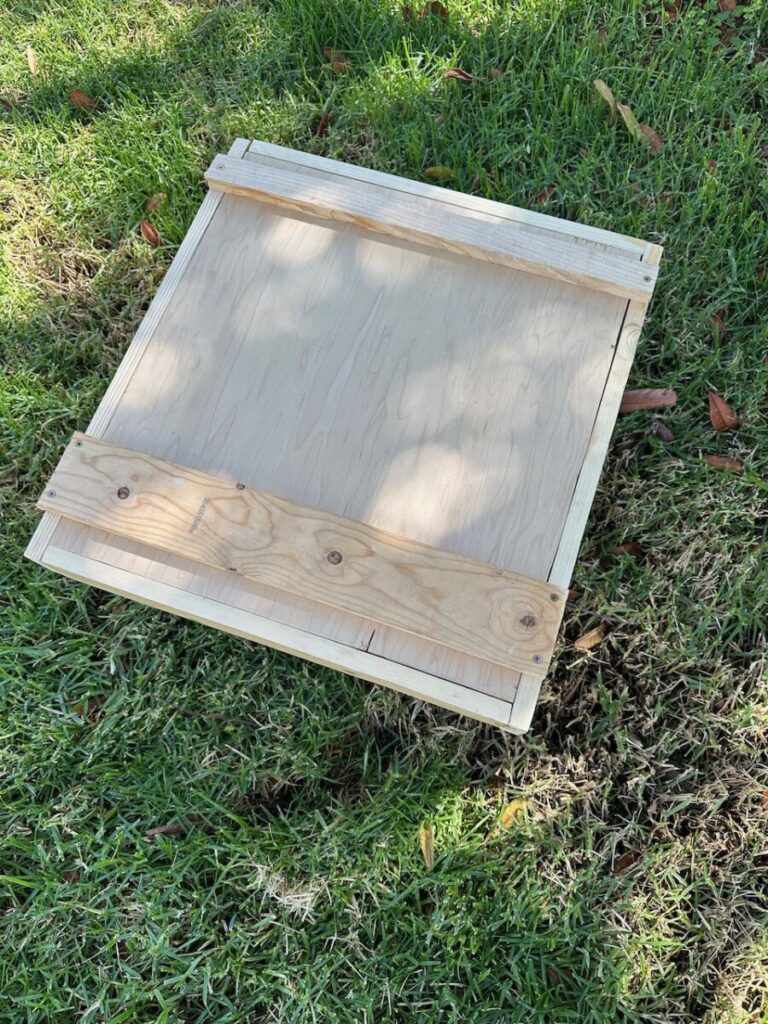
The following photo shows the bottom of my custom RV battery tray. I ended up just using scrap wood I had around the house from previous projects. The previous battery tray was mounted above the propane tank and there were two metal square bars. I measured the distance between them and placed the two braces on the underside of the new tray so that the new tray fits over them to keep the tray from sliding forward or backwards.
Finishing Touches
These steps protect your investment and improve the tray’s longevity.
- Sand Rough Edges (Wood): Use sandpaper or a sanding block to smooth any rough edges or splinters on your wooden tray. This makes it safer to handle and prepares it for finishing.
- Prime and Paint/Seal:
- For Wood: Apply at least two coats of marine-grade primer, followed by two or more coats of durable, exterior-grade paint or a clear marine sealant/urethane. Ensure all surfaces, especially cut edges, are thoroughly coated to prevent moisture absorption.
- For Steel: If you haven’t had it powder-coated, apply a high-quality rust-inhibiting primer to all surfaces. Once dry, follow with several coats of a tough, exterior enamel paint. Make sure to cover every inch to prevent future rust.
- For Aluminum: While aluminum doesn’t rust, you can paint it for aesthetic reasons or extra protection. Use a self-etching primer designed for aluminum before applying your topcoat.
- Add Drainage Holes (if applicable): If your tray is in an area prone to moisture collection, drill a few small (e.g., 1/4 inch) holes in the lowest points of the base to allow water to escape.
- Install Non-Slip Matting: Cut a piece of rubber matting or non-slip drawer liner to fit snugly in the bottom of the tray. This will prevent your batteries from sliding around and absorb vibrations, protecting both the batteries and the tray.
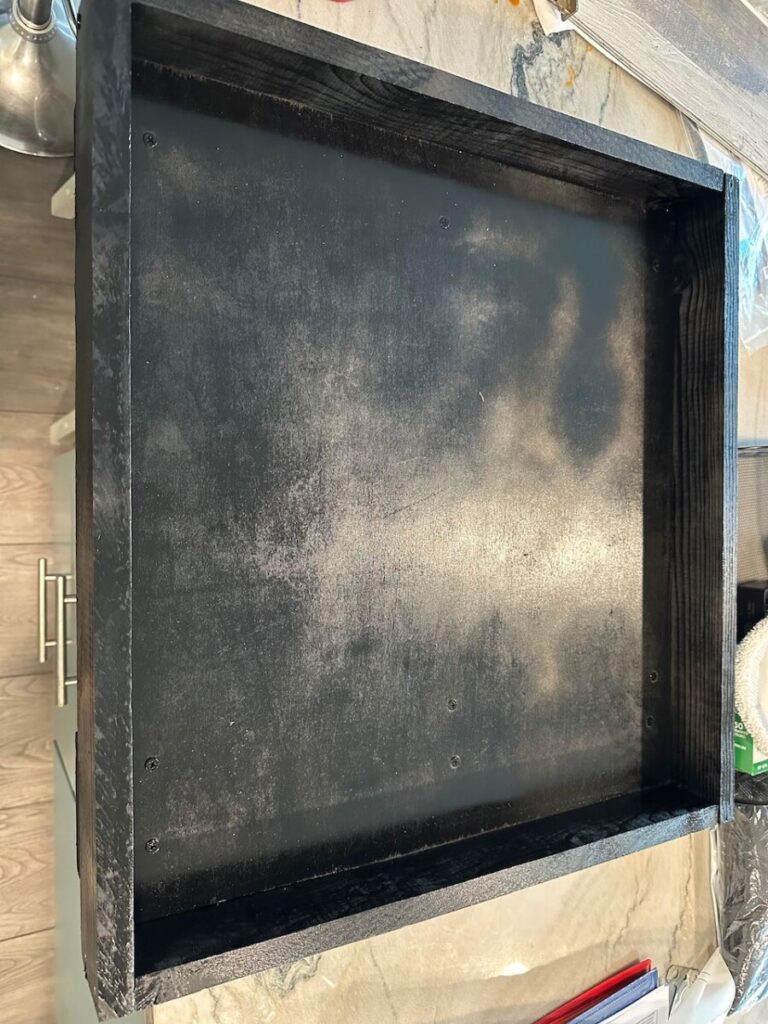
The following photo shows a top view of my custom RV battery tray after I spray painted it. This tray will be sitting inside the storage bay with the propane tank so should be protected fairly well from the elements. I had some scrap peel and stick vinyl flooring that I lined the bottom of the tray with (not pictured).
Creating Hold-Downs
This is a critical safety component. Your batteries must be securely held in place to prevent movement during travel. Choose a method that suits your tray design and battery type.
- Strap Method:
- If using heavy-duty nylon straps, plan how they will go over the batteries and secure to the tray or the RV structure. You might need to drill small holes or attach loops to the tray sides for the straps to pass through or hook onto.
- Ensure the straps are robust enough for the weight of your batteries and can be tightened firmly.
- J-Hook/Threaded Rod Method:
- This is often used with a top crossbar. Drill holes through the base of the tray where the J-hooks or threaded rods will pass through.
- The J-hooks wrap around the bottom edge of the tray (or a dedicated support) and come up beside the batteries. A metal or sturdy wood crossbar then goes over the top of the batteries, and wing nuts or regular nuts are tightened down on the threaded rods to clamp the batteries securely.
- Custom Metal Clamps: If you’re proficient in metalworking, you can fabricate custom clamps that bolt to the tray’s sides and secure over the batteries.
I went ahead and used the nylon strap method for my solution. Below is an option similar to the strap I ended up using. You do not need a long strap as the distance should be fairly short to go over the top of the batteries.
Installation in Your RV
With your custom RV battery tray built, painted, and ready to go, the final crucial step is its secure installation in your RV. This isn’t just about placing it; it’s about permanently integrating it into your RV’s structure to ensure the safety of your batteries and your vehicle during all your travels.
Preparing the Location
Before you bring your shiny new tray into the RV, take a moment to prepare the designated spot.
- Clean the Area Thoroughly: Remove any old battery acid residue, dirt, dust, or debris from the installation site. A clean surface ensures better adhesion for any sealing and allows for proper inspection. Use baking soda and water to neutralize any lingering lead-acid residue if it was previously a lead-acid battery compartment. Rinse and dry thoroughly.
- Inspect for Damage/Corrosion: While cleaning, take the opportunity to inspect the RV’s structure in that area. Look for any rust, rot, or structural weaknesses that might compromise the security of your new tray. Address any issues before proceeding.
- Ensure Proper Ventilation: Even though LiFePO4 batteries don’t off-gas like lead-acid, good airflow is still important. If your batteries have internal heaters (common for cold weather charging) or if they’re in a confined space, ensure there’s adequate air circulation. If installing in a completely sealed compartment, consider adding passive vents to the compartment itself, following your battery manufacturer’s recommendations.
Securing the Tray
This is arguably the most critical step. Your custom tray, and the heavy batteries it contains, must be bolted firmly to the RV’s frame or a robust structural element. Relying solely on screws into thin plywood or fiberglass is a recipe for disaster on bumpy roads.
- Position the Tray: Carefully place your custom battery tray into its intended location. Ensure it’s perfectly level and aligned as desired.
- Mark Drilling Locations: Use a pencil or marker to precisely mark the spots where you will drill mounting holes through the bottom (or sides, depending on your tray design) of your tray and into the RV’s structure. Aim for at least 4-6 secure mounting points for a typical tray.
- Identify Secure Mounting Points:
- Best Option: RV Chassis/Frame: If possible, align your mounting holes to go through the RV’s metal chassis or a substantial metal crossmember. This provides the strongest attachment.
- Strong Subfloor/Structural Wood: If the chassis isn’t accessible, bolt through a thick, solid piece of the RV’s subfloor or a reinforced wooden beam. Avoid thin floor panels or fiberglass alone.
- Drill Pilot Holes: Using a drill bit slightly smaller than your chosen bolts, carefully drill pilot holes through your battery tray and then through the RV’s structure. Be absolutely sure of what’s on the other side before drilling to avoid hitting wiring, plumbing, or fuel lines. If unsure, drill a small pilot hole first and inspect from underneath or behind.
- Bolt the Tray Securely:
- Insert your stainless steel bolts through the tray and the RV’s structure.
- On the underside or opposite side, use large fender washers or backing plates. These distribute the load over a wider area, preventing the bolt from pulling through the material during vibrations.
- Follow with lock washers (or use nylock nuts) and then tighten down with nuts.
- Use a wrench or socket set to tighten all bolts firmly. Do not overtighten to the point of deforming the material, but ensure there is no wiggle or movement in the tray once secured.
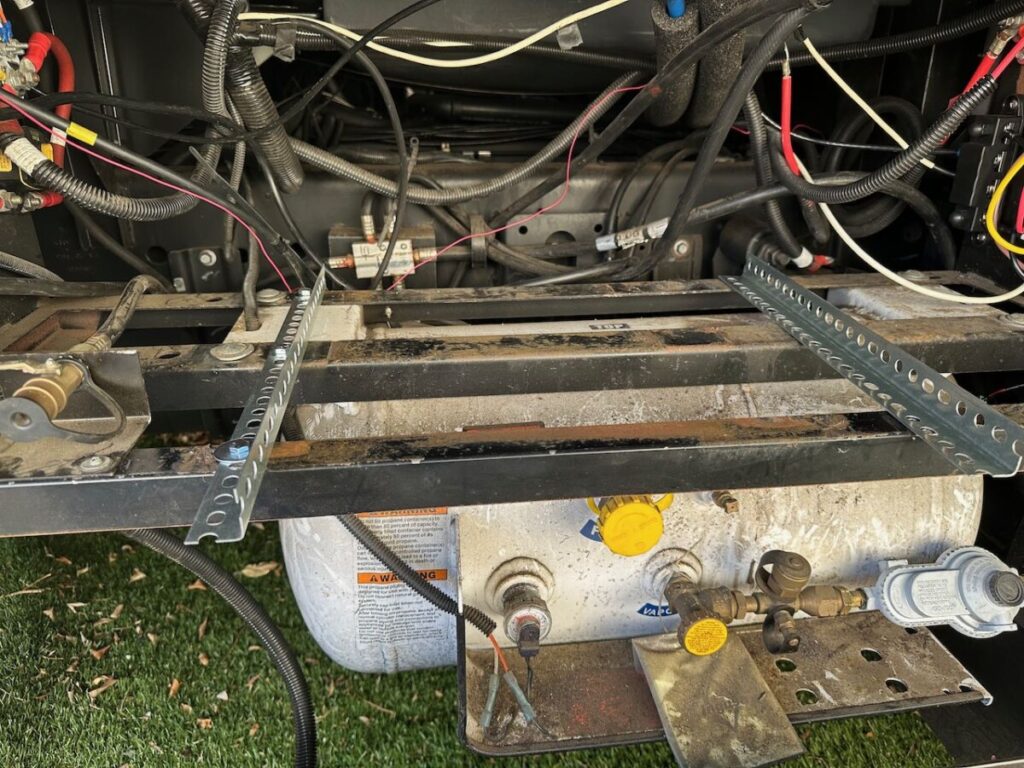
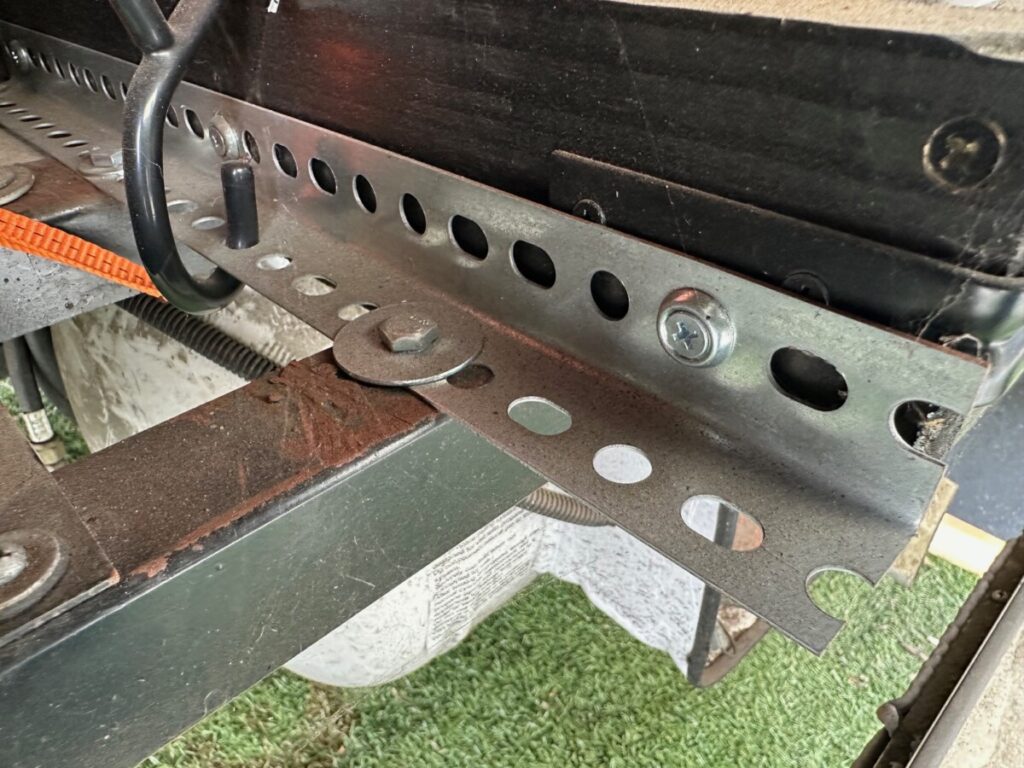
The photos below show how I mounted my custom RV battery tray inside my storage bay above the propane tank. I used 1-1/4 in. x 3 ft. x 18 gauge slotted steel angle. I cut the steel angle to size and then drilled through the steel bars and bolted each piece to the frame. I then slid in the battery tray and put a screw through a slot in the steel angle and into the tray to hold it in place.
Placing and Securing Batteries
Now that the tray is permanently installed, it’s time to introduce your new power sources.
- Carefully Place Batteries: Gently lower your lithium batteries into the custom tray. Position them as planned, ensuring there’s a small amount of clearance around them and at the terminals for wiring.
- Attach Hold-Down System: This is paramount. Whether you’re using nylon straps, J-hooks with a crossbar, or custom clamps, ensure the batteries are cinched down tightly. There should be absolutely no movement or wiggle once the hold-downs are secured. This prevents damage from vibrations and impacts during travel. Over time, check these hold-downs occasionally and re-tighten if necessary.
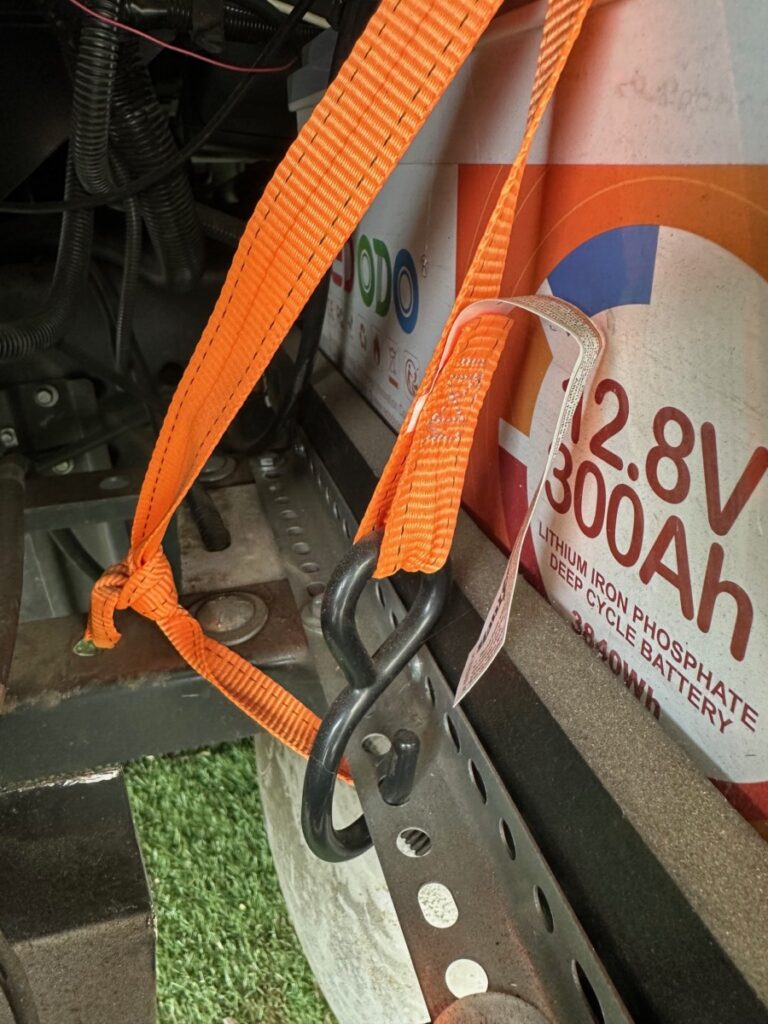
For my install I used a heavy-duty nylon strap to secure the batteries in place. I was able to put the hook of the strap through one of the holes in the steel angle on both sides of the batteries.
Wiring (A Quick Note)
While a full guide to battery wiring is beyond the scope of this post (and deserves its own dedicated article!), it’s the next logical step after securing your batteries.
- Correct Wire Gauge: Always use the appropriate wire gauge for your system’s amperage and length to prevent voltage drop and overheating.
- Fusing: Install appropriate fuses (e.g., ANL or Class T fuses for large battery banks) as close to the battery positive terminal as possible to protect your system from short circuits.
- Secure Connections: Use properly crimped and heat-shrinked lug terminals for all connections. Ensure all terminal bolts are tightened to the manufacturer’s specified torque.
- Strain Relief: Ensure your battery cables have enough slack to prevent strain on the terminals and are routed safely, away from sharp edges or moving parts.
By carefully following these installation steps, your custom RV battery tray will provide a robust and secure foundation for your new lithium power system, giving you peace of mind on all your adventures!
Testing and Safety
Congratulations! You’ve successfully designed, built, and installed your custom RV battery tray. But before you hit the road and rely on your new lithium power system, a final round of testing and safety checks is crucial. This ensures everything is secure, functions as intended, and minimizes any potential risks. Think of it as your final quality assurance check for peace of mind.
Double-Check All Connections and Fasteners
This might seem obvious, but it’s often overlooked in the excitement of a completed project.
- Tray Mounting Bolts: Revisit every bolt that secures your custom tray to the RV. Using your wrench or socket set, give each one a firm tug to confirm it’s still tight. Vibrations during the initial installation or even just handling can sometimes slightly loosen fasteners. Ensure the washers are properly seated and no material is deforming.
- Battery Hold-Downs: Critically, inspect your battery hold-down system.
- Straps: If using straps, pull on them firmly to confirm they are cinched down as tight as possible. There should be zero perceptible movement or wiggle from the batteries when you try to push or pull them.
- J-Hooks/Clamps: Check that all nuts (especially wing nuts if used) are fully tightened and the crossbar or clamp is applying firm, even pressure across the batteries.
- Battery Terminal Connections: While you’ve likely just completed wiring, double-check all positive and negative battery terminal connections.
- Ensure the lugs are fully seated on the terminals.
- Confirm the terminal bolts are torqued down to the battery manufacturer’s specifications (usually found in the battery manual). Loose connections can cause resistance, heat, and potential damage.
- Verify that any protective covers over the terminals are securely in place to prevent accidental shorts.
Ensure Batteries are Snug and Don’t Wiggle
This is a direct test of your hold-down system and tray fit.
- Push and Pull Test: With the hold-downs secured, vigorously try to push and pull each battery (within reason, don’t break anything!). They should feel absolutely rock-solid within the tray. Any discernible movement means your hold-down system needs adjustment or reinforcement.
- Simulated Road Conditions (Minor): If possible, take your RV for a short, gentle drive around the block or on some slightly uneven ground. Come back and re-check all fasteners and hold-downs. This brief test can reveal any settling or loosening that might occur under mild road conditions.
Review Battery Manufacturer’s Guidelines
Your specific lithium battery manufacturer provides critical safety and operational information. Do not ignore it!
- Ventilation Requirements: While LiFePO4 batteries are generally safe, some manufacturers still recommend specific ventilation clearances, especially if the batteries have internal heating elements or are housed in a very confined space. Compare your tray’s design and installation location with these recommendations. Ensure airflow is not obstructed.
- Operating Temperatures: Lithium batteries perform best within a certain temperature range. Understand your battery’s recommended operating and charging temperatures. If your battery compartment gets excessively hot in summer or extremely cold in winter, you might need to consider additional insulation, active cooling, or heating solutions to protect your investment.
- Charging Parameters: Confirm that your RV’s charging system (converter, solar charge controller, DC-to-DC charger) is properly configured for lithium batteries. Incorrect charging voltages or profiles can damage the batteries or limit their lifespan. While this isn’t directly related to the tray, it’s a critical safety and longevity point when upgrading to lithium.
- Winterization/Storage: Understand the manufacturer’s recommendations for storing your batteries, especially during cold weather, to prevent damage.
By taking these final steps to test and confirm the safety of your custom RV battery tray and the overall battery installation, you can embark on your adventures with confidence, knowing your power system is secure and ready for the journey ahead.
Conclusion
You did it! You’ve navigated the journey of creating a custom RV battery tray, transforming a potential roadblock into a perfectly tailored solution for your RV’s power needs. This project is more than just building a box; it’s about optimizing your RV for the superior performance of lithium batteries and ensuring their safety and longevity on all your adventures.
By taking the time to meticulously plan, select the right materials, precisely cut and assemble each piece, and securely install your new tray, you’ve invested in peace of mind. Your new lithium batteries, with their incredible usable capacity, lighter weight, and longer lifespan, now have a secure, custom-fit home that will withstand the bumps and vibrations of the open road.
No more worrying about ill-fitting compartments or batteries shifting in transit. Your custom RV battery tray provides the stable, protected environment your valuable lithium power system deserves, freeing you up to focus on what truly matters: exploring new destinations and making lasting memories.
We hope this guide empowers you to tackle this rewarding DIY project and elevate your RV’s power system to the next level. Happy travels, and may your custom tray serve you well for countless adventures to come!





Leave a Reply