Are you tired of rummaging through a disorganized kitchen cabinet just to find one pot or pan? Do you have to get on your hands and knees and reach into the back of your pantry to find that one can of tomatoes? It’s a common problem, but a frustrating one. The good news is there’s a simple, affordable solution that can transform your kitchen: kitchen cabinet pull out shelves.
In this guide, I’ll walk you through the entire process of installing your own pull out shelves in your kitchen cabinets. You’ll learn how to build them from scratch and install them in your pantry, under the cooktop for pots and pans, and even under the sink for cleaning supplies. By the end of this project, you’ll have a more organized and efficient kitchen, making your daily life just a little bit easier. Let’s get started!
Tools & Materials
To install your new pull-out shelves, you won’t need to build them yourself, which makes this a quicker and easier project! You can find these pre-made units at most home improvement stores or online.
Materials:
- Commercially Available Pull-Out Shelves: Select the units that best fit your cabinet dimensions. Brands like Rev-A-Shelf offer a wide variety of sizes for pantries, base cabinets, and under-sink areas. Be sure to measure your cabinets carefully before purchasing.
- Screws: The kits usually come with their own screws, but it’s always a good idea to have a box of standard wood screws (1-inch or 1 1/4-inch) on hand, just in case.
- Scrap Wood: You may need to brace the pull out shelves in the cabinet and a piece of scrap wood can come in handy.
Tools:
- Tape Measure: For accurately measuring your cabinet interior to ensure you purchase the correct size kit.
- Drill: You’ll use this to pre-drill holes and drive in the screws to mount the shelves.
- Level: Crucial for making sure your shelves are installed perfectly straight.
- Pencil: For marking the placement of your shelves and screw holes.
Step-by-Step Installation
Installing these pre-made shelves is a quick and rewarding process. By following these steps, you’ll have a perfectly organized cabinet in no time.
Step 1: Unbox and Prepare
First, carefully unpack your new pull-out shelf unit. Your kit should include the shelf itself, the frame or mounting hardware, and all the necessary screws. Take a moment to read through the manufacturer’s instructions. While the process is similar for most brands, there might be specific details or measurements unique to your kit.
Step 2: Measure and Mark Placement
Decide on the perfect placement for your shelf inside the cabinet. Use your tape measure to find the center of the cabinet floor, and then use your pencil to mark the exact position where the mounting brackets or frame will be installed.
Pro Tip: If you’re installing multiple shelves in a pantry, consider the height of the items you plan to store on each shelf. Use a level to ensure your marks are perfectly straight and level before you start drilling.
Step 3: Secure the Shelf to the Cabinet Floor
Most pull-out shelf units come with a base frame that secures directly to the bottom of the cabinet. Place the frame on your marked spot. Using your drill, pre-drill pilot holes to prevent the wood from splitting, then drive the screws through the mounting frame and into the cabinet floor. This is the most crucial step for a sturdy installation, so make sure it’s secure.
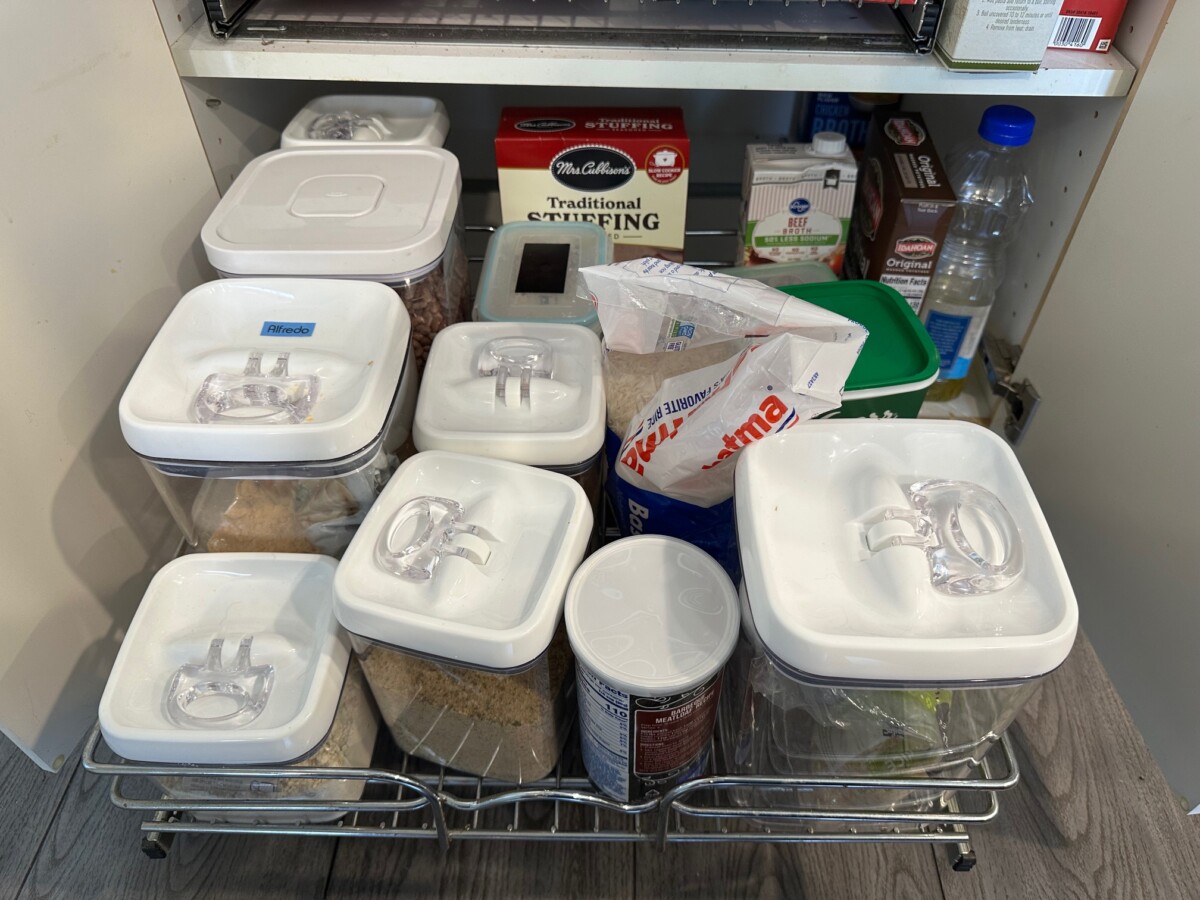
Pro Tip: I installed some pull out shelves to adjustable shelves in a tall kitchen cabinet. In order to prevent the shelf from tipping when pulling out the pull-out shelves, I installed additional shelf pegs in the back cabinet above the adjustable shelf. This keeps the shelf from tipping.
Additional Bracing
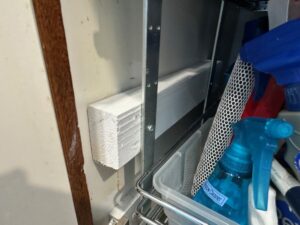
If you run into issues when mounting the frame of the shelves to the side of the cabinet wall where the pull-out shelves would not clear the opening or hit the door, you can look to do what I did and use a piece of scrap wood. I cut a piece of 2×4 and painted it white and then I screwed this into the cabinet wall and then mounted the pull-out shelf frame to this scrap piece of wood.
Step 4: Attach the Pull-Out Shelf
Once the base frame is securely attached, you can slide your pull-out shelf onto the glides. The shelves should click into place. If your kit has a front panel, this is when you would attach it according to the manufacturer’s instructions.
Step 5: Test and Adjust
With the shelf in place, give it a few test runs. Slide it in and out to ensure it glides smoothly and easily. If it feels tight or wobbly, double-check that the frame is level and the screws are secure. Make any minor adjustments needed, and you’re all done!
Now you can load up your new kitchen cabinet pull out shelves and enjoy your beautifully organized space!
The Benefits of Installing Kitchen Cabinet Pull Out Shelves
You might be wondering if a DIY project like this is worth the effort, and I’m here to tell you it absolutely is! Installing pull out shelves is one of the most impactful upgrades you can make to your kitchen storage. The benefits go far beyond just looking neat and tidy.
- Goodbye to the “Cabinet Black Hole”: The single biggest benefit is that you’ll finally be able to access everything in your cabinets. No more getting on your hands and knees or digging through a pile of items just to find what’s in the back. Your items come to you with a smooth pull, making everything visible and within reach.
- Maximizes Every Inch of Space: Traditional stationary shelves often leave a lot of wasted space, especially in the deep, lower cabinets. Pull out shelves make that previously unusable space completely accessible, essentially giving you more storage without a full remodel.
- Effortless Organization: By creating a dedicated space for everything, pull out shelves make it easy to keep your kitchen organized. You can group pots and pans together, store cleaning supplies without them toppling over, and arrange pantry items so you can see exactly what you have at a glance.
- Reduces Strain and Saves Time: The ergonomic design of pull out shelves means less bending, stretching, and straining. For anyone with a bad back or mobility issues, this is a game-changer. Plus, the time you save not having to search for a specific item will add up quickly!
These shelves are more than just a storage solution—they are a lifestyle upgrade that will make your kitchen more functional and your daily routine more efficient.
Choosing the Right Kitchen Cabinet Pull Out Shelves
Before you even start shopping, you’ll need to accurately measure your cabinets. There’s no such thing as a “standard” cabinet size when it comes to finding a perfect fit, so take the time to do this right.
1. Measure, Measure, Measure!
- Width: Measure the inside width of your cabinet from left to right. Be sure to account for any hinges, pipes (especially under the sink), or other obstructions that might get in the way of the shelf’s frame.
- Depth: Measure from the very back of the cabinet to the inside of the front frame. Most shelves are designed for standard cabinet depths (21-22 inches), but it’s crucial to know your exact measurement.
- Height: If you’re installing multiple shelves in a tall cabinet or pantry, measure the height from the cabinet floor to the top of the opening. This will help you plan the vertical spacing for each shelf.
2. Understand the Different Types of Shelves
- Wire Basket Shelves: These are a very popular, cost-effective option. They are great for pantries and cleaning supplies as they allow for air circulation and are easy to clean.
- Solid Wood or Melamine Shelves: These provide a more finished, custom look and are ideal for heavier items like pots, pans, or small appliances. They are also great for preventing small items from falling through.
- Full-Extension Glides: Look for shelves that have “full-extension” glides. This feature allows the shelf to pull out completely from the cabinet, giving you full access to everything, even in the back.
- Weight Capacity: Check the weight rating of the shelves. If you plan to store heavy pots and pans, you’ll want to choose a heavy-duty option to ensure they are durable and safe.
3. Consider Your Cabinet’s Specifics
- Under the Sink: For under-sink cabinets, look for units designed specifically to fit around plumbing. These often have a U-shaped or cut-out design to maximize storage around pipes.
- Pots and Pans: For cookware storage, consider shelves with tall sides or dividers to keep everything from sliding around.
By taking the time to measure your space and select the right type of shelves for your needs, you’ll ensure a smooth installation and a perfectly organized kitchen.
Recommendations
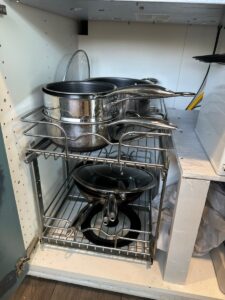
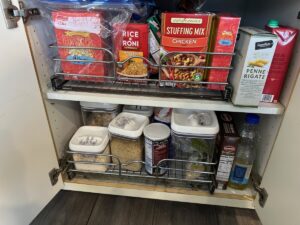
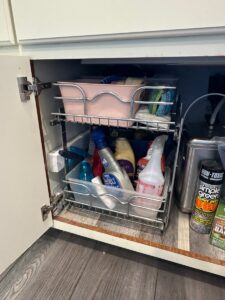
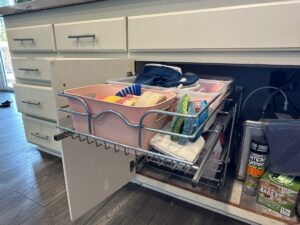
Here are the products I ended up using. I used the 2-Tier shelves under the cooktop on our island for storing our pots and pans as well as under our sink for storing cleaning supplies. I used the single tier shelves in our tall kitchen pantry cabinets.
Here are a few additional recommendations that would be a huge help with organizing your kitchen:
Conclusion
Congratulations! By installing kitchen cabinet pull out shelves, you’ve transformed your cluttered, disorganized cabinets into a functional, efficient, and beautiful storage system. This simple upgrade is a game-changer for any kitchen, making everything from your pantry staples to your pots and pans easily accessible.
This project proves that you don’t need a full-scale remodel to make a huge impact on your home. With just a little effort, you can solve a frustrating everyday problem and make your kitchen work better for you. Now, go enjoy your newly organized space and the peace of mind that comes with it!







Leave a Reply