Welcome to your guide for installing the Renogy ONE Core, the central hub for monitoring and managing your off-grid energy system. The Renogy ONE Core installation process can seem daunting, but with the right steps, it’s a straightforward task you can handle yourself. This post will walk you through everything you need to know, from preparing your workspace to the final wiring, so you can start enjoying a smarter, more connected energy system. Let’s get started!
Before You Begin: Essential Preparation
Before you dive into the installation of your Renogy ONE Core, a little preparation goes a long way. Taking the time to gather your tools, understand what’s included, review safety measures, and pick the perfect spot will make the entire process smoother and ensure a successful setup.
Gathering Your Tools
Having the right tools on hand before you start will save you time and frustration. Here’s what you’ll likely need:
- Phillips Screwdriver (#1): For securing the device.
- Insulation Tape: Always good to have for securing connections.
- Skill Saw or Electric Drill with a 55mm (2.17in) Hole Saw: This is crucial if you plan on flush mounting your Renogy ONE Core directly into a wall or panel.
- Multimeter (Recommended): While not strictly required for every step, a multimeter is invaluable for checking polarity and confirming voltage, especially when dealing with DC power.
What’s in the Box?
When you unbox your Renogy ONE Core, you should find the following components:
- Renogy ONE Core Unit: The main device itself.
- Power Cable: Included for connecting the Core to your DC power supply.
- Mounting Template: Often included to assist with precise hole drilling for flush mounting.
Always double-check the contents against the packing list in your Renogy ONE Core’s official quick guide or user manual to ensure everything is there.
Crucial Safety Precautions
Safety is paramount when working with electrical systems. Please pay close attention to these critical precautions:
- Always Read the Manual: Before doing anything, thoroughly read the official Renogy ONE Core Quick Guide and User Manual. It contains vital safety information specific to your device.
- Polarity Check is Key: When connecting the power cable, it’s absolutely essential to connect the negative (-) wire first, and then the positive (+) wire. Reversing the polarity can cause severe damage to your Renogy ONE Core and will void your warranty. Use your multimeter to confirm polarity if you’re unsure.
- Verify Voltage Range: Ensure your DC power supply is within the specified voltage range for the Renogy ONE Core. Depending on your model, this is typically 8V to 60V DC (or 8V to 35V DC for some versions). Connecting it to a power source outside this range can lead to permanent damage.
- General Safety: Keep the Renogy ONE Core out of reach of children. Do not expose it to flammable or harsh chemicals/vapors. Remember, there are no user-serviceable parts inside; do not attempt to open, dismantle, or modify the unit.
Selecting the Ideal Installation Site
Choosing the right location for your Renogy ONE Core is important for both functionality and convenience:
- Environment: Opt for a clean, cool, and dry location, free from any accumulation of water, oil, or dirt. These elements can lead to current leakage, self-discharge, or even short-circuiting over time.
- RV Leveling Function: If you plan to utilize the RV leveling function, the Renogy ONE Core must be installed with its screen pointing to the front, rear, left, or right side of your RV, mounted vertically to the RV floor. This ensures accurate readings for leveling assistance.
- Accessibility and Viewing: Consider a spot where the screen is easily visible and accessible for interaction. Also, think about the routing of power and communication cables to ensure a clean and organized installation.
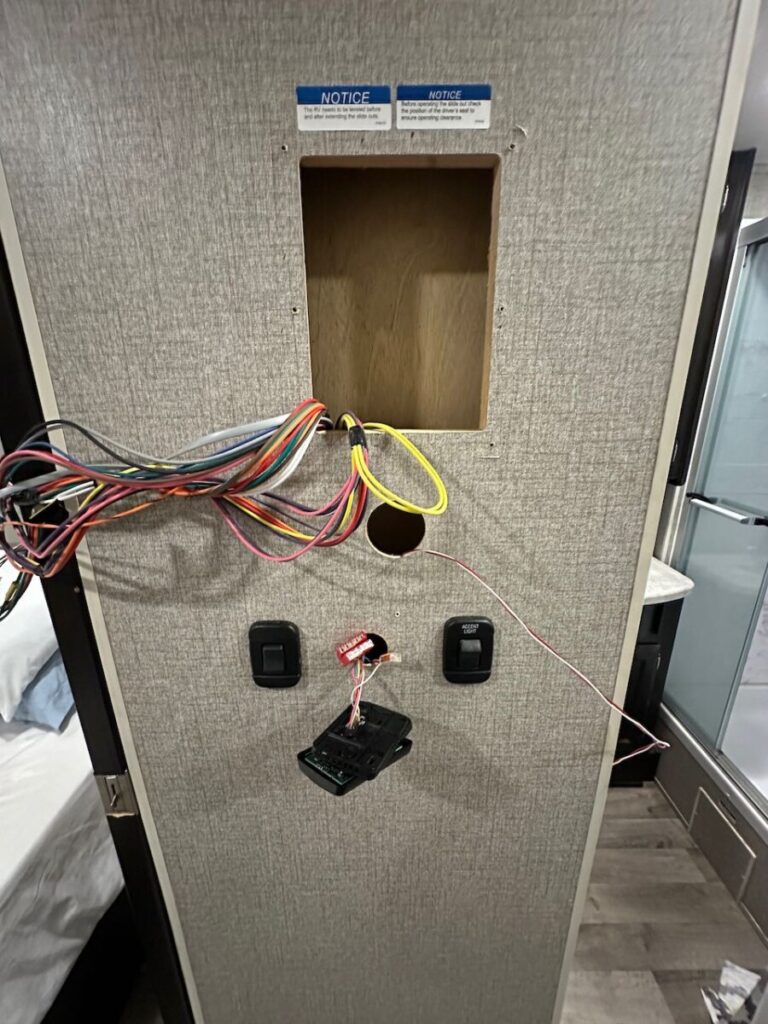
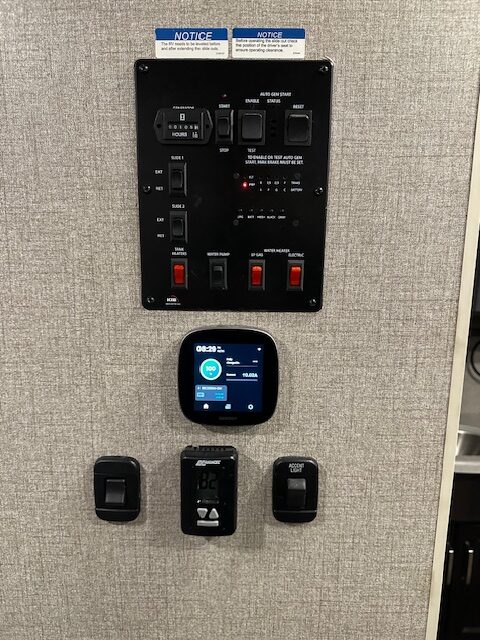
In my RV, I selected a location right underneath the main control panel for the RV. I was able to use the power wiring for the thermostat to power the Renogy ONE Core.
Mounting the Renogy ONE Core
Once you’ve completed your preparations, it’s time to physically mount your Renogy ONE Core. You have a couple of options, depending on your preference and the available space in your RV or off-grid setup.
Option 1: Simple Tabletop Placement
For the simplest installation, you can place your Renogy ONE Core on a flat surface, such as a table or counter.
- Using the Packaging Box: Renogy often designs its packaging to be environmentally friendly and functional. You can use the Renogy ONE Core’s packaging box as a convenient bracket to hold the Core upright on a table. This is a great option if you don’t need a permanent wall mount or if you’re testing the unit.
- Important Note: If you choose tabletop placement, please be aware that the RV leveling function will not be available. This feature requires the unit to be mounted vertically to the RV floor to provide accurate leveling assistance.
Option 2: Secure Wall Flush Mounting
For a more integrated and permanent installation, flush mounting the Renogy ONE Core into a wall or panel provides a clean and professional look. This method is also necessary if you intend to use the RV leveling function.
- Using the Mounting Template: Your Renogy ONE Core package should include a mounting template. Carefully tear off this piece of paper and paste it onto the desired installation location on your wall or panel. This template will guide you in marking the precise spot for drilling.
- Tip: If you don’t have the template, you can create your own. The installation hole required is 2.17 inches x 2.17 inches (55 mm x 55 mm).
- Drilling the Hole: Using your skill saw or electric drill with a 55mm (2.17in) hole saw, carefully cut out the marked square opening in your wall or panel. Take your time to ensure a clean cut. I was shipped a hole sole with the Renogy One Core I purchased, which made it easy for drilling the hole.
- Securing the Device: Once the hole is cut, gently insert the Renogy ONE Core into the opening. The unit is designed to fit snugly. Secure it in place using the provided mounting screws and your Phillips screwdriver. Ensure it’s flush with the surface and firmly attached.
The following photo shows the location I selected for the Renogy ONE Core Installation. I removed the control panel for the RV to expose the wires. I also removed the thermostat and discovered Wago connectors with extra room that would provide the power I needed for the Renogy ONE Core. You can see the circle hole I drilled with the circle drill bit that came with my Renogy ONE Core.
Here is a photo of the final installation of the Renogy ONE Core in my RV:
Connecting the Renogy ONE Core
With your Renogy ONE Core securely mounted, the next crucial step is to connect it to your power supply and, optionally, to other communication devices. This is where your system truly comes to life, so pay close attention to the details!
Power Supply Connection
The Renogy ONE Core requires a stable power source to operate. You have a couple of ways to provide power:
- Using the Included Power Cable: The most common method is to use the power cable provided in your Renogy ONE Core package. This cable is designed to connect directly to a DC power supply within the specified voltage range, typically 8V to 60V DC (or 8V to 35V DC, depending on your specific Core model). I was able to tap into the power for my RV thermostat.
- Optional Type-C Cable: For a 5V DC power supply, you can use a standard USB Type-C cable (not included). This offers flexibility if you have a readily available 5V source.
Crucial Wiring Order: Negative First, Then Positive! This cannot be stressed enough: when connecting the power cable, always connect the negative (-) wire to your power source first, and then the positive (+) wire. This order minimizes the risk of sparks and protects your device from potential damage due to reverse polarity. A reverse polarity connection can permanently damage your Renogy ONE Core and will void its warranty.
- Voltage Verification: Before making any connections, use your multimeter to double-check that your power source’s voltage falls within the acceptable operating range of your Renogy ONE Core. This simple step prevents power-on failures or permanent damage.
Optional Communication Cable Installation
The Renogy ONE Core is designed to integrate seamlessly with other Renogy components, allowing for comprehensive monitoring and control. This is achieved through communication cables:
- RS-485 Devices: If you have Renogy devices that communicate via RS-485 (e.g., certain charge controllers or inverters), you’ll connect them to the appropriate RS-485 ports on your Renogy ONE Core. Refer to your device manuals for specific wiring diagrams.
- CAN Communication (for G2/G3 Models): Some Renogy ONE Core models (G2 and G3 versions) support CAN (Controller Area Network) communication. If your other Renogy devices use CAN, you’ll connect them here for enhanced data exchange.
- Ethernet Cable (for Remote Monitoring): For robust remote monitoring capabilities, you can connect your Renogy ONE Core to your network via an Ethernet cable. The maximum recommended length for this cable is 6 meters (19.6 feet) to ensure reliable data transmission. This connection allows your Core to upload energy data to the cloud, enabling worldwide monitoring via the DC Home App and Renogy ONE Portal.
By carefully completing these power and communication connections, your Renogy ONE Core will be ready to power on and begin its initial setup, bringing you one step closer to intelligent energy management.
Initial Setup and Pairing
With your Renogy ONE Core powered up and all necessary cables connected, it’s time for the exciting part: bringing your system online and pairing it with the Renogy DC Home App. This step allows you to unlock the full potential of your new energy monitoring and smart living hub.
Powering On/Off
The Renogy ONE Core has a simple power control mechanism:
- Power On/Off: To power the Core on or off, simply long-press the On/Off button for approximately 5 seconds. You’ll typically see a startup or shutdown sequence on the screen.
Pairing with the Renogy DC Home App
The Renogy DC Home App is your gateway to remote monitoring and control. Pairing your Core with the app is straightforward:
- First-time Startup Wizard: For initial startup, the Renogy ONE Core will likely guide you through a startup wizard on its built-in screen. Follow the on-screen prompts to begin the pairing process with the DC Home app.
- Manual Pairing: If you need to pair it later or prefer a manual approach, you can navigate on the Core’s screen to
System>Pair with App. - Connectivity: The Renogy ONE Core supports various wireless technologies for seamless integration: Bluetooth, Bluetooth Mesh, and Zigbee. Ensure your smartphone’s Bluetooth is enabled when attempting to pair.
Adding Compatible Devices
Once paired with the DC Home App, you can begin adding your other Renogy components to the system for centralized monitoring:
- Overview: The Renogy ONE Core is designed to combine data from various Renogy devices, including batteries, charge controllers, and inverters, into one cohesive system.
- Integration: It connects with devices that have built-in Bluetooth (newer Renogy components) or those that use BT-1/BT-2 modules (for older components). Additionally, it integrates with devices communicating via RS-485. Follow the prompts within the DC Home App to discover and add your compatible Renogy devices.
RV Leveling Calibration (If Applicable)
If you’ve flush-mounted your Renogy ONE Core and plan to use its RV leveling feature, a quick calibration is necessary:
- When to Calibrate: It’s important to calibrate the RV leveling function each time the installation site for the Core is changed or if you notice inaccuracies.
- Purpose: This calibration ensures the Renogy ONE Core provides highly accurate and responsive updates about your vehicle’s stability, helping you achieve optimal leveling for comfort and safety. Refer to the Renogy ONE Core user manual for detailed calibration steps within the device settings.
Maximizing Your Renogy ONE Core: Key Features
With your Renogy ONE Core successfully installed and paired, you’re now ready to unlock its full potential. This powerful device is more than just a monitor; it’s the brain of your off-grid system, offering a suite of features designed to enhance your energy management, comfort, and security.
24/7 Energy Monitoring & Analysis
One of the primary benefits of the Renogy ONE Core is its ability to provide real-time data on your energy generation and consumption. Through its intuitive interface and the DC Home App, you can track:
- Battery Status: Monitor voltage, current, state of charge, and health of your connected batteries.
- Solar Yield: See how much power your solar panels are generating at any given moment.
- Appliance Consumption: Understand which devices are drawing power and how much.
This continuous monitoring allows you to make informed decisions to optimize your energy usage and extend the life of your components.
Worldwide Remote Monitoring
Thanks to the DC Home App and the Renogy ONE Portal, your energy system is always at your fingertips, no matter where you are. As long as your Renogy ONE Core is connected to Wi-Fi, you can:
- Check System Status Remotely: Monitor all your connected devices from across town or across the globe.
- Receive Alerts: Get notifications for critical events, such as low battery voltage or system faults.
- Access Historical Data: Review past performance to identify trends and improve efficiency.
This feature provides unparalleled peace of mind, allowing you to manage your off-grid power with ultimate flexibility.
RV Leveling Assistant
For RV owners, the built-in RV leveling assistant is a game-changer. When correctly flush-mounted, the Renogy ONE Core helps you achieve optimal stability for your vehicle without the guesswork:
- Accurate Readings: Provides precise, real-time updates on your RV’s tilt and orientation.
- Effortless Leveling: Guides you to the perfect level, saving time and effort when setting up camp.
This feature ensures a more comfortable and safe experience, preventing issues like uneven cooking or uncomfortable sleeping.
Smart Automation
The Renogy ONE Core acts as a central hub for smart automation, allowing you to connect and control various smart accessories via Zigbee 3.0 protocol. This opens up a world of convenience and enhanced security:
- Smart Plug: Program 120V AC appliances to turn on/off automatically or remotely. Imagine having your coffee maker start before you wake up!
- Motion Sensor: Detect unexpected movements in your RV and trigger alarms or send notifications to your phone, adding a layer of security.
- Door & Window Sensor: Receive alerts if a door or window is opened unexpectedly, and even link it to an alarm system.
- Smart Relay: Control 250V AC or 30V DC appliances (up to 16A max), allowing for automated control of lights or fans based on specific conditions.
These automations can significantly simplify your off-grid life, making your RV or cabin feel more like a smart home.
Over-the-Air (OTA) Updates
Renogy is continuously improving the ONE Core with new features and enhancements. With Over-the-Air (OTA) updates, your device stays current without any manual intervention:
- Future-Proof: Ensures you always have access to the latest functionalities and performance improvements.
- Hassle-Free Maintenance: Updates are delivered seamlessly, keeping your system optimized.
By leveraging these powerful features, your Renogy ONE Core transforms your off-grid energy system into an intelligent, responsive, and highly manageable setup.
Troubleshooting Common Issues
Even with a clear guide, sometimes things don’t go exactly as planned. If you encounter any issues after your Renogy ONE Core installation, don’t worry! Here are some common problems and their solutions to help you troubleshoot.
No Power to the Renogy ONE Core
If your Renogy ONE Core isn’t turning on or appears to have no power:
- Check Connections: Double-check all power cable connections at both the Renogy ONE Core and your power source. Ensure they are secure and free from any loose wires.
- Verify Voltage: Use your multimeter to confirm that your DC power supply is providing the correct voltage (8V-60V DC or 8V-35V DC, depending on your model) and that it matches the Core’s requirements.
- Confirm Polarity: Reconfirm that the negative (-) wire was connected first, followed by the positive (+) wire. Reverse polarity is a common cause of power issues and device damage.
- Check Fuses/Breakers: If your system has fuses or breakers on the power line to the Core, ensure they haven’t tripped or blown.
Device Not Pairing with the DC Home App
If you’re having trouble connecting your Renogy ONE Core to the DC Home App:
- Bluetooth/Wi-Fi Enabled: Ensure Bluetooth is enabled on your smartphone and that your Renogy ONE Core is connected to a stable Wi-Fi network if you’re attempting remote monitoring.
- Pairing Mode: Make sure the Renogy ONE Core is in pairing mode. Typically, you’d initiate this through the Core’s screen via
System>Pair with App. - App Updates: Ensure your Renogy DC Home App is updated to the latest version.
- Restart Devices: Sometimes, simply restarting your smartphone and the Renogy ONE Core can resolve connectivity glitches.
Inaccurate Readings or Data
If the data displayed on your Renogy ONE Core or in the DC Home App seems incorrect:
- Verify All Connections: Ensure all communication cables (RS-485, CAN, Ethernet) are securely connected to the correct ports on both the Core and your other Renogy devices.
- Device Compatibility: Confirm that all your connected Renogy components (batteries, charge controllers, inverters) are compatible with the Renogy ONE Core. Refer to the Core’s user manual or Renogy’s compatibility charts.
- RV Leveling Calibration: If your RV leveling readings are off, recalibrate the function as described in the user manual, especially if the Core’s mounting location has changed.
- Shunt Connection (if applicable): If you’re monitoring battery state of charge, ensure your battery shunt (if used) is properly installed and connected to the Core.
If you’ve gone through these troubleshooting steps and are still experiencing issues, it’s always a good idea to consult the comprehensive Renogy ONE Core User Manual or contact Renogy’s customer support for further assistance.
Conclusion
Congratulations! You’ve successfully navigated the Renogy ONE Core installation process, from unboxing and mounting to connecting and initial setup. By following this step-by-step guide, you’ve laid the foundation for a smarter, more efficient off-grid energy system.
The Renogy ONE Core is truly a powerful addition to any RV or remote setup. You’re now equipped to enjoy:
- 24/7 real-time energy monitoring, giving you complete visibility into your power generation and consumption.
- The convenience of worldwide remote monitoring through the DC Home App, keeping you connected to your system no matter where your adventures take you.
- The practical assistance of the RV leveling feature, ensuring comfort and stability at every stop.
- The added comfort and security of smart automation, transforming your space with intelligent control over your appliances.
We hope this guide has empowered you to confidently install your Renogy ONE Core and take full control of your off-grid energy. Now, go forth and enjoy the peace of mind that comes with a well-managed and intelligent power system!
What are your thoughts on the Renogy ONE Core, or do you have any tips from your own installation experience? Share them in the comments below!





Leave a Reply