

Do you have a Govee device that is no longer working? Here are my steps on how to fix a Govee power adapter. I used these steps to fix the power adapter on my Govee LED Light Strings that I use to decorate my gazebo.
My Broken Govee Device
I had the Govee Lynx Dream LED Bulb String Lights that I use to decorate my Gazebo. They worked great for a period of time and then just wouldn’t turn on anymore. I tried the reset procedures and no luck. I know that the electrical outlet that the power adapter was using was in working. Following these steps, I was able to get the light string up and operational again. Note that this may not work for your situation as you could have a different problem.
Tools Required to Fix a Govee Power Adapter
The following are the tools you may need:
- Wire cutters / strippers
- Multimeter
- Test lead set & alligator clips
- Extension cord
- Extra 12v power adapter
- Electrical tape (optional)
- Soldering equipment (optional)
Here is an option for the replacement power supply:

Procedure to Fix a Govee Power Adapter
The following steps will help you identify if your power adapter is bad and how to go about replacing it.
WARNING: Some of the steps below involve working with power. Please use caution to avoid electrocution. Please check out the following post for more information on DIY Electrical Safety.
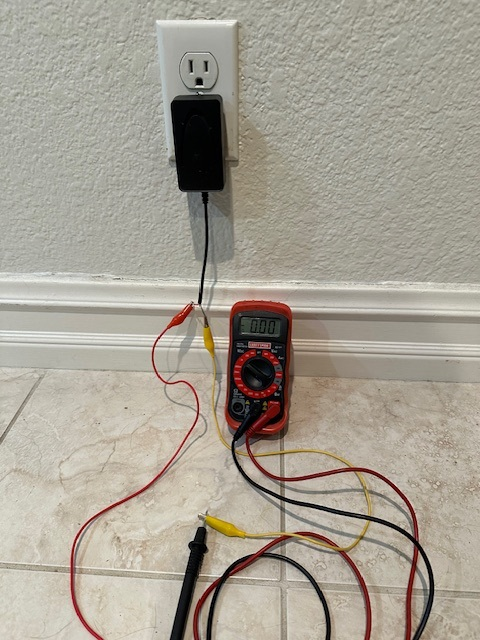
Step 1 – Cut the Wire
The first step is to make sure the power adapter and control box unit are disconnected from power as well as from your Govee device. In my case it was the light strings.
Then you will want to cut the wire between the power adapter and control box. Make sure you leave enough wire from the power adapter so that you can work with it.
Step 2 – Strip the Wire
You then need to strip the wire so that the red and black wires are exposed and then you need to strip a little bit off of each of these as you will need to check to see if there is any voltage being produced by the power adapter.
Step 3 – Test Output Voltage
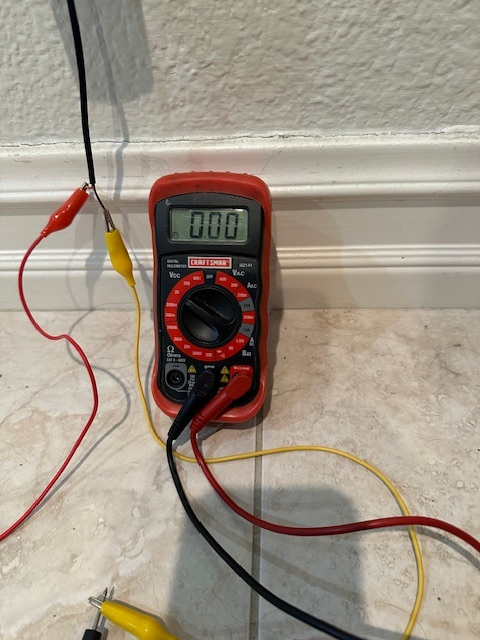
Using a multimeter set to the 20 DC or similar setting you will want to connect the multimeter to the red and black wires. Make sure to match the same colors on your multimeter. I used test leads with alligator clips to make it easier to perform this step. Be careful not to touch the black and red wires together. You will need to plug in the power adapter to a wall outlet. An extension cord can help with this.
You should be expecting a reading of 12 volts. If you are not seeing a reading of 12 volts than you most likely have a bad power adapter and it will need to be replaced.
In my situation, I was getting 0.00 volts registered on the multimeter. If you are seeing 0, it would be good to double check all the wires and connection to the multimeter to make sure this is accurate and you didn’t come disconnected.
Step 4 – Wire up a Replacement Power Adapter
If you had a bad power adapter the next thing to try is using a replacement power adapter. I happen to have a 12v power supply I use for work with me. If you do not have one, you can purchase one that produces an output of 12v and 2 amps. Once you have a replacement power adapter, the next step is to strip the wires on the control box to expose the red and black wire and made sure that each wire had a bit of copper exposed.
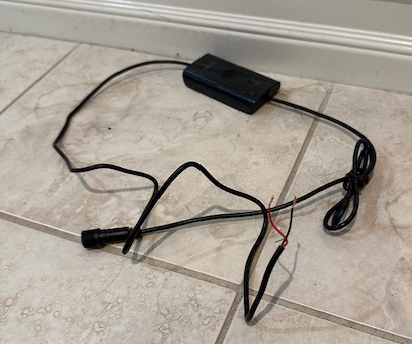
I then wired the red wire to 12v on the replacement power source and the black wire to Ground on the replacement power source. I recommend doing this with the replacement power source powered down.
Step 5 – Check if Control Box Works
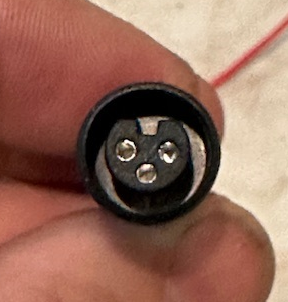
Now that you have the control box wired up, you can plug in the power. Using a multimeter you can then check to see if there is power coming out of the other end of control box at the 3 pin connector.
In the picture below there are 3 pins. The the one on the upper left is where you will want to connect the red lead from your multimeter. The one on the upper right is where you will want to connect the black lead from your multimeter. With your multimeter still set to the DC 20v setting you should see a reading of around 18v. Note you may need to press the button on the control box to make sure that it is “turning” on. In my case with the replacement power adapter I was now getting output voltage.
Step 6 – Test out the Govee Device
If you were getting good results in the previous step, now we can move on to testing out the Govee device. I would turn off the control box and then connect the device to the connector coming out of the control box. Once connected it is time to turn on the control box and see if your Govee device works. In my case it did!
Step 7 – Complete Permanent Setup
Now that you tested everything and hopefully it is now working. The final step is to connect the new power adapter properly to the control box. This step can vary based on the type of power adapter you are using as a replacement. You may need to solder wires together and use electrical tape or even electrical shrink wraps.
PRO TIP: The original Govee power adapter and control box are not very waterproof. Make sure that if you are using the Govee device outdoors you properly protect these components from the elements.
Summary
Following the above steps may be a way to extend the life of your Govee device. They may not work in all cases, but hopefully they help you out like it did for me.


Leave a Reply