

Tired of tripping over tangled extension cords in your garage? Is your workspace constantly cluttered with unruly power lines, making it hard to move around or even find what you need? You’re not alone! Many DIY enthusiasts and homeowners face this daily frustration. But what if we told you there’s a simple, effective solution that not only clears the clutter but also puts power precisely where you need it, whenever you need it? Enter the retractable cord reel ceiling mount. This ingenious device is a true game-changer for any garage, transforming a messy, potentially hazardous area into a safe, organized, and highly functional workspace. In this guide, we’ll walk you through everything you need to know to easily install one yourself, making those tangled cord woes a thing of the past. Get ready to power up your projects with unparalleled convenience and reclaim your garage!
Why a Retractable Cord Reel is a Garage Game-Changer
If you’re still wrestling with extension cords that seemingly multiply overnight, you’re about to discover why a retractable cord reel ceiling mount isn’t just another gadget—it’s an essential upgrade for any garage. This isn’t just about tidiness; it’s about making your workspace safer, more efficient, and genuinely enjoyable to use.
Safety First: Eliminate Tripping Hazards
Let’s face it, cords snaking across the floor are an accident waiting to happen. A retractable cord reel keeps your power source overhead and out of the way. No more tripping over lines when you’re carrying tools or moving heavy equipment. This simple change significantly reduces the risk of falls and keeps your family and pets safer too.
Ultimate Organization: Say Goodbye to Tangles
Picture this: pulling out exactly the length of cord you need, using it, and then watching it effortlessly retract back into its housing. That’s the beauty of a retractable cord reel. It eliminates the frustrating knots and kinks that plague traditional extension cords. Your garage will look cleaner, feel less cluttered, and you’ll save precious time no longer wrestling with tangled messes.
Convenience at Your Fingertips: Power Where You Need It
Mounted on your ceiling, a cord reel provides power precisely where you need it, often reaching every corner of your garage. Whether you’re working on your car, a woodworking project, or just vacuuming, you’ll have instant access to power without hunting for an outlet or dragging multiple cords around. It’s about maximizing your workspace’s functionality.
Durability & Protection: Extend the Life of Your Cords
When cords are left on the floor, they’re susceptible to damage from being stepped on, run over, or exposed to spills and debris. A retractable cord reel keeps the cord protected within its robust casing when not in use, significantly extending its lifespan. This means fewer replacements and more reliable power for years to come.
Choosing the Right Retractable Cord Reel
Before you grab your drill, it’s crucial to select a retractable cord reel that’s a perfect fit for your needs. Not all cord reels are created equal, and a little forethought now can save you headaches later. Here’s what to consider:
Cord Length & Gauge: Power for Every Corner
This is perhaps the most critical factor. Think about the farthest point in your garage you’ll need to reach with power.
- Length: Cord reels typically come in lengths from 25 feet to 100 feet or more. Measure the dimensions of your garage and consider where you’ll be working. It’s always better to have a bit more length than not enough.
- Gauge (AWG): The lower the gauge number, the thicker the wire, and the more power it can safely carry.
- 16-gauge (16 AWG): Good for lighter-duty tools like drills, work lights, and small power tools.
- 14-gauge (14 AWG): A good all-around choice for most DIY garage tasks, handling circular saws, miter saws, and vacuum cleaners.
- 12-gauge (12 AWG) or 10-gauge (10 AWG): Essential for heavy-duty tools that draw a lot of power, such as air compressors, welders, or larger shop equipment. Using too thin a gauge for high-amp tools can lead to overheating and potential fire hazards.
Mounting Options: Built for the Ceiling
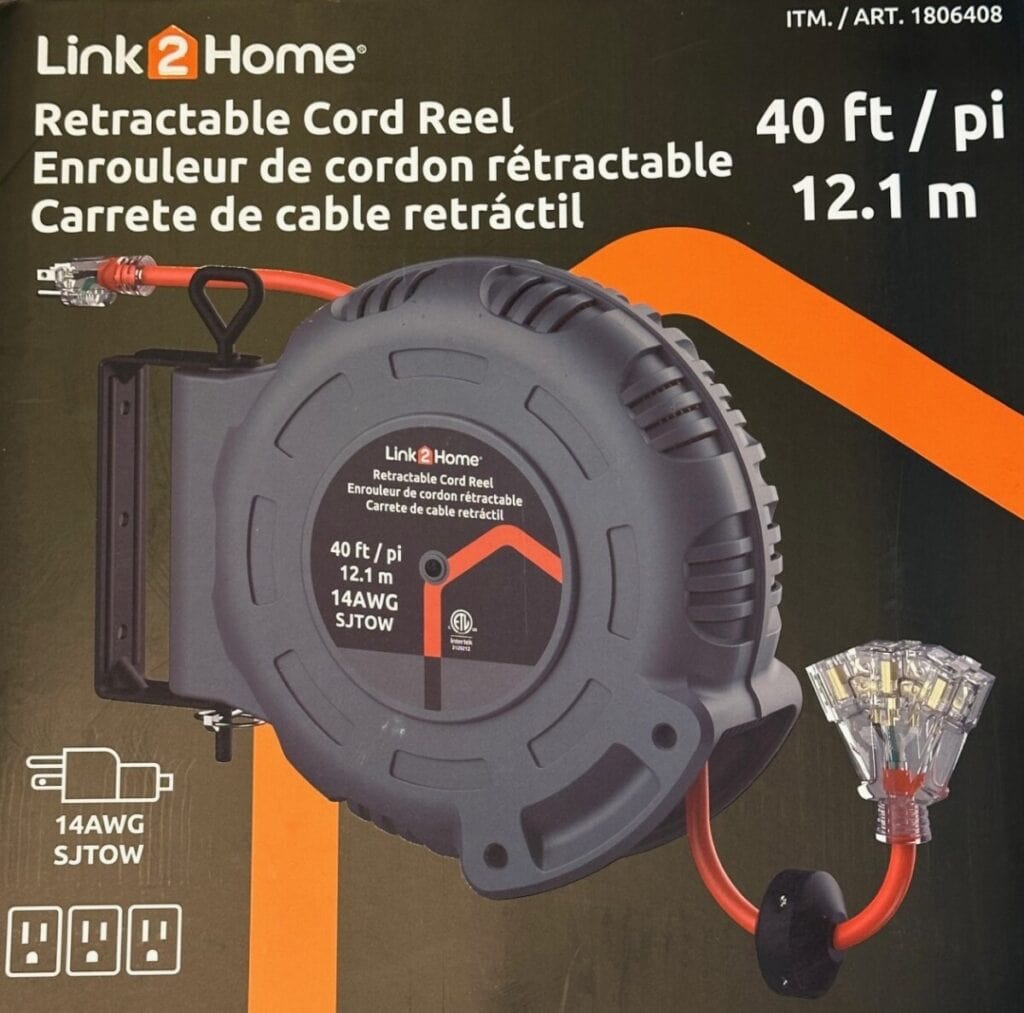
While some cord reels offer wall mounting, for this project, you’re specifically looking for a ceiling mount design. Ensure the model you choose is clearly designed and rated for overhead installation. Check that the mounting bracket is robust and designed to safely bear the weight of the reel, especially when the cord is fully extended.
Retraction Mechanism: Smooth and Reliable
A good retractable cord reel should operate smoothly. Look for models with a reliable spring-loaded mechanism that pulls the cord back in without excessive effort or snagging. Some higher-end models feature a slow-retraction mechanism, which is a nice safety feature, preventing the plug from whipping around when it retracts.
Durable Casing: Built to Last in the Garage
Your garage can be a harsh environment. Choose a cord reel with a tough, impact-resistant casing, often made from durable plastic or metal. This will protect the internal components from accidental bumps, dust, and moisture, ensuring longevity.
Safety Features: Protection You Can Count On
Safety should always be a priority.
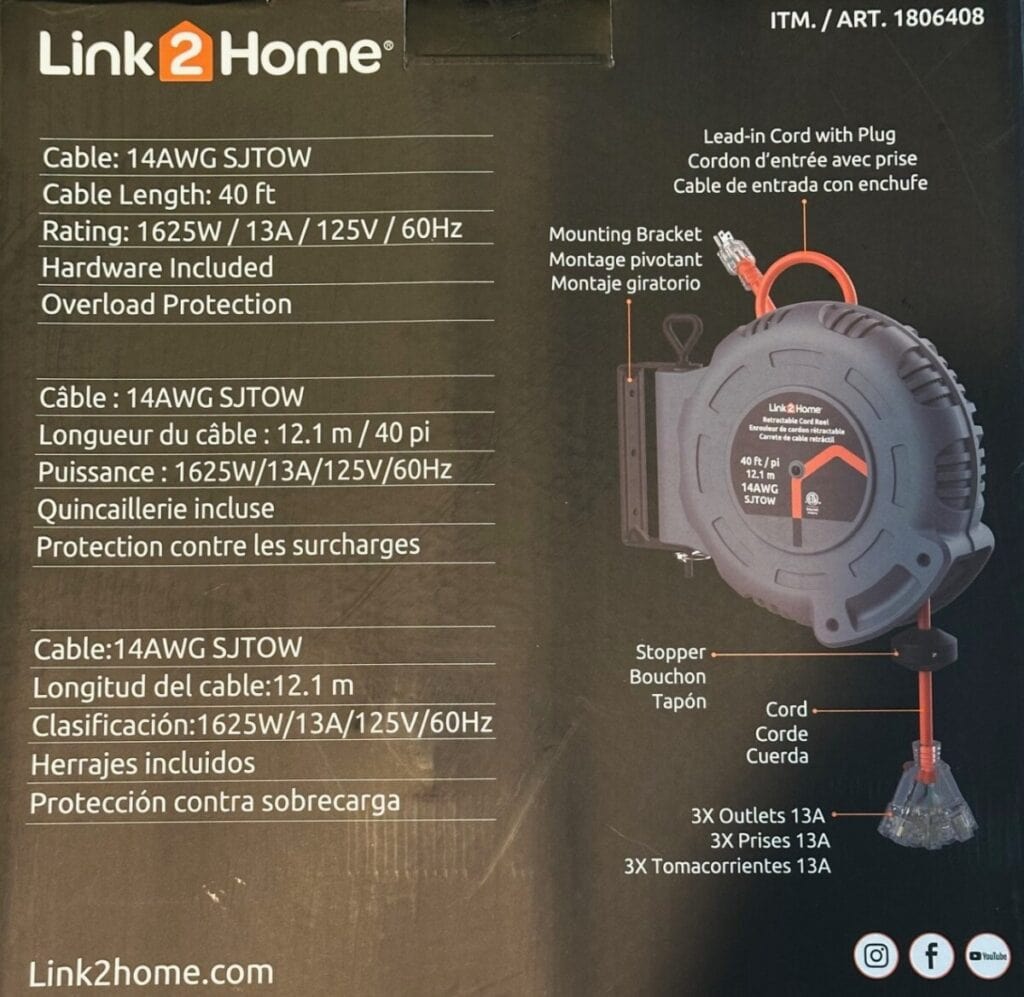
- Circuit Breaker/Overload Protection: Many quality cord reels include a built-in resettable circuit breaker. This crucial feature will trip and cut power if the cord is overloaded, preventing overheating and potential electrical fires.
- Grounding: Ensure the cord reel and its plug are properly grounded (three-prong plug) for electrical safety.
- LED Power Indicator: A small LED light on the reel or plug that indicates when power is present can be a convenient visual safety cue.
My Selection
After researching various options, I ultimately chose the Link2Home retractable Cord Reel available at Costco. This particular model struck a great balance between features, quality, and value, making it an ideal fit for my garage setup. It offered the right cord length and gauge for my typical DIY projects, felt robustly constructed, and came with a reliable retraction mechanism. Finding it readily available at Costco was a huge plus, offering both convenience and a brand I trust for good value.
Other Recommendations
While the Link2Home reel fit my needs perfectly, here are a few other highly-rated retractable cord reel ceiling mount options to consider for your garage:


Tools and Materials You’ll Need
Before you begin your retractable cord reel ceiling mount installation, gathering all your tools and materials upfront will make the process smoother and more efficient. Nothing’s more frustrating than being halfway through a project and realizing you’re missing a crucial item! Here’s a comprehensive list to ensure you’re fully prepared:
Essential Tools:
- The Retractable Cord Reel (of course!): Make sure it’s the specific model you’ve chosen based on the considerations in the previous section. Double-check that it includes all the necessary mounting hardware.
- Stud Finder: This is non-negotiable for safe and secure installation. You must mount your cord reel into a ceiling joist (a sturdy wooden beam) to support its weight and the tension from the cord.
- Drill and Drill Bits: You’ll need a power drill. Ensure you have a set of drill bits, specifically one that matches the diameter of the pilot holes required for your mounting hardware (usually specified in the reel’s instruction manual).
- Ladder: A stable, sturdy ladder is crucial for safely reaching your garage ceiling. Don’t try to balance on a shaky chair or workbench!
- Pencil or Marker: For marking the precise locations of your mounting holes on the ceiling.
- Socket Wrench or Adjustable Wrench: Depending on the type of bolts or nuts included with your cord reel’s mounting hardware, you’ll need the appropriate wrench to tighten them securely.
- Tape Measure: To accurately determine placement and ensure the cord reel is centered or positioned optimally.
Crucial Safety Gear:
- Safety Glasses: Protect your eyes from falling dust, debris, or errant wood chips while drilling overhead.
- Gloves: Can provide a better grip and protect your hands, especially when handling tools or if your ceiling has rough surfaces.
Optional (But Recommended) Items:
- Extension Cord (if needed): If the built-in power cord on your reel isn’t long enough to reach your nearest power outlet, have a heavy-duty extension cord on hand to bridge the gap.
- Cable Ties or Cable Management Clips: Once installed, you might want to neatly route the reel’s power cord along a joist or wall to the outlet, keeping it tidy and out of the way. These clips are perfect for that.
- Small Level: While not always strictly necessary for a cord reel, a small level can help ensure your mounting bracket is perfectly straight, which is aesthetically pleasing.
Having everything laid out before you start will make this a quick and satisfying DIY project!
Step-by-Step Installation Guide
Now that you’ve got your retractable cord reel and all your tools ready, it’s time to get it installed! This process is straightforward, but taking your time and following these steps carefully will ensure a safe and secure installation.
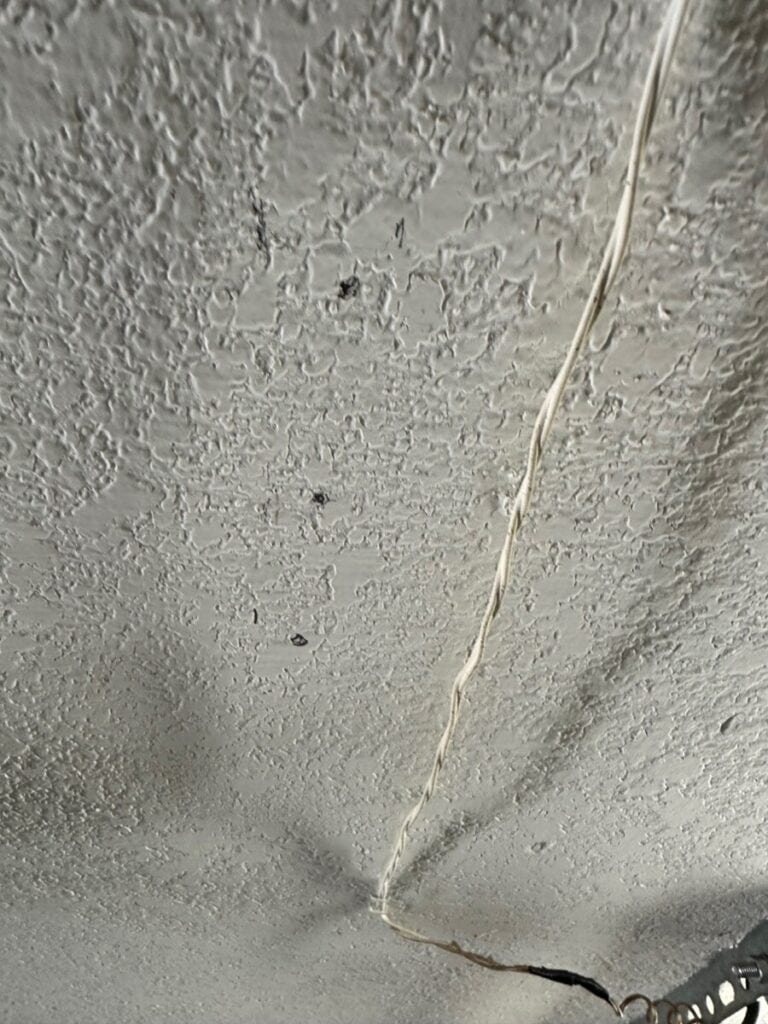
Step 1: Locate Your Ceiling Joists
This is the most critical step for safety and stability. You absolutely must mount your cord reel into a sturdy wooden ceiling joist, not just into drywall. Drywall won’t hold the weight of the reel, especially when the cord is extended and under tension.
- Using a Stud Finder: Turn on your stud finder and run it slowly across your garage ceiling. When it detects a joist, it will typically beep or light up.
- Mark the Edges: Once you’ve found a joist, use your pencil or marker to lightly mark both edges of the joist.
- Verify the Center: Many stud finders have a feature to indicate the center of the joist. If yours doesn’t, mark a spot roughly in the middle of your two edge marks. This will be your ideal mounting line. You may want to find a second joist to confirm consistent spacing and ensure you’re working with the structural framing.
Pro Tip: When installing on the garage ceiling make sure you do not obstruct any garage doors that may need to open. If needed, open the garage door when identifying the location to mount the retractable hose reel.
Step 2: Mark the Mounting Holes
With your joist located, it’s time to mark exactly where the reel will attach.
- Position the Reel: Hold your retractable cord reel’s mounting bracket up against the ceiling, aligning it with the center of the joist you just found. Consider the best placement for cord access in your garage.
- Trace the Holes: Using your pencil or marker, carefully mark the locations of all the mounting holes through the bracket onto the ceiling. Double-check that all your marks are squarely within the width of the joist.
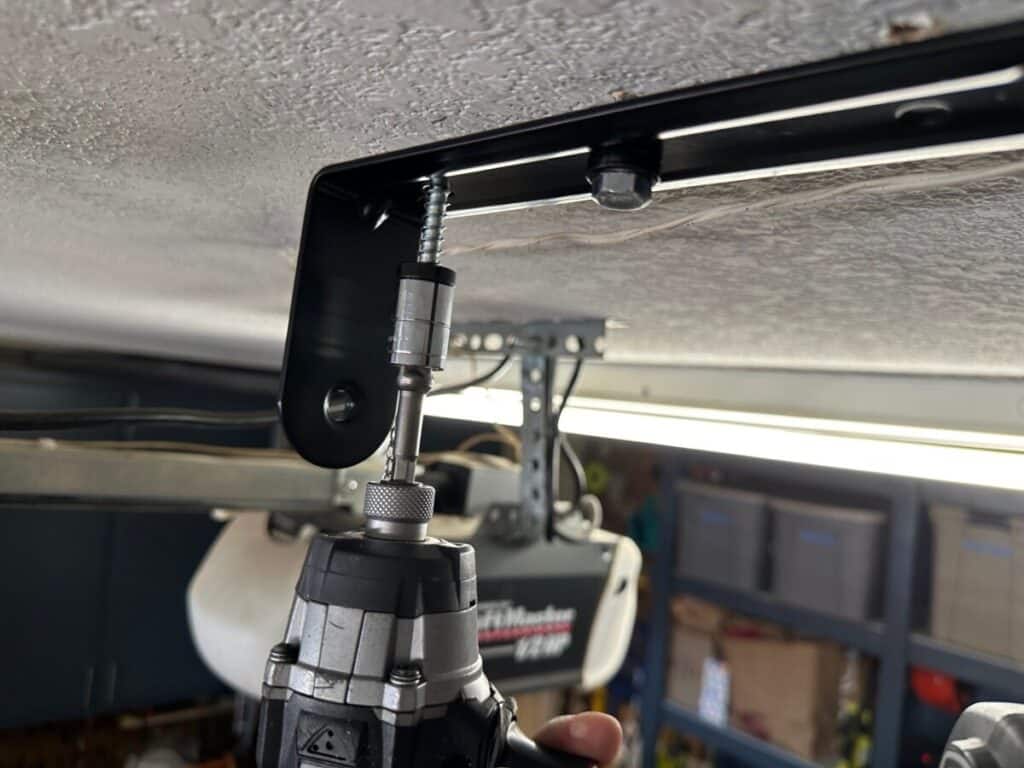
Step 3: Drill Pilot Holes
Pilot holes guide your screws or bolts and prevent the wood from splitting.
- Choose the Right Bit: Refer to your cord reel’s instruction manual for the recommended drill bit size for the mounting hardware. It’s usually slightly smaller than the diameter of the screw threads.
- Drill Carefully: Wearing your safety glasses, drill your pilot holes at each marked spot. Drill straight up into the joist, ensuring the depth is appropriate for your hardware.

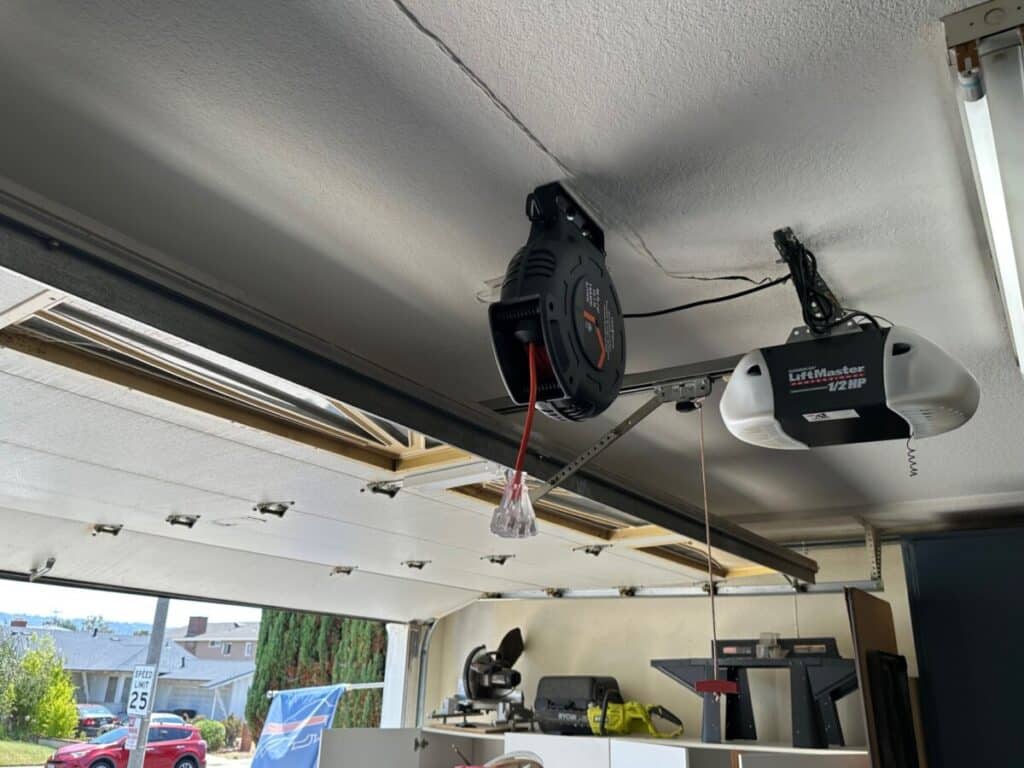
Step 4: Secure the Cord Reel
Now for the main event – attaching your reel!
- Lift and Align: Carefully lift the retractable cord reel back into position, aligning the mounting holes on its bracket with the pilot holes you just drilled.
- Insert and Tighten Hardware: Insert the provided mounting screws or bolts into the pilot holes. Use your socket wrench or adjustable wrench to tighten them down securely. Make sure the reel is absolutely tight against the ceiling and doesn’t wobble or flex. It needs to be rock solid to withstand the repeated pulling and retracting of the cord.
Step 5: Route the Power Cord
With the reel securely mounted, you’ll need to get power to it.
- Plug It In: Plug the power cord from your retractable cord reel into a nearby, accessible electrical outlet.
- Neaten the Cord: To keep your garage tidy and safe, use cable ties or cable management clips to neatly route the power cord along the ceiling joist or down a wall to the outlet. This prevents the power cord itself from dangling or becoming a hazard.
Step 6: Test Your New Cord Reel!
The moment of truth!
- Gentle Pull: Slowly and gently pull the cord out from the reel, extending it to its full length (or close to it). Listen for smooth operation.
- Smooth Retraction: Hold the cord firmly and then allow it to retract. Guide it gently back into the reel to prevent it from whipping. Repeat this a few times to ensure the retraction mechanism is working perfectly.
Congratulations! You’ve just installed your retractable cord reel, bringing organization, convenience, and safety to your garage workspace.
Tips for Maximizing Your Cord Reel’s Life
You’ve just invested in a fantastic upgrade for your garage, and with a little care, your retractable cord reel will serve you well for years to come. Here are some simple tips to keep it operating smoothly and extend its lifespan:
- Don’t Overextend: Most cord reels have a visible red marker or a physical stop indicating the maximum safe extension. Avoid pulling the cord beyond this point. Constantly overstretching can strain the internal spring mechanism and lead to premature wear or damage.
- Guide the Retraction: While the reel is designed to retract automatically, don’t just let go and let it snap back. Hold onto the cord lightly and guide it back into the housing. This prevents the cord from whipping around, which can damage the cord itself, the plug, or even the reel’s internal components over time. It also prevents the plug from hitting you or your car!
- Keep it Clean: Your garage can be a dusty place. Periodically wipe down the cord itself and the exterior casing of the reel with a clean, dry cloth. This prevents grime and debris from accumulating and potentially interfering with the retraction mechanism or damaging the cord insulation.
- Avoid Kinks and Twists: When pulling the cord out or retracting it, try to do so in a straight line whenever possible. Avoid letting the cord twist or kink excessively, as this can lead to internal wire damage over time and make retraction difficult.
- Protect from Extremes: While designed for garage use, extreme temperatures can affect the longevity of the cord and plastic components. If your garage experiences drastic temperature swings (e.g., freezing winters or scorching summers without climate control), keep an eye on the cord and casing for any signs of brittleness or cracking.
- Don’t Overload: Always be mindful of the cord’s gauge (AWG) and the amperage rating of your tools. Using tools that draw more power than the cord is rated for can cause the cord to overheat, trip the built-in circuit breaker, or even damage the reel. Respect the limits!
By following these simple maintenance tips, your retractable cord reel will remain a convenient and reliable power source, keeping your garage tidy and your projects powered for many years to come.
Conclusion
Congratulations! You’ve successfully navigated the process of installing a retractable cord reel ceiling mount in your garage. What might have seemed like a daunting task has hopefully proven to be a straightforward and incredibly rewarding DIY project.
By taking the time to select the right reel, gather your tools, and follow our step-by-step guide, you’ve transformed your garage from a battleground of tangled cords into a highly organized, safer, and much more efficient workspace. No more tripping hazards, no more wasted time untangling knots, and no more searching for an outlet – just convenient power exactly where and when you need it.
Embrace the newfound freedom and functionality your organized garage provides. Now that you’ve mastered this essential upgrade, you’re ready to tackle your next project with ease and confidence.
What are your favorite garage organization hacks? Share them in the comments below!


Leave a Reply