Keeping track of your RV generator’s usage is essential for timely maintenance and efficient performance, but what happens when the hour meter fails? In this guide, we’ll walk you through an easy hour meter replacement to ensure you stay on top of your generator’s maintenance schedule. Whether your old meter stopped working or suffered physical damage, this simple DIY replacement will help you get back on track and keep your RV generator running smoothly. Let’s dive into the steps for a quick and effective hour meter replacement!
Damaged Generator Hour Meter
During the installation of new batteries and solar on my 2021 Jayco Precept 34G RV, I accidently touched two cables and created a spark and this ended up tripping a resettable fuse and apparently damaged my generator hour meter.
As you can see in the photo below, the generator is running, but nothing is being shown on the generator hour meter.
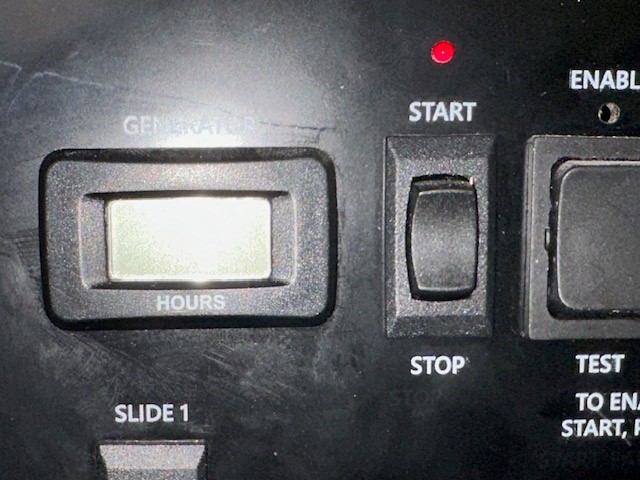
I contacted Jayco support on what my options were to fix this and they indicated that the entire control panel needed to be replaced! There was no way I was going to replace the entire control panel just because the generator hour meter was the damaged component. There needed to be a better solution.
Preparing for Generator Hour Meter Replacement
Before moving forward with the replacement you first need to figure out what replacement part will work. To do this you will need to remove the existing generator hour meter from where it is mounted. In my case this required removing the screws from the control panel so that I could remove it from the wall and get at the hour meter. The existing hour meter just was installed using some tabs. You just need to push in the tabs to remove the hour meter but first you should disconnect the wires.
For my 2021 Jayco Precept 34G, the hour meter used had a sticker with the following characters: “T42A2A2C03 03/2020”.
Once the old hour meter was removed you can then measure it. I measured mine to be about 24 mm x 37 mm. I wasn’t too worried about depth as there was plenty of space so this measurement wasn’t as critical.
You should also take note of the polarity of the wires that were connected to the old hour meter. The old meter didn’t have any markings as to which connector was positive or negative. Using a multimeter you could start the generator and then measure the voltage to determine which wires were positive and which were negative. This is useful when installing the replacement.
Locating Suitable Hour Meter Replacement
Now that you have the measurements it is time to find a replacement. I went to Amazon.com and searched on hour meters and I found the following below. Looking at the description and images it had the same dimensions for the cut out in my control panel. I also liked that it was more old school with numbers that rotated as this allows you to view the hours when the generator wasn’t turned on. The old hour meter only showed the hours when the generator was running.
Generator Hour Meter Replacement Steps
The replacement is really simple. With the old hour meter already removed, the process is to just snap in the new hour meter and connect the wires making sure to observe polarity.
The new hour meter I selected had a little larger face plate which ended up covering up the lower portion of the label “generator” on my control panel, but you could still make out that this was for the generator. This may bother some people, but it will be just fine for my situation.
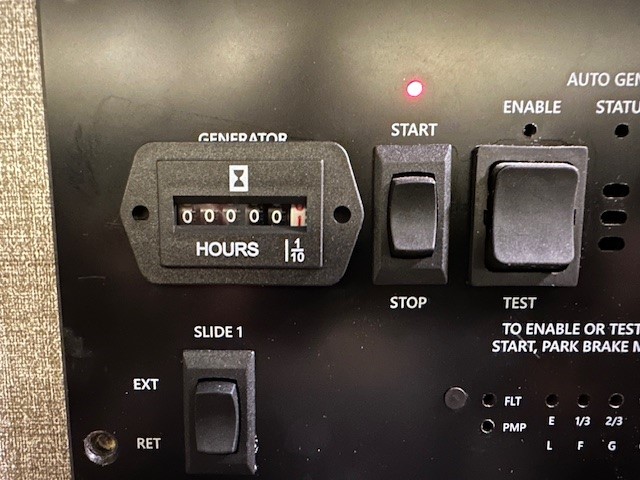
Before finalizing putting back the control panel it would be a good idea to test out the new hour meter. In order to do this step, take a look at the existing reading on the hour meter, turn on your generator and let it run and after a few minutes take a look at the hour meter to make sure that the numbers are advancing.
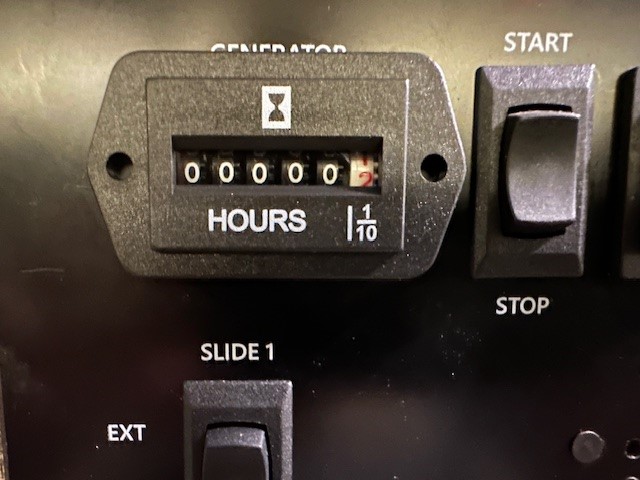
DIY Pro Tip: If you knew how many hours were on your old hour meter and wanted to set your new hour meter to the same value you could hook up your new meter to a power source with same voltage and let it stay connected for that many hours. Depending on how many hours were on your old hour meter this could take multiple days or even longer.
Once you have tested that the old meter is functioning properly it is time for you to put everything back together and clean up!
Conclusion
Replacing a damaged hour meter on your RV generator may seem like a small task, but it plays a crucial role in keeping your generator—and your RV—running smoothly. By following these simple steps for hour meter replacement, you can ensure accurate tracking of generator hours and avoid unexpected maintenance issues down the road. This DIY fix not only saves time and money but also empowers you to handle essential RV upkeep yourself. With your new hour meter in place, you’re all set for worry-free adventures and well-timed maintenance checks. Safe travels, and happy DIYing!




Leave a Reply