

So, you’re ready to embrace the freedom of the open road with your own RV solar power system. That’s a fantastic decision! But before you start drilling holes in your roof and running wires, the most important step is proper RV solar panel planning. Getting the design right from the start ensures your system will be efficient, safe, and powerful enough to keep your batteries charged on all your adventures. In this guide, we’ll walk you through the essential calculations and decisions, using a real-world example with the popular Renogy 100W solar panels and their IP67 50A DC-DC Battery Charger. We’ll show you how to determine the right number of panels for your setup and, more importantly, how to wire them correctly to maximize performance and protect your equipment.
Understanding Your Solar Components
Before we dive into calculations, it’s essential to understand the key specifications of your main components. These numbers act as the guardrails for your entire system, telling you exactly what your equipment can handle. I will use the Renogy components I used in my setup as an example.
- Renogy DC-DC Battery Charger with MPPT: This is the brain of your system. It takes the power from your solar panels and converts it into the correct voltage and current to safely charge your batteries.
- Maximum Output Power: 720 W
- Maximum Open Circuit Voltage (Voc): 50 V
- Maximum Short Circuit Current (Isc): 48 A
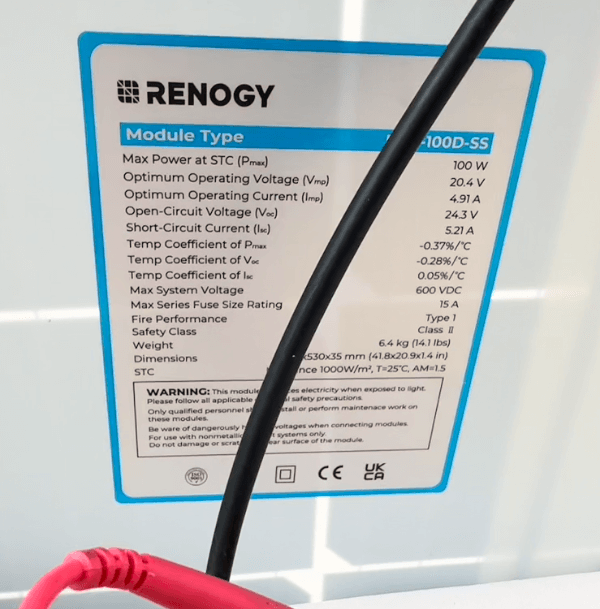
- Renogy RNG-100D-SS Solar Panel: This is the power generator. While the rated numbers are what the panel can produce under ideal conditions, it’s the Voc (Open Circuit Voltage) and Isc (Short Circuit Current) that are most important for planning your solar panel installation and wiring. You can typically find the specifications on a sticker on the underside of the solar panel.
- Rated Power (Pmax): 100 W
- Open Circuit Voltage (Voc): 24.3 V
- Short Circuit Current (Isc): 5.21 A
How Many Solar Panels Do You Need?
I ended up deciding on 6 Renogy RNG-100D-SS panels for my setup. Originally, I was only planning on going with 4 100 W solar panels and this is all I purchased but when I realized I could actually add two more to my setup it was worth the extra investment to mount all 6 at the same time then to find out I wanted more in the future. This was a smart move, as it’s better to have a bit more capacity than you think you need. Here’s why this number works perfectly for my system.
- Initial Power Calculation: Six 100W panels gives me a total of 600 W of power under ideal conditions.
- Checking Your Charger’s Capacity: My Renogy charge controller has a maximum input power of 720 W. Since 600 W is well within this limit, my system can safely handle the full output of all six panels.
So, why go with extra panels if my original plan of 400W is more than enough for many needs? The “more is better” philosophy is crucial for an RV because the real world is rarely “ideal.” Factors like shading from trees or other RVs, the angle of the sun throughout the day, and even panel degradation over time can significantly reduce your actual power output. Having extra capacity means you’ll still be generating good power even on cloudy days, keeping your batteries charged and your electronics running without a hitch.
Wiring Your Solar Panels: Series vs. Parallel vs. Combination
Once you’ve decided how many panels you’re using, the next critical step is figuring out how to connect them. This choice dictates the voltage and current your panels send to your charge controller, and it has a massive impact on your system’s efficiency and safety. Let’s break down the three main wiring configurations.
A. Series Wiring
In a series connection, you link the positive terminal of one panel to the negative terminal of the next, creating a single electrical string.
- How it Works: The voltage of each panel adds up, while the current stays the same.
- Formula:
- Total Voltage: Vtotal=V1+V2+V3…
- Total Current: Itotal=Ipanel
- Advantages:
- Higher Voltage: This is great for an MPPT charge controller, as it operates more efficiently with higher voltage. It also allows you to use thinner, less expensive wiring over longer distances.
- Disadvantages:
- Susceptible to Shading: If even one panel in the string is shaded, the output of the entire string drops dramatically. This is a major concern on an RV roof where you might have vent covers, AC units, antennas, or tree branches casting shadows.
B. Parallel Wiring
In a parallel connection, you connect all the positive terminals together and all the negative terminals together.
- How it Works: The current of each panel adds up, while the voltage stays the same.
- Formula:
- Total Voltage: Vtotal=Vpanel
- Total Current: Itotal=I1+I2+I3…
- Advantages:
- Shading Tolerance: If one panel is shaded, its output drops, but it does not significantly affect the other panels in the circuit. This is a huge benefit for RVers.
- Disadvantages:
- Lower Voltage: The system’s voltage is limited to that of a single panel, which might not be high enough for some MPPT charge controllers to operate efficiently.
- Thicker Wiring: The high current requires thicker, more expensive wiring to prevent power loss and overheating.
C. Series-Parallel Combination Wiring
This configuration combines the two methods: you create multiple series strings and then connect those strings in parallel. This is the most common and often most effective wiring method for multi-panel RV systems.
- How it Works: You get the benefits of both higher voltage (from the series strings) and some shade tolerance (from the parallel strings).
- Formula:
- First, calculate the voltage and current for each series string:
- Vstring=Vpanel×number of panels in series
- Istring=Ipanel
- Then, calculate the total voltage and current for the entire array:
- Vtotal=Vstring (the voltage stays the same across parallel strings)
- Itotal=Istring×number of parallel strings
- First, calculate the voltage and current for each series string:
- Advantages:
- Best of Both Worlds: It allows you to meet the voltage requirements of your MPPT controller while still providing a degree of protection against partial shading.
- Flexibility: This method provides the most options for designing your system.
Applying the Formulas: Wiring Your 6 Renogy Panels to Your Renogy Charge Controller
Now for the most important part: applying these formulas to your specific components to find the optimal wiring configuration. We need to create a plan that keeps the voltage and current within the safe limits of your Renogy 50A MPPT charge controller.
Key Constraints from Your Charge Controller:
- Maximum Open Circuit Voltage (Voc): 50 V
- Maximum Short Circuit Current (Isc): 48 A
- Maximum Power: 720 W
Individual Panel Specs (Reminder):
- Voc: 24.3 V
- Isc: 5.21 A
Let’s look at the three potential ways to wire your six panels and see if they’re a safe fit for your system.
Option 1: Three Strings of 2 Panels in Series, Then Parallel
This is the most likely and recommended configuration.
- Step 1: Calculate for one series string of 2 panels:
- Voltage: Vstring=24.3V×2=48.6V
- Current: Istring=5.21A
- Step 2: Connect the three strings in parallel:
- Total Voltage: Vtotal=48.6V (Voltage stays the same in parallel)
- Total Current: Itotal=5.21A×3=15.63A
Conclusion: This configuration is perfect!
- The 48.6 V is safely below your 50 V max Voc limit.
- The 15.63 A is well below your 48 A max Isc limit.
- The total power of 600 W is well within the 720 W maximum.
- It offers a great balance of voltage for MPPT efficiency and parallel strings for shade tolerance.
Option 2: Six Panels All in Parallel
- Total Voltage: Vtotal=24.3V
- Total Current: Itotal=5.21A×6=31.26A
Conclusion: This is technically safe for your controller’s limits, but it’s not ideal. The 24.3 V is too low for your MPPT charge controller to operate at its peak efficiency, especially on cooler days. It’s safe, but not optimal.
Option 3: Six Panels All in Series
- Total Voltage: Vtotal=24.3V×6=145.8V
- Total Current: Itotal=5.21A
Conclusion: This is a definitive no-go! The 145.8 V hugely exceeds your 50 V max Voc limit and would instantly damage or destroy your charge controller. This is why these calculations are so important.
Final Recommendations for Your RV Solar Setup
Based on your components and our calculations, the recommended and safest wiring configuration for your 6 Renogy 100W panels with the Renogy 50A DC-DC MPPT charger is:
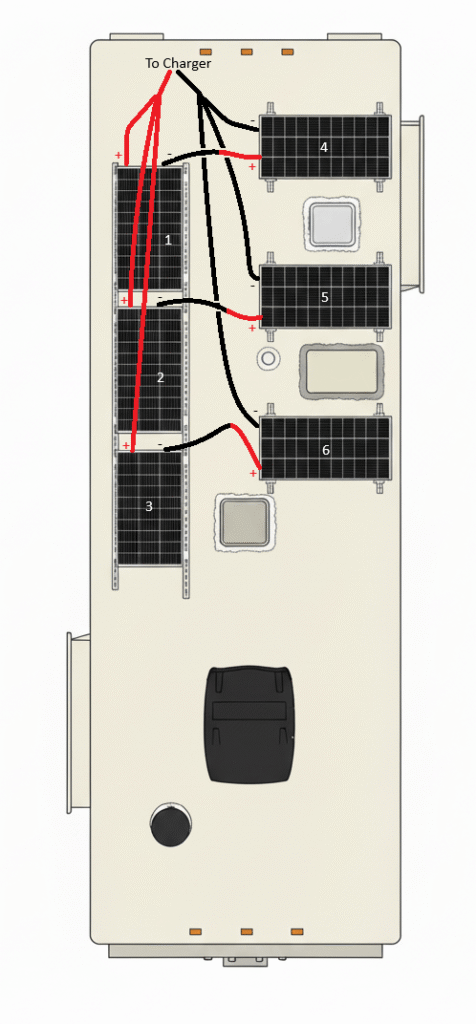
- Three parallel strings, with each string containing two panels wired in series.
The following diagram shows my setup on my 2021 Jacyco Precept 34G. I wired in series solar panels #1 and #4, #2 and #5, and #3 and #6. To wire them in series I connected the – wire from one solar panel to the + wire on another solar panel. I then connected the remaining + wires together and the remaining – wires together to connect the sets of 2 panels in series.
This setup provides:
- Safe Operating Voltage: The total Voc of 48.6 V is well within your charge controller’s 50 V limit. This ensures you won’t risk damaging your equipment and that your MPPT will operate in its most efficient range.
- Sufficient Current: The total Isc of 15.63 A is well below the 48 A limit. This leaves plenty of headroom for any short spikes and ensures all the power gets safely to your battery.
- Maximum Power Potential: Your system’s total power is 600 W, which is perfect for your 720 W charge controller. This leaves you with a little extra capacity for optimal performance.
- Improved Shade Tolerance: While a shadow on one panel will still affect its series partner, the other two parallel strings will continue to produce power unaffected. This is a huge advantage over a single series string, where a small shadow could cripple your entire system.
Get Ready to Go Solar!
With your system planned, you’re ready to start your solar installation. You’ve chosen the right number of panels and, most importantly, you have a solid wiring plan that ensures your system will work safely and efficiently. The time you spent on RV solar panel planning will pay off with a reliable source of power for all your off-grid adventures. Happy travels!


Leave a Reply