

Imagine the sudden, deafening thwack-thwack-thwack of an RV tire blowout while cruising down the highway. A tire failure on a heavy vehicle isn’t just a hassle; it can cause thousands of dollars in body damage, ruin your schedule, and create a serious safety hazard. This is precisely why a proper RV TPMS Installation is the single most crucial safety and maintenance upgrade you can perform on your rig. Unlike passenger cars, RVs and trailers have unique vulnerabilities: they carry immense, sustained loads, often run on tandem axles (where one flat can go unnoticed for miles), and their tires may sit idle for months at a time. This combination makes them uniquely susceptible to the subtle changes in pressure or temperature that signal impending failure. A Tire Pressure Monitoring System (TPMS) eliminates the guesswork, giving you real-time data on both tire pressure and temperature. In this complete DIY guide, we’ll walk you through selecting the perfect aftermarket system and installing it on your RV, motorhome, or towable trailer, ensuring safety and peace of mind on every journey.
Understanding RV TPMS Options
Before you start your RV TPMS installation, selecting the right hardware is essential. A system designed for a passenger car simply won’t cut it for a heavy trailer, fifth wheel, or motorhome. RV tires operate at higher pressures, require more monitoring points, and the sheer length of the rig demands a stronger signal solution. Here’s what you need to look for to ensure your system can handle the demands of the road.
Non-Negotiable Features for Heavy Rigs
When shopping, prioritize three main specifications:
- High-Pressure Capacity: Many RV and commercial tires require 80 PSI, 100 PSI, or even more. Ensure the system you select can comfortably handle pressures of at least 140 PSI. Trying to use a low-capacity passenger car TPMS on an RV will result in inaccurate readings and damage to the sensors.
- Adequate Tire Count: Whether you have a truck, a fifth wheel, or a Class A motorhome, you need a system that can track all your tires, often six, eight, or more. Look for systems that can expand to 10, 12, or even 18 sensors, especially if you plan on adding a tow dolly or tow vehicle to your setup later.
- Temperature Monitoring: Pressure alerts are good, but temperature alerts are often the first sign of disaster. Excessive heat usually means a bearing is failing, a brake is dragging, or the tire is severely overloaded, leading directly to a blowout. A quality RV TPMS will alert you to high temperatures immediately.
Choosing Your Sensor Type: External vs. Flow-Through
The biggest decision you’ll make is how the sensors attach to your valve stems:
- Cap Sensors (External): These are the simplest to install, screwing directly onto your existing valve stem like a regular valve cap. They are lightweight and easy to swap between tires. However, they must be unscrewed every time you need to add air, and on heavy-duty applications, they require metal valve stems to prevent the centrifugal force from tearing off the rubber ones.
- Flow-Through Sensors (External): These are larger and heavier, but they include a pass-through chamber that allows you to add air to the tire without removing the sensor. This convenience is a massive time-saver at the gas station. If you choose this type, verify that your RV has sturdy, high-quality metal or brass valve stems, as the heavier sensor weight (1−2 ounces each) can damage standard rubber valve stems at highway speeds.
The Repeater/Booster: Bridging the Distance
The distance between the back axle of a 40-foot fifth wheel and the cab monitor of the tow truck can easily exceed 60 feet. When you factor in the signal interference from metal frames and water tanks, a standard Bluetooth signal simply won’t make it reliably.
This is where a signal repeater or booster comes in. This small, weatherproof box is typically wired into the 12V power system of the RV or trailer. Its job is to capture the weak signals from the rear sensors and transmit them strongly to the monitor in your cab. Placement is key: Mount the repeater roughly halfway down the length of the trailer (or near the front hitch) to ensure maximum signal coverage and consistency.
My Selection for my 2021 Jayco Precept 34G
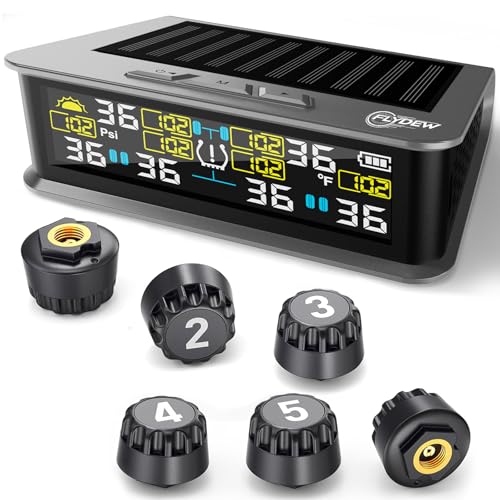
For my class A motorhome with 6 tires I selected the following product. The price was right, it listed it could go to 144 PSI which was above what my tires were rated for, and it had 6 sensors.
Step-by-Step Installation Guide
The actual installation process is straightforward, requiring no special tools beyond basic electrical knowledge (for the repeater) and a tire pressure gauge.
DIY Pro Tip: Always work on tires when they are cool and before the RV is loaded for travel.
Step 1: Prep the Monitor and Plan Your Layout
Before attaching anything to your wheels, set up your display monitor.
- Charge and Configure: Plug the monitor unit into its charger and turn it on. Familiarize yourself with the menus for setting tire positions and alarm parameters (you’ll set the exact alarm values in Section IV).
- Mount the Display: Mount the display unit in the cab of your tow vehicle (or motorhome) using the provided suction cup or dash mount. Choose a spot that ensures clear visibility without obstructing your view of the road. Ensure it has easy access to its charger, especially if you plan on long travel days.
- Crucial Tip: Use a piece of masking tape to label each sensor with its intended position (e.g., “Left Rear Outer,” “Tandem Right Inner”). This prevents confusion during the pairing process.
I was able to mount the display monitor just above the steering wheel just below dash using some double-sided tape and then route the USB cable under the dash and plug it into an available USB outlet.
Step 2: Install the Signal Repeater (If Needed)
If you have a long trailer (25 feet or more) or a fifth wheel, you need a repeater to ensure reliable signal transmission.
- Choose a Spot: Select a weatherproof location roughly halfway down the length of the RV or near the front trailer hitch. The ideal spot is mounted high and clear of large metal obstructions like propane tanks or generators.
- Wire the 12V Power: The repeater needs constant 12V power. The easiest method is often wiring it directly to a lighting circuit (like a marker light) or the 12V hot lead from your trailer battery, ensuring you use an in-line fuse. If you wire it to a light, remember the light must be on for the repeater to work! A dedicated 12V source is best.
- Secure: Use screws, 3M VHB tape, or zip ties to securely fasten the repeater unit and run the wiring neatly.
For my setup I did not need a signal repeater.
Step 3: Program Sensors to the Monitor
Before they go on the tire, the monitor must know which sensor belongs to which tire location.
- Pairing Process: Following your system’s instructions (usually a “learn” or “pairing” mode), associate each sensor’s unique ID with the position you determined in Step 1.
- Double-Check: After programming, physically place the sensors near their correct wheel positions to confirm the monitor is displaying the correct ID for the right spot.
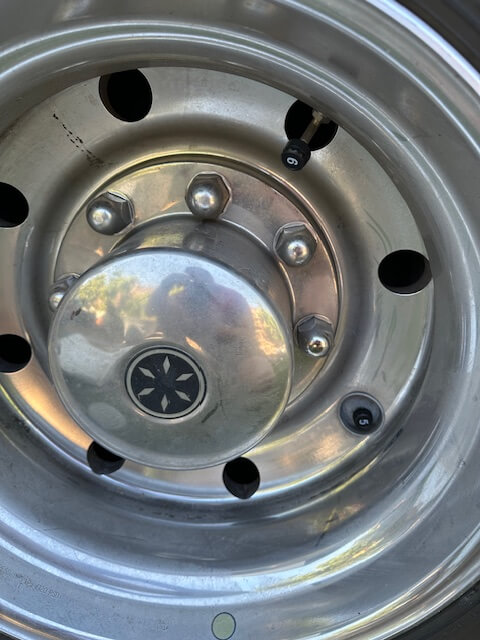
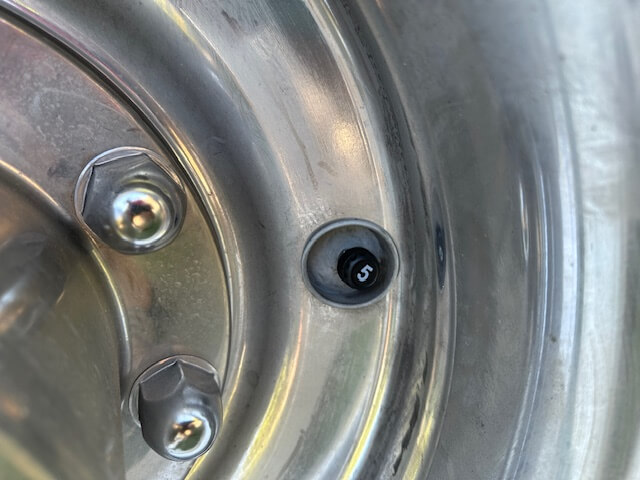
My system already had the sensors paired and labeled with numbers 1 – 6. I just needed to install them in the proper order.
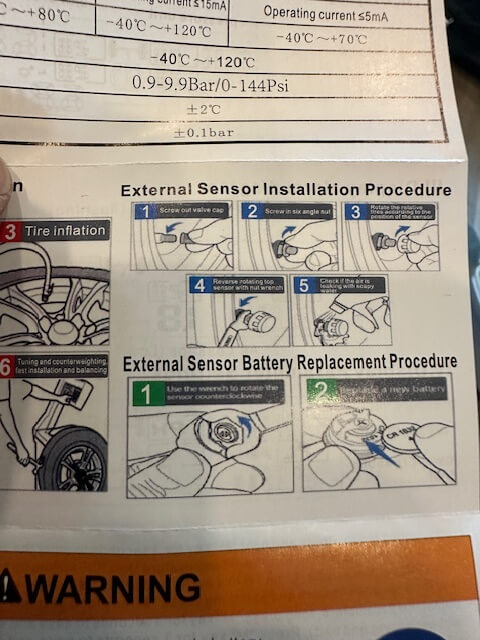
Step 4: Install the Sensors on the Tires
This is the final, hands-on step.
- Safety First: Ensure the tires are cool. Check the current pressure with a calibrated mechanical gauge.
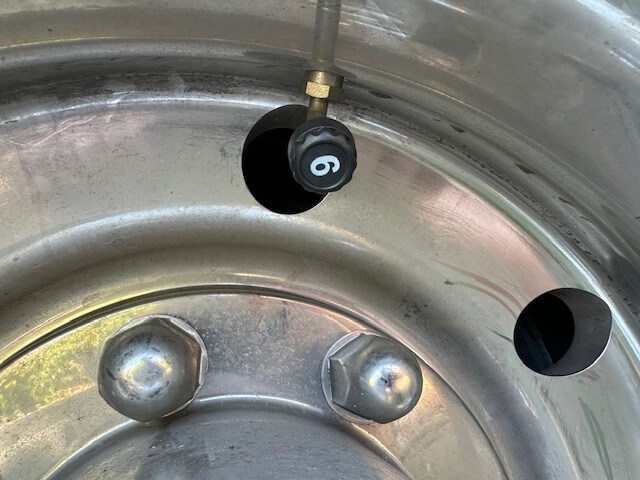
- The Pro Tip: Before screwing on the sensors, apply a small dab of anti-seize compound (available at any auto parts store) to the valve stem threads. This prevents dissimilar metals from fusing together over time, making future removal much easier.
- Install: Screw the sensor onto the valve stem. If your system uses anti-theft nuts, slide the nut onto the stem first, then screw on the sensor, and finally, tighten the anti-theft nut up against the sensor using the provided wrench. This simple step prevents the sensor from being unscrewed without the specialized tool.
- Recheck Pressure: After installing the sensors, use your mechanical gauge to confirm the pressure is still at the target cold inflation pressure. The TPMS reading should match the gauge reading.
Calibration, Testing, and Setting Baseline Alarms
Your TPMS sensors are installed, but the system isn’t truly set until you customize the alarm parameters to your RV’s specific needs. Setting the correct thresholds is essential to avoid false warnings while guaranteeing alerts for genuinely dangerous conditions.
Setting Baseline Pressures and Alarms
The key to proper calibration is knowing your Cold Inflation Pressure (CIP). This is the pressure required when the tires are cold (before driving) to safely carry the weight of your fully loaded RV. Do not use the max pressure stamped on the tire sidewall; consult your RV manufacturer’s placard or a tire load inflation chart.
- Establish CIP: Pump your tires up to the correct CIP (e.g., 100 PSI). This number will be your baseline. Check your RV for the proper inflation pressure.
- Set Low-Pressure Alarm: Set the low limit to 15 to 25% below your CIP. For example, if your CIP is 100 PSI, a low alarm set at 80 PSI (20% drop) provides a safety buffer. Any drop greater than this indicates a significant leak or failure.
- Set High-Pressure Alarm: Set the high limit to 20 to 25% above your CIP. When tires heat up from driving, pressure naturally increases. Setting the alarm at 120 PSI (20% increase from 100 PSI) prevents alerts from normal road friction while still catching dangerous over-inflation events.
- Set Temperature Alarm: Set this alarm to approximately 158∘F (70∘C). While RV tires are built to withstand higher heat, an immediate alarm at this temperature indicates a major issue—such as a seized wheel bearing or dragging brake—that needs immediate attention, long before a blowout occurs.
Road Testing and Final Checks
You must confirm that your monitor is not only receiving data but doing so reliably at highway speed and maximum distance.
- The Test Drive: Take your RV (with the trailer attached, if applicable) for a minimum 30-minute drive on the highway.
- Monitor Signal Stability: Watch the display closely. All tires should show consistent pressure updates. Look for any tires that flash “NO SIGNAL” or drop out for extended periods. If this happens, your repeater needs adjustment or re-siting.
- Verify Alarm Function (Optional): If you want to be 100% certain, use a valve core tool to temporarily drop the pressure in one tire below your low threshold (80 PSI in our example) while the RV is stationary. The monitor should immediately trigger an audible and visual alarm. Remember to immediately re-inflate the tire to the correct CIP afterward.
Final Security Checklist
- Secure Anti-Theft Nuts: Ensure the anti-theft nuts (if used) are tightly secured against the sensor bodies.
- Repeater Power: If you wired the repeater to a keyed power source, verify that it powers down when the ignition is off, or if wired directly to the battery, ensure it has its own power switch to prevent battery drain during long storage.
- Monitor Charging: Confirm the monitor is charging correctly in its dash mount location.
Conclusion: Peace of Mind on the Road
Installing an RV TPMS isn’t just about adding another gadget to your dashboard; it’s a foundational upgrade to your overall safety and a smart investment in your rig’s longevity. By following this complete DIY guide, you’ve eliminated the primary unknown on the road: the condition of your tires. You’ve established real-time monitoring that will save you time, money, and stress by preventing dangerous blowouts. Beyond the immediate safety benefit, properly inflated tires—monitored constantly by your new system—will ensure you maximize your fuel economy and extend the life of your expensive RV rubber. This project is a simple, high-impact DIY win that delivers peace of mind, allowing you to focus on the journey and the destination, not what’s happening behind you. Now that you’ve secured your RV with this critical technology, you’re ready to roll with confidence.


Leave a Reply