
First impressions count, and when it comes to your home, your curb appeal sets the tone. The exterior of your house, from the landscaping to the front door, says a lot about your style and attention to detail. Often, it’s the little things that make a big difference, and one of those often-overlooked details is your house numbers on the curb. Repainting house numbers on the curb may seem like a small project, but it can have a significant impact on the overall look and feel of your home’s exterior. In this step-by-step guide, we’ll show you how to revamp your home’s entrance by giving those house numbers a fresh, eye-catching makeover.
Materials and Tools
Before you embark on repainting your house numbers on the curb, it’s essential to gather the right materials and tools.
Here’s a checklist of what you’ll need to get started:
Materials:
- Outdoor Paint: Choose a high-quality outdoor paint that’s suitable for concrete or asphalt surfaces. Acrylic or enamel paints are commonly used for this purpose. Consider selecting a paint color that complements your home’s exterior. A great choice is to consider using spray paint as this will make the project go along quickly. I was able to find cans of white and black spray paint I already had on hand.
- Primer (optional): Depending on the condition of your curb and the type of paint you’re using, you may need a concrete primer. This will help the paint adhere better and ensure a longer-lasting finish.
- Painter’s Tape: Get good-quality painter’s tape to mark off the area around the house numbers and create clean lines.
- Paintbrushes and Rollers (optional): Have a variety of paintbrushes and rollers on hand, including small brushes for detail work and larger ones for covering larger areas. These are not needed if using spray paint.
- Drop Cloths or Plastic Sheeting (optional): Protect the surrounding area from paint splatter by laying down drop cloths or plastic sheeting. I did not need these when using spray paint.
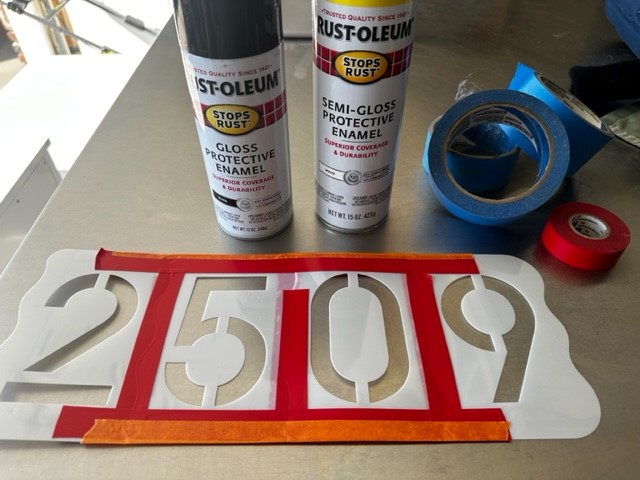
- Stencils: You can either make or purchase stencils to aid in painting the house numbers on the curb. The following is the stencil set I used: Curb Stencil Kit for Address Painting, All Numbers – 14 Mil Mylar Plastic

Tools:
- Wire Brush or Scraper: Use a wire brush or scraper to remove any loose or peeling paint from the existing house numbers and the surrounding area.
- Cleaning Supplies: You’ll need a bucket of soapy water and a stiff-bristle brush to thoroughly clean the curb and numbers. This ensures proper adhesion of the paint.
- Sandpaper: If the curb is rough or uneven, you may need sandpaper to smooth the surface before painting.
- Measuring Tape and Level: To ensure that your new house numbers are aligned correctly and evenly spaced, a measuring tape and level are essential.
- Safety Gear: Don’t forget safety goggles, gloves, and a mask to protect yourself from any fumes or dust during the project.
- Rags and Paper Towels: Keep rags and paper towels handy for cleaning up spills and for touch-up work.
- Sealer (Optional): If you want to give your painted numbers added protection, consider an outdoor sealer. It can help preserve the paint and keep it looking fresh for longer.
Preparing for the Project
Before you start repainting your house numbers on the curb, taking the time to prepare and plan is essential. Proper preparation ensures a smoother and more successful project. Here are some key steps to get you ready:
1. Safety First
Always prioritize safety. Wear safety goggles to protect your eyes from paint splatters, gloves to shield your hands, and a mask to prevent inhaling fumes or dust during the project. If you’re working in a well-ventilated area, ensure good airflow.
2. Cleaning the Curb
Begin by thoroughly cleaning the curb and the old house numbers. Use a bucket of soapy water and a stiff-bristle brush to remove dirt, grime, and loose paint. Cleanliness is crucial for the paint to adhere properly. Rinse the area and let it dry completely before moving on.
3. Choosing the Right Paint
Select a high-quality outdoor paint suitable for concrete or asphalt surfaces. Acrylic or enamel paints are popular choices. Consider the color carefully, as it should complement your home’s exterior. If the curb is in poor condition, you may also need a concrete primer to ensure better paint adhesion. In our neighborhood all the house numbers are black on a white background so I used the same colors to be consistent.
4. Planning and Layout
Measure the area where the numbers will be placed, ensuring they are evenly spaced and at the correct height. Use a measuring tape and a level to mark the positions accurately. Additionally, use painter’s tape to outline the area around the house numbers. This will help create clean lines and prevent any accidental paint smudges.
5. Taping Off the Area
Carefully apply painter’s tape along the marked lines, ensuring it adheres firmly. This tape will serve as a stencil to guide your painting and maintain neat edges. Be meticulous with this step to achieve professional-looking results.
With these preparatory steps completed, you’re now ready to move on to the actual repainting process. Taking the time to prepare will make the project smoother and more satisfying in the end.
Step-by-Step Guide to Repainting House Numbers
Now that you’ve prepared and gathered your materials, it’s time to get started on repainting your house numbers on the curb. Follow this step-by-step guide for a successful and visually appealing outcome:
Step 1: Taping Off the Area
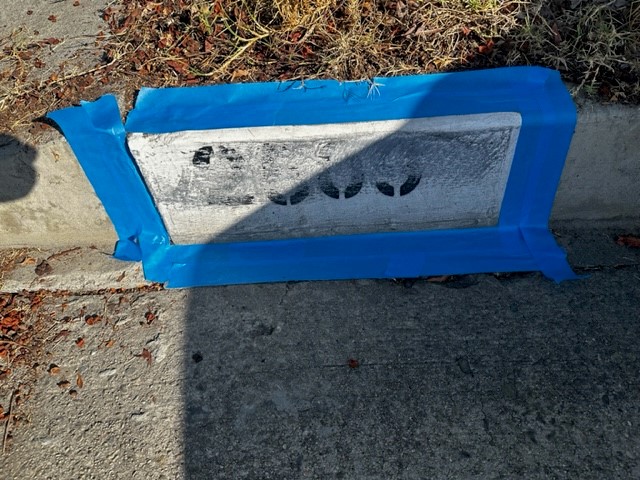
- Use painters tape to mark the background area. Make sure you use enough to protect surrounding area. Lay down drop cloths or plastic sheeting to safeguard against accidental spills.
Step 3: Priming the Surface
- If your curb is in poor condition or has never been painted before, consider applying a concrete primer. This will help the paint adhere better and ensure a longer-lasting finish.
- Follow the manufacturer’s instructions for the primer, including drying times. Ensure the primer is completely dry before moving on to the next step.
Step 4: Painting the Background
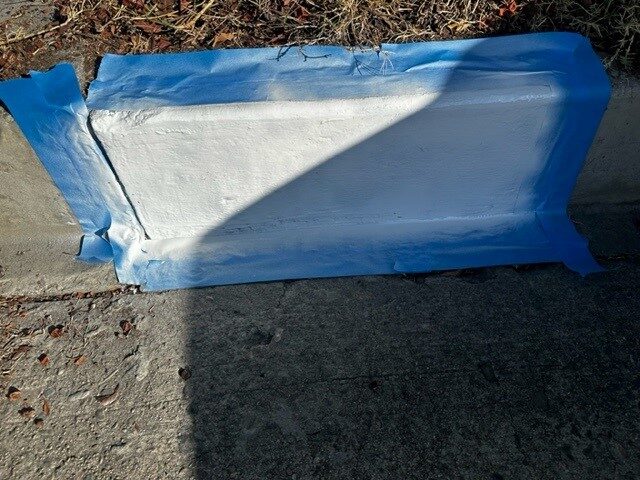
- With your curb and numbers prepped and the primer dry, it’s time to start painting the background area. You can either use spray paint or a brush/roller.
- Apply a thin, even coat of paint. If necessary, apply a second coat after the first one dries to achieve the desired color and coverage.
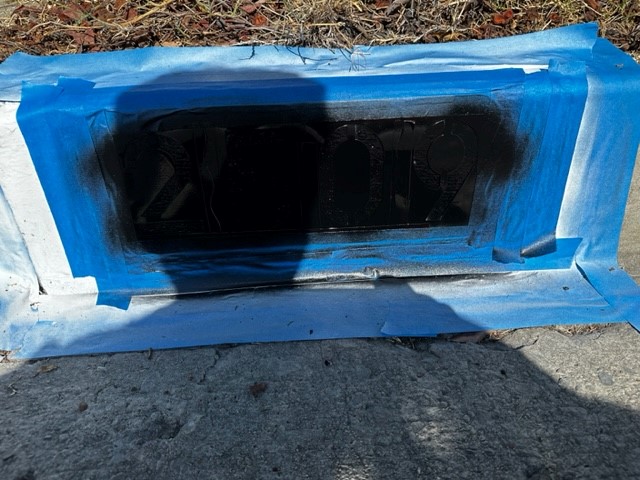
Step 5: Installing the Stencils
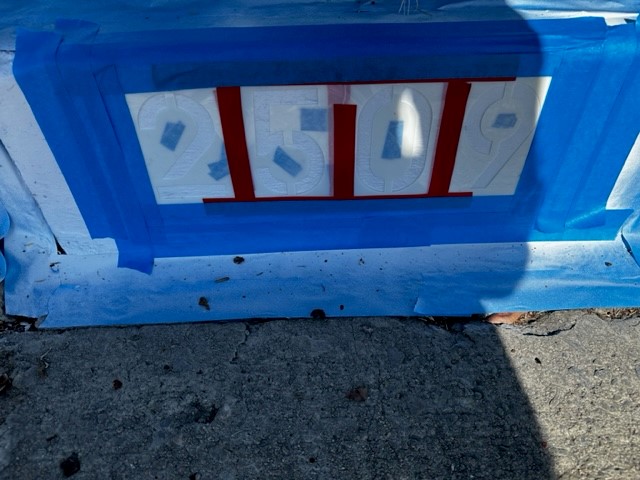
- After the background paint has been allowed to dry, it is now time to install the stencils.
- If you are using a stencil kit like I did, you will then need to connect the individual numbers together to match your house number. You can use painters tape or other suitable tape to do this step. I had some electrical tape on hand that was easier to use in between the numbers.
- You will then need to tape the stencil in place on the curb. You can use a level to make sure they are aligned properly. You can use painters tape to attach the stencil to the curb. In my case I also used some tape behind the stencil doubled over to keep the numbers securely against the curb (you can see the tape through the stencil in the above photo).
- Apply a thin, even coat of paint. If necessary, apply a second coat after the first one dries to achieve the desired color and coverage.
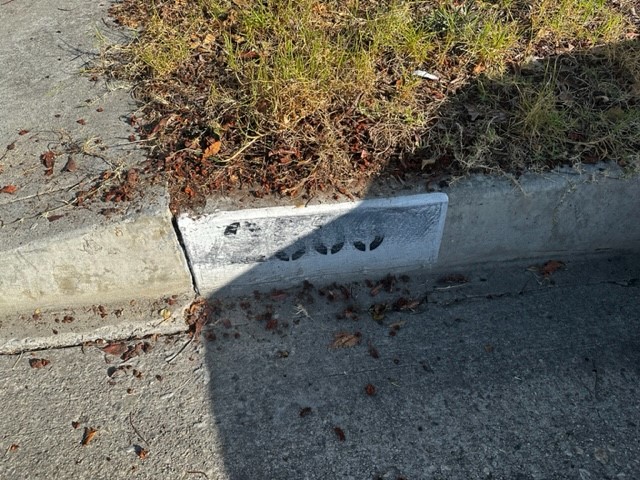
Step 6: Adding a Finishing Touch
- Once the paint is dry, carefully remove the painter’s tape and any additional tape used to protect the surrounding area.
- Inspect your work for any imperfections or areas that may need touch-up. Use small brushes and paint as needed to refine the numbers’ appearance.
- If you want to provide extra protection and longevity to your newly painted numbers, consider applying an outdoor sealer following the manufacturer’s instructions.
Tips and Tricks
Repainting your house numbers on the curb can be a straightforward project, but a few tips and tricks can help you achieve the best results and ensure the longevity of your work. Consider the following advice:
1. Troubleshooting Common Issues
- Uneven Surface: If your curb has a rough or uneven surface, sand it down before painting. This will help create a smoother finish.
- Drips and Runs: To prevent drips and runs while painting, use light, even strokes. Don’t overload your brush or roller with too much paint.
- Choosing the Right Paint: Ensure the paint you choose is specifically designed for outdoor use and suitable for concrete or asphalt surfaces.
2. Maintenance and Longevity
- Regular Cleaning: Keep your house numbers and the surrounding area clean by periodically washing them with mild soap and water. This will help maintain the paint’s vibrancy.
- Touch-Ups: Over time, your paint may wear or become chipped. Keep a small amount of paint in storage for touch-ups as needed to keep your numbers looking fresh.
- Outdoor Sealer: Consider applying an outdoor sealer over your painted numbers to provide an extra layer of protection. Reapply the sealer as recommended by the manufacturer.
3. Creative Design Ideas
- Color Contrast: Experiment with paint colors that contrast with your home’s exterior for a visually striking effect.
- Stencils and Designs: Get creative by using stencils or adding decorative elements around your house numbers to make them stand out.
- Glow-in-the-Dark Paint: For added visibility, use glow-in-the-dark paint for your house numbers. They’ll be easier to see at night, enhancing both aesthetics and safety.
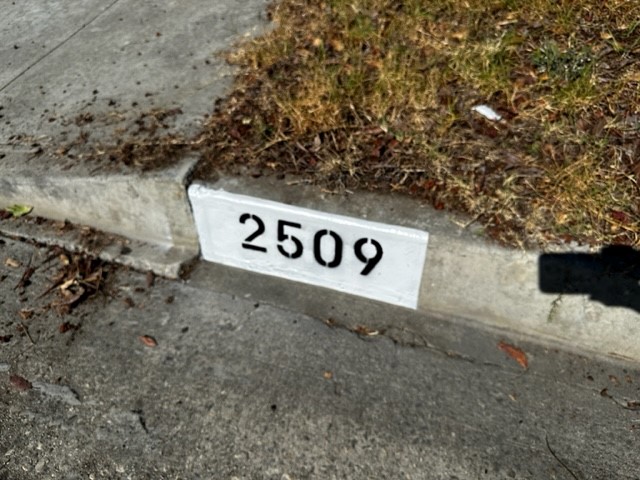
Showcasing the Results
My results turned out great and didn’t take too much time at all. I had all the tools and equipment on hand for this project except for the stencils that I ordered off of Amazon.
Conclusion
Repainting your house numbers on the curb may seem like a small project, but its impact on your home’s curb appeal is significant. As the saying goes, “first impressions matter,” and your home’s exterior is the first thing guests and passersby see. By giving your house numbers a fresh coat of paint, you’re not only enhancing the aesthetics of your curb but also making your home more inviting.
Throughout this guide, we’ve taken you through the essential steps, from preparation and planning to the actual painting process. We’ve shared tips and tricks to help you troubleshoot common issues, maintain the appearance of your house numbers, and even get creative with your design.
As you embark on this DIY journey, remember that it’s not just about beautifying your curb; it’s about expressing your personal style and attention to detail. Whether you opt for a classic, timeless look or decide to get creative and add unique elements, the result will be a more appealing and distinctive entrance to your home.
So, gather your materials, follow the steps, and transform your curb. Your house numbers are more than just a practical necessity; they’re a reflection of your pride in your home. Take the time to make them shine, and watch as your home’s curb appeal receives a well-deserved boost.
We hope this guide has been helpful, and we encourage you to embark on this DIY project with enthusiasm. It’s a simple yet gratifying way to make your home’s exterior a true standout in your neighborhood. Enjoy the process, and let your freshly repainted house numbers make a lasting impression!


Leave a Reply