
Facing an F1E9 error on your KitchenAid dishwasher can be frustrating. While the code points to a drainage problem, a properly draining appliance often means the real culprit is a faulty electronic control board. Rather than spending a small fortune on a technician, I decided to take on the repair myself. This guide will walk you through my successful KitchenAid dishwasher control board replacement on model KDPM604KPS0, proving that you can save money and get your machine running perfectly again with just a few basic tools and a little confidence.
Troubleshooting the F1E9 Error
Before jumping into a major repair like replacing the control board, it’s crucial to rule out other common issues first. The F1E9 error code specifically indicates a drainage problem, and a faulty control board is often the last resort after checking the more obvious culprits. Here’s a look at the troubleshooting steps I took to confirm that the control board was the root of the issue.
- Check the Drain Hose and Garbage Disposal: I first verified that the dishwasher’s drain hose wasn’t kinked, clogged, or otherwise blocked. I also checked my garbage disposal to ensure it was clear, as a backed-up disposal can prevent the dishwasher from draining properly. Both were completely free of any blockages.
- Inspect the Float Valve: The float valve is a small plastic component at the bottom of the tub that rises with the water level. It tells the control board when the tub is full to prevent overfilling. I checked to make sure the float was not stuck or obstructed and that it could move freely. A stuck float could prevent the cycle from progressing correctly.
- Verify the Drain Cycle: To be certain the pump was working, I manually added a few gallons of water to the dishwasher tub. I then ran a “drain only” cycle. The dishwasher emptied the tub completely and efficiently, confirming that the drain pump itself was functioning as it should.
- Inspect the Water Inlet and Turbidity Sensor: While not directly tied to drainage, a dirty water inlet can sometimes cause problems, so I checked and cleaned mine out. I also read that a faulty turbidity sensor could sometimes trigger an error, so I replaced it. Unfortunately, even with a new sensor, the F1E9 error persisted, leading me to believe the issue was electrical rather than mechanical.
- Check the Water Inlet Valve and Water Pressure: While the F1E9 error is about drainage, a dishwasher that isn’t getting enough water can sometimes cause unexpected cycle issues. I checked the water supply line and the water inlet valve to ensure the dishwasher was receiving adequate water pressure to fill properly. A slow fill could potentially trigger an error, so it’s a good step to rule out.
After ruling out all of these common problems, it became clear that the F1E9 error wasn’t due to a physical blockage or a failing part—it was a communication issue. All signs pointed to the “brain” of the dishwasher, the electronic control board, as the final and most likely source of the problem. This confirmed my decision to proceed with the control board replacement.
Tools and Parts You’ll Need
Before you start, make sure you have everything on hand to avoid interruptions. The entire process is fairly straightforward, but having the right equipment will make it go smoothly. Here’s what you’ll need:
- Replacement Control Board: This is the most important part. Ensure you have the correct Whirlpool dishwasher electronic control board for your KitchenAid model KDPM604KPS0. Double-checking the part number before you begin will save you a lot of frustration.
- Phillips Head Screwdriver: This is your primary tool for removing the screws that hold the dishwasher door panels together.
- Nut Driver or Socket Set: You might need this for any specific bolts, but a screwdriver is usually sufficient.
- Pliers: These can be helpful for gripping and disconnecting any stubborn wire harnesses.
- A Towel or Rag: Keep this handy to protect your floor and catch any drips or minor spills.
- A Small Container: A simple cup or bowl is perfect for holding all the screws you remove, preventing them from getting lost during the process.
- A Smartphone or Camera: This is a crucial “tool” for taking photos of the wiring before you disconnect anything. Trust me, you’ll want a visual reference to reconnect everything correctly.

Step-by-Step Replacement Guide
Step 1: Safety First
Before you do anything else, you must disconnect the power to your dishwasher. This is the most important step to ensure your safety. Go to your home’s circuit breaker box and flip the breaker for the kitchen to the “off” position. To be absolutely sure the power is off, try to turn the dishwasher on—nothing should happen.
Step 2: Access the Control Board
The control board is located inside the dishwasher door. To access it, you’ll need to separate the inner and outer door panels.
- Open the dishwasher door completely and locate the screws around the inner edge of the door.
- Using your Phillips head screwdriver, carefully remove all of these screws. Keep them in your small container so they don’t get lost.
- Once the screws are out, gently pull the outer door panel away from the inner panel. The wiring harnesses are still connected, so don’t pull too hard or you might damage them.


Step 3: Disconnect the Old Control Board
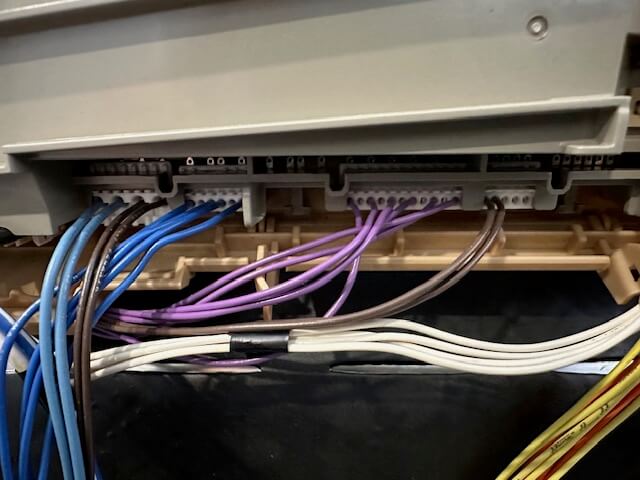
This is where your camera comes in handy. You’ll want to document the wiring so you can reconnect everything correctly.
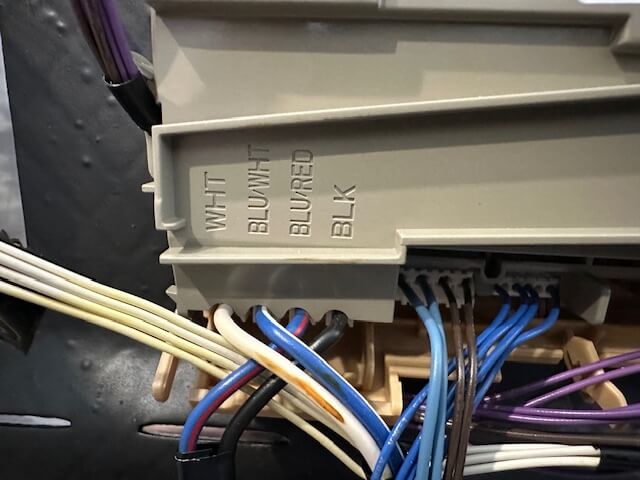
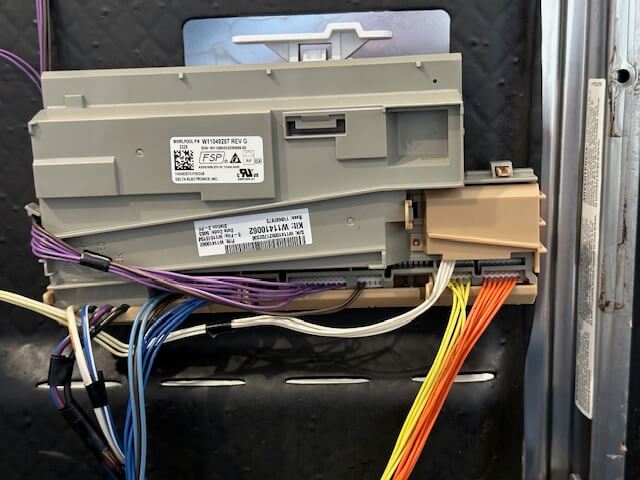
- Before you unplug anything, take a few clear, close-up photos of how all the wiring harnesses connect to the old control board. There were a few access doors you needed to open by pushing in on the tabs that kept them secured.
- One by one, carefully unplug each wiring harness from the board. They may have small clips you need to press to release them.
- Once all the wires are disconnected, you can unclip the old board from its housing and remove it. You need to press the clip and slide the control board up.
Step 4: Install the New Control Board
Now it’s time to install the new board and reconnect all the wires.
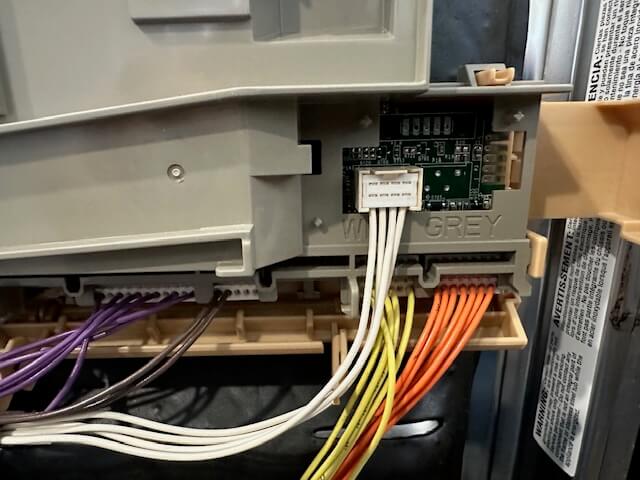
- Secure the new Whirlpool dishwasher electronic control board into the housing. It should fit perfectly into the same spot where the old one was.
- Using the photos you took, carefully plug each wiring harness back into the new board. Ensure each connection is snug and secure. The Whirlpool dishwasher electronic control board was very well labeled as to where the various colored wires connect.
Step 5: Reassemble and Test
You’re almost done! All that’s left is to put everything back together and see if the repair was a success.
- Align the outer and inner door panels and carefully screw them back together.
- Once everything is secure, go back to your circuit breaker box and restore power to the dishwasher.
- Turn the dishwasher on and run a test cycle. If the F1E9 error is gone and the cycle runs without a hitch, congratulations! You’ve successfully completed the repair.
DIY Pro Tip: Before pushing the dishwasher fully back into the cabinet, I left it out and ran the water line through the sink cabinet door so that I could test a few cycles and watch the water draining and filling through the water inlet. This saved having to pull the entire unit back out if there was still an issue.
Conclusion
Congratulations! You’ve successfully navigated the KitchenAid dishwasher control board replacement and solved the frustrating F1E9 error. By taking on this DIY project, you not only saved a significant amount of money that would have been spent on a professional repair technician, but you also gained the satisfaction of fixing the appliance yourself.
It’s a powerful reminder that with a little patience and the right guidance, many appliance issues can be resolved without a costly service call. Go ahead and enjoy your working dishwasher—and the extra cash in your pocket!


Leave a Reply