In this comprehensive guide, I will show you how to efficiently empty your RV tanks without the need for a dump station. By utilizing a macerator, a handy tool that grinds waste into smaller particles, you can easily dispose of your RV’s waste at home. Follow these simple steps on how to use the macerator method to make the process quick, clean, and hassle-free.
How does a RV Macerator pump work?
An RV macerator pump is a crucial tool for efficiently emptying wastewater tanks at home. It works by utilizing a combination of cutting blades, impellers, and a powerful motor to break down solid waste and facilitate the smooth transfer of wastewater from your RV’s holding tanks to a sewage or septic system. Let’s dive into the inner workings of an RV macerator pump to better understand how it accomplishes this task.
1. Cutting blades
At the heart of an RV macerator pump are specially designed cutting blades. These blades are strategically positioned within the pump chamber to effectively shred solid waste, toilet paper, and other debris present in the RV’s holding tanks. As wastewater enters the pump, these blades finely chop the solid materials into smaller particles, making it easier for the pump to handle and transport them through the plumbing system.
2. Impeller mechanism
Adjacent to the cutting blades, an impeller mechanism plays a crucial role in moving the macerated waste through the pump and into the connected hose or pipe. The impeller consists of rotating vanes that create a strong centrifugal force, propelling the macerated wastewater forward. The combination of the cutting blades and the impeller ensures that the waste is broken down into manageable pieces and effectively transported through the pump system.
3. High-powered motor
To drive the cutting blades and impeller, an RV macerator pump is equipped with a high-powered electric motor. This motor provides the necessary torque and rotational speed to enable the cutting and pumping actions. The power of the motor contributes to the pump’s ability to handle even tough waste materials efficiently.
4. Hose or pipe connection
The macerated wastewater is then directed through a hose or pipe connected to the outlet of the pump. This hose can be directed towards a suitable sewage or septic system for proper disposal. Some RV macerator pumps even come with features like quick-connect fittings and swivel capabilities, making it easier to set up and maneuver the hose during the emptying process.
5. Safety and convenience features
Modern RV macerator pumps often come with additional features aimed at ensuring user safety and convenience. These can include built-in thermal overload protection to prevent motor overheating, self-cleaning mechanisms to prevent clogs, and anti-vibration components to reduce noise and vibrations during operation.
Procedure for using macerator method
Step 1: Gather the necessary equipment
To begin, gather the following items:
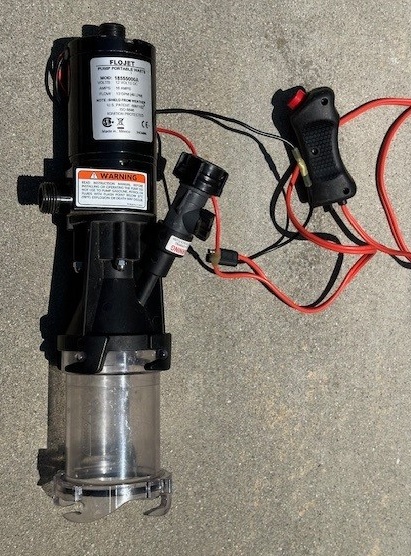
- A macerator pump: This is the key tool for emptying your RV tanks. It connects to your RV’s waste outlet and grinds the waste into a slurry for easy disposal. The one I use is the Flojet 1855-000A.
- A garden hose: Choose a sturdy hose that can handle the volume of waste being pumped.
- Gloves and protective gear: Ensure you have gloves, goggles, and any other protective gear you feel necessary.
Step 2: Locate a suitable disposal point
Identify a suitable disposal point. If you do not have a dedicated disposal location, two other options include using a toilet or sewer clean out. For my usage the nearest toilet was too far away, but luckily there was a sewer clean out on the rear of my house that wasn’t too far away.
Step 3: Set up the macerator pump
Connect the macerator pump to your RV’s waste outlet. Most pumps come with clear instructions for attachment, but typically, you’ll need to remove the cap from the waste outlet and securely attach the pump’s hose to it. Ensure the connection is airtight to avoid any leaks. I also used a clear sewer hose extender so that I could visibly see what was happening.
Step 4: Connect the garden hose
Connect one end of the garden hose to the outlet of the macerator pump. Make sure it’s securely fastened to avoid any leakage. Make sure this is a dedicated hose that you only use for waste disposal and not for other purposes.
Step 5: Position the other end of the hose
Position the other end of the garden hose in the designated disposal area. Ensure the hose is securely in place and won’t move during the pumping process.
For my usage, I needed to put together some pieces I purchased at the hardware store in order to connect the hose to the sewer clean out. The parts needed for this will vary based on your application.
Step 6: Connect power to the macerator pump
Connect the macerator pump’s power cord to a nearby power outlet, ensuring it is securely plugged in and the pump receives power. In my case, the macerator I used required 12 volts, which I am able to connect to the RV coach battery.
Step 7: Turn on the macerator pump
Before turning on the pump, double-check all connections to ensure they are secure. Once you’re confident, switch on the macerator pump. It will begin grinding the waste and pumping it through the hose.
Step 8: Monitor the process
As the waste is being pumped, monitor the flow to ensure everything is working properly. Keep an eye out for any leaks or blockages in the hose. If necessary, pause the pump to address any issues before resuming. You should also make sure you do not run the pump for prolonged time periods and also if there is no more liquid flowing through the pump.
Step 9: Clean and store the equipment
Thoroughly clean the macerator pump, garden hose, and any other equipment used during the process. Store them in a designated area, ensuring they are clean and free from any residual waste.
Summary
By following these steps, you can confidently and efficiently empty your RV tanks at home using a macerator. Remember to always comply with local regulations and guidelines for waste disposal. Happy travels and happy emptying!


Leave a Reply