

Creating an EarthBox trellis is a fantastic way to maximize your garden’s productivity and ensure your plants have the support they need to thrive. Whether you’re growing tomatoes, cucumbers, or beans, a sturdy trellis can help your plants grow vertically, saving space and making it easier to manage your garden. In this guide, we’ll walk you through the step-by-step process of building your own EarthBox trellis, providing tips and tricks to ensure your plants grow strong and healthy. Let’s get started and take your gardening to the next level!
What is an EarthBox?
An EarthBox is a self-watering, container gardening system designed to simplify the process of growing plants while maximizing yield. It features a built-in water reservoir that ensures consistent moisture levels, reducing the need for frequent watering. This innovative design helps prevent common issues like overwatering or underwatering. The EarthBox is ideal for both novice and experienced gardeners, offering a convenient solution for growing a variety of vegetables, herbs, and flowers. Its compact size makes it perfect for small spaces, patios, and urban gardens. The benefits of using an EarthBox include improved plant health, higher productivity, and reduced maintenance, making it an excellent choice for anyone looking to enhance their gardening experience.

Materials Needed
- 2″ x 2″ x 8′ board (4)
- 2″ x 4″ x 8′ board (1)
- Screws
- Medium Flat Corner Brace (8)
- Hinges (2)
- Wood Stain
Tools Required
- Tape Measure
- Pencil
- Miter Saw
- Drill and Drill Bits
- Impact Driver
- Screwdriver (Phillips Head)
- Paint Brush
- Staple Gun (Optional)
- Personal Protective Equipment (PPE)
Step-by-Step Instructions
Step 1 – Cut the Wood
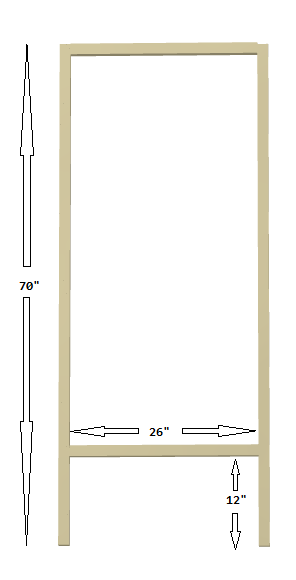
You will need to cut the 4 2×2 boards into one 70″ section and one 26″ section. These will be used for the 2 vertical frames.
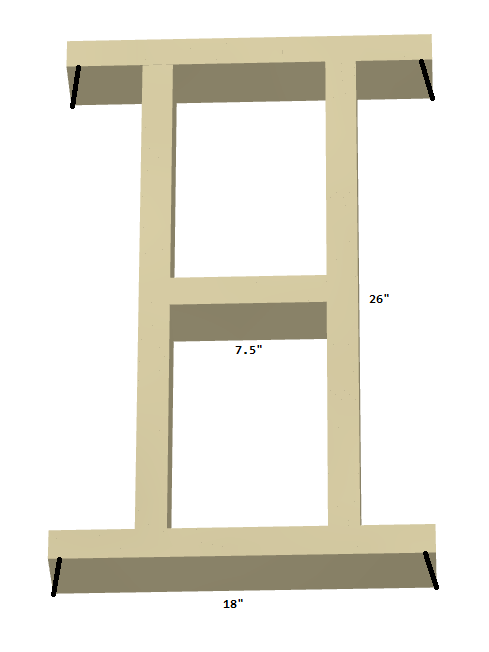
You will need to cut the 4×4 board into two 18″ pieces, two 26″ pieces, and one 7.5″ piece.
You will then need to cut an angle on each end of the 18″ pieces so that the bottom is 18″ and the top is 17.25″.
Step 2 – Stain the Wood
With the wood all cut, it is a good time to stain the wood to help protect it from the elements. You may need a couple of coats of stain and then allow time for it to dry before moving on to the next step.
Step 3 – Assemble the Two Vertical Frames
In this step you will assemble the two vertical frames. They are identical, so you will perform the same steps for each vertical frame. Each vertical frame utilizes two of the 2×2 70″ pieces and two of the 2×2 26″ pieces and 4 flat corner braces.
You should drill a pilot hole in each location that you will be putting in a screw. The diagram below shows how the vertical fame comes together. In each of the corners you will add a flat corner brace for support. These will be on the inside of the trellis so you will not be able to see them when the trellis is all together.
Step 4 – Assemble the Base
In this step we will be putting together the base. You will be using the two 2×4 26″ pieces, two 2×4 18″ pieces and one 2×4 7.5″ piece.
The diagram below shows how the pieces go together. The black lines show the angle cut you needed to make on each end of the 18″ pieces.
To attach the boards together you should drill pilot holes and secure using a 3″ decking screw. Each joint should use 2 screws for a total of 12 screws in this step.
Step 5 – Attach Vertical Frames Together
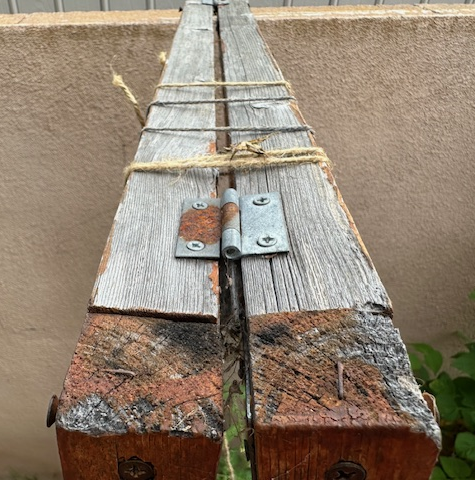
The two vertical fames can be attached with two hinges at the top. The hinges usually come with screws that you can use to complete this step.
The following diagram shows one of the hinges in place. The trellis shown here was made a number of years ago so you can see it has been weathered and is really in the need for more stain.
Step 6 – Attach Vertical Frames to Base
In this step you will attach the vertical frames to the base. At each corner I recommend using two screws and pre-drilling pilot holes.
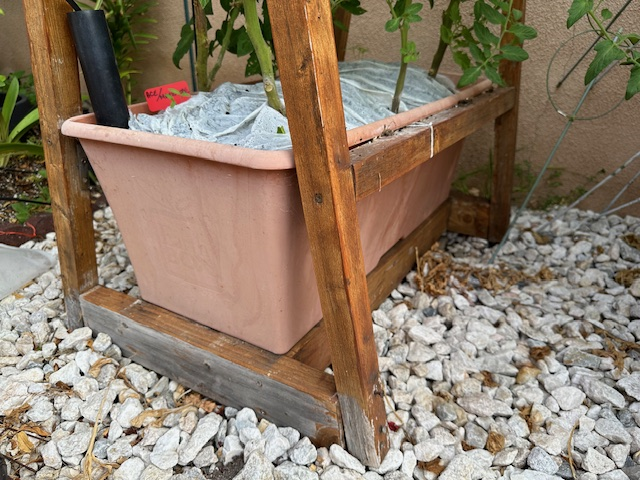
Step 7 – Put EarthBox in Place
Now that trellis is assembled it is now time to add the EarthBox. Make sure you have moved the trellis to the desired location first. Then add EarthBox. It is good to have it already loaded up with the dirt/soil as will be a little more difficult to work with once it has been inserted into the trellis.
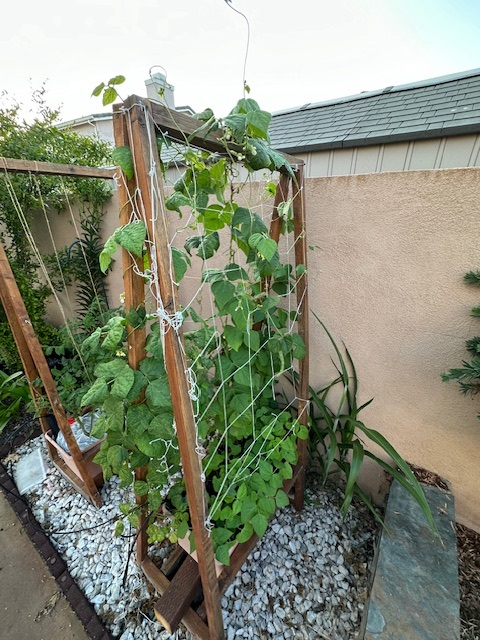
Step 8 – Add Netting
On the vertical frame you will need to use some small screws (dry wall screws work well) to attach the net. You may need to cut net to size and position screws where they can catch the net. Alternatively you could use staples and a staple gun to attach net.
I used the following netting: Luster Leaf 869 Vine and Veggie Trellis Net
Planting and Training the Plants
Once your EarthBox trellis is securely in place, it’s time to start planting and training your plants. Begin by planting your chosen vegetables or climbing plants in the EarthBox, ensuring they are spaced appropriately for optimal growth. As the plants begin to grow, gently guide their stems and tendrils towards the trellis, using soft ties or garden clips to secure them if necessary. Regularly check the plants and adjust their ties to prevent any damage and to encourage even growth. Training your plants to climb the trellis not only supports their development but also improves air circulation and sunlight exposure, leading to healthier and more productive plants. With consistent care and attention, your trellised plants will thrive, making your EarthBox garden both efficient and visually appealing.
Benefits of Using a Trellis with an EarthBox
Using a trellis with an EarthBox offers numerous benefits that enhance both plant health and garden management. By providing vertical support, a trellis allows plants to grow upwards, which maximizes space and makes efficient use of small gardening areas. This vertical growth improves air circulation and sunlight exposure, leading to healthier plants and reducing the risk of fungal diseases. Additionally, a trellis keeps fruits and vegetables off the ground, protecting them from pests and soil-borne issues. Harvesting becomes easier and more convenient, as the produce is more accessible and visible. Overall, incorporating a trellis with your EarthBox not only boosts plant productivity and health but also creates a more organized and manageable gardening experience.
Conclusion
Creating a trellis for your EarthBox is a rewarding project that can significantly enhance your gardening experience. By following our step-by-step guide, you can provide your plants with the support they need to thrive, resulting in healthier growth and a more bountiful harvest. A well-designed trellis not only maximizes your garden space but also makes maintenance and harvesting easier and more efficient. We hope this guide has inspired you to build your own EarthBox trellis and take your gardening to the next level. Happy gardening, and don’t hesitate to share your experiences or ask questions in the comments below!


Leave a Reply