

Curved stairs with a banister lend a distinctive charm to any home, but they can present a unique challenge when it comes to child safety and pet containment. Whether you’re a parent looking to safeguard your little one or a pet owner aiming to create a secure environment, installing a gate on curved stairs requires careful planning and precise execution.
In this guide, we’ll delve into the intricacies of installing a baby or pet gate on curved stairs with a banister. We’ll walk you through the essential steps, from assessing your needs and options to selecting the right gate, measuring and planning, gathering the necessary tools and materials, and, ultimately, executing a successful installation.
As safety takes precedence, our comprehensive approach encompasses various gate types, considering the nuances of each installation method. Whether you opt for the sturdiness of hardware-mounted gates, the convenience of pressure-mounted gates, or the adaptability of retractable gates, we’ll provide you with tailored insights to ensure that your chosen gate fits seamlessly into your unique curved stair environment.
Join us as we embark on a journey to make your home a safer haven for your little ones and furry companions. By the end of this guide, you’ll be well-equipped with the knowledge and confidence to install a gate that not only enhances safety but also complements the aesthetics of your home.
Let’s begin the process of transforming your curved stairs into a secure haven where you can enjoy peace of mind without compromising on style or functionality.
Assessing your needs and options
Before you dive into installing a baby or pet gate on your curved stairs with a banister, it’s crucial to evaluate your specific requirements and explore the different options available. Here’s how to assess your needs and make informed choices:
Determine the Purpose: Consider why you need a gate. Is it primarily for child safety, to contain pets, or both? Understanding your goal will help you choose a gate that suits your needs effectively.
Evaluate Banister and Stair Configuration: Take a close look at your banister and stair layout. Note any unique features, such as the curvature of the stairs, the type of banister (wood, metal, etc.), and the available space for gate installation.
Gate Types for Curved Stairs: Explore the various gate types suitable for curved stairs with a banister:
- Hardware-Mounted Gates: These gates are securely anchored to the wall and banister using brackets and screws. They offer excellent stability but may require drilling. This may not be the best option if this is only a short term installation.
- Pressure-Mounted Gates: Pressure-mounted gates rely on tension to stay in place. They are easier to install and don’t require drilling, but they might not be as secure for curved stairs. This is the option I selected and it has worked great. I needed to use a Y spindle to properly secure gate to the bannister.
- Retractable Gates: These gates are designed to retract like a roller blind when not in use. They can be a good choice for irregular spaces, but their stability depends on proper installation.
Gate Height and Width: Determine the appropriate gate height to prevent climbing or jumping over by children or pets. Measure the width of the stair opening to ensure the gate fits properly.
Consider Aesthetics: Since the gate will be a visible part of your home, consider the aesthetics. Choose a gate that complements your interior design and banister style.
Ease of Use: Think about how easy it will be for you to open and close the gate while carrying items or when your hands are full.
Long-Term Needs: Anticipate potential changes in your household. If you’re planning to have more children or if your pets are still growing, consider a gate that can accommodate these changes.
Budget: Set a budget for your gate installation. Remember that investing in a quality gate ensures durability and safety.
Check Regulations and Guidelines: If you’re installing the gate for child safety, research safety regulations and guidelines specific to your region. Ensure the gate you choose meets these standards.
Consult Experts: If you’re uncertain about which gate type is best for your curved stairs and banister, consider seeking advice from professionals who specialize in child safety or pet containment.
By carefully assessing your needs and options, you’ll be better equipped to choose the right gate that offers optimal safety and convenience for your household.
Gathering the necessary tools and materials
Before you embark on the installation process, it’s essential to gather all the required tools and materials. Having everything at hand will streamline the process and help you avoid interruptions. Here’s a list of tools and materials you’ll need:
Tools:
- Screwdriver: Depending on the gate type, you might need a Phillips or flathead screwdriver for assembling and mounting components.
- Measuring Tape: Accurate measurements are crucial for a secure fit. A measuring tape helps you determine the gate’s height and the width of the stair opening.
- Level: A level ensures that your gate is installed straight and aligned properly, preventing any unevenness or wobbling.
- Pencil: Use a pencil to mark positions for brackets, screws, or any measurements on the wall or banister.
- Drill and Bits: If you’re installing a hardware-mounted gate, a drill and appropriate drill bits are necessary for making holes in the wall or banister.
- Adjustable Wrench: This tool can be useful for tightening bolts and nuts, especially if your gate comes with adjustable components.
- Safety Glasses: Protect your eyes during drilling or installation by wearing safety glasses.
Materials:
- Gate Kit or Hardware: Ensure you have the gate installation kit or hardware provided with your gate. This may include brackets, screws, bolts, and other components required for installation.
- Mounting Hardware: If your gate requires additional hardware beyond what’s included in the kit, make sure you have the appropriate screws, anchors, and other fasteners suitable for your wall and banister materials.
- Adhesive Pads or Wall Protectors: These help prevent damage to your banister or wall caused by the gate installation.
- Lubricant: If your gate has moving parts, having a suitable lubricant on hand can aid in smoother operation.
- Protective Equipment: Depending on the gate type and your installation method, you might need items like wall anchors, corner protectors, or edge bumpers for added safety.
- Gate Locking Mechanism (if applicable): If your gate features a locking mechanism, make sure it’s included and in good working condition.
- User Manual: Keep the user manual or installation instructions handy for reference throughout the installation process.
By gathering all the necessary tools and materials in advance, you’ll be well-prepared to tackle the installation process with confidence and efficiency.
Measure and planning
Accurate measurements and careful planning are crucial when installing a gate on curved stairs with a banister. Taking the time to measure correctly and plan your installation will ensure a secure and properly fitting gate. Follow these steps for successful measurement and planning:
1. Measure the Stair Opening:
Using a measuring tape, measure the width of the stair opening where you intend to install the gate. Measure at both the top and bottom of the opening, as the width might vary due to the curvature of the stairs.
2. Determine the Gate Height:
Measure the height of the opening from the floor to the top of the banister or handrail. This measurement will help you select a gate that is tall enough to prevent climbing or jumping over.
3. Consider Banister and Wall Materials:
If your banister or walls are made of different materials (wood, metal, drywall, etc.), consider the type of hardware needed for each surface. Some gates come with versatile hardware suitable for various materials, while others may require specific hardware.
4. Evaluate Curvature:
Examine the curvature of the stairs and banister. If the banister is curved or has irregular shapes, make note of these variations, as they might impact the installation process.
5. Determine Mounting Points:
Based on your measurements, determine where the gate’s mounting points will be placed. For hardware-mounted gates, mark the locations for brackets on both the banister and the wall. Ensure that the brackets align properly for a secure fit.
6. Mark Mounting Heights:
Use a pencil to mark the desired mounting height for the gate on both the banister and the wall. Use a level to ensure the marks are straight and aligned.
7. Check Clearances:
Check for any potential obstructions near the gate’s installation area. Ensure that the gate can swing open and close without hitting objects or walls.
8. Consider Gate Swing Direction:
Decide whether you want the gate to swing open towards the stairs or away from them. Consider the layout of the space and choose the direction that provides the most convenience and safety.
9. Review Manufacturer’s Instructions:
Refer to the gate’s installation manual or instructions provided by the manufacturer. Different gate models might have specific requirements or recommendations for measurements and installation.
10. Double-Check Measurements:
Before proceeding with the installation, double-check all measurements and markings. Accurate measurements are vital for ensuring a secure and properly aligned gate.
By meticulously measuring and planning the installation, you’ll set the foundation for a successful and safe gate installation process that fits seamlessly into your curved stair environment.
Preparing the installation area
Properly preparing the installation area is crucial for a smooth and successful installation of gate on curved stairs. Taking the time to clear the space and ensure a clean, obstruction-free environment will contribute to a safe and secure installation. Here’s how to prepare the area:
Clear the Space:
Remove any objects, furniture, or clutter near the stairs and banister. Create enough room to work comfortably and ensure unobstructed access to the installation area.
Clean the Area:
Clean the stairs, banister, and adjacent walls to ensure there is no dirt, dust, or debris that could affect the gate’s installation or stability.
Inspect for Hazards:
Examine the installation area for any potential hazards, such as exposed wires, sharp edges, or loose materials. Address these issues before starting the installation to ensure a safe environment.
Check Flooring:
If your gate has a bottom bar or threshold, make sure the flooring is even and doesn’t create an obstacle for the gate. If needed, consider adding a small threshold to create a level surface.
Secure Loose Objects:
Ensure that any loose objects, such as rugs or mats, are properly secured to prevent tripping hazards during the installation process.
Remove Wall Decor:
If there are wall decorations or artwork near the installation area, consider removing them temporarily to prevent potential damage during the installation.
Protect Banister and Wall:
If your gate’s installation involves drilling or attaching hardware to the banister and wall, use adhesive-backed protective pads or painter’s tape to safeguard the surfaces from scratches or damage.
Gather Tools and Materials:
Having all the necessary tools and materials within reach before you start will make the installation process smoother and more efficient. Double-check your list to ensure you have everything you need.
Work Safely:
When drilling or using tools, wear appropriate safety gear, such as safety glasses, to protect your eyes from debris.
By thoroughly preparing the installation area, you’ll create an environment that facilitates a successful gate installation, ensuring both safety and functionality.
Installing the gate on curved stairs
The installation process of a gate on curved stairs with a banister demands precision and attention to detail. Depending on the type of gate you’ve selected, the installation steps will vary. Here, we’ll outline the general installation process for different gate types:
Hardware-Mounted Gates:
- Position Brackets: Using a pencil, mark the positions for the mounting brackets on both the banister and the wall. Ensure the brackets align correctly with the stair opening.
- Attach Brackets: Securely attach the brackets to the banister and wall using appropriate screws or fasteners. Use a level to ensure they are perfectly aligned.
- Place Gate: Carefully position the gate within the installed brackets. Make sure the gate is level and centered within the stair opening.
- Secure Gate: Tighten the screws on the brackets to secure the gate in place. Ensure the gate is stable and doesn’t wobble.
- Test Locking Mechanism: If your gate comes with a locking mechanism, verify that it functions correctly. Ensure it latches securely to prevent accidental openings.
Pressure-Mounted Gates:
- Expand the Gate: Adjust the gate to its widest setting. Insert the gate into the stair opening, applying even pressure against the walls and banister.
- Tension Adjustment: If your gate has tension knobs, gradually tighten them to create a snug fit. Avoid overtightening, which could damage the walls or banister.
- Stability Check: Gently push and pull the gate to test its stability. It should remain secure without wobbling. Adjust the tension if necessary.
Retractable Gates:
- Install Mounts: Attach the mounting brackets to the wall and banister according to the manufacturer’s instructions. Ensure they are level and secure.
- Gate Installation: Slide the gate into the mounted brackets. Some retractable gates come with guides that need to be installed to direct the gate’s movement.
- Test the Movement: Pull the gate across the opening to test its retracting and locking mechanisms. Ensure it operates smoothly and securely.
- Check Locking Feature: If your gate has a locking mechanism, ensure it engages and disengages effectively.
General Tips for All Gate Types:
- Alignment is Key: Throughout the installation, consistently check and adjust the gate’s alignment with the stairs and banister. Misalignment can compromise stability.
- Follow Manufacturer’s Instructions: Refer to the gate’s user manual for specific instructions or recommendations provided by the manufacturer.
- Regular Inspection: After installation, periodically inspect the gate’s brackets, screws, and tension. Tighten or adjust components if needed.
- Childproof Locks (if applicable): If your gate features a childproof lock, activate it when the gate is closed to prevent tampering.
By adhering to these steps and considering the gate’s individual installation instructions, you’ll ensure a secure and reliable gate that enhances safety for your curved stairs and banister.
Ensuring Safety and Stability
Installing a gate on curved stairs with a banister is a crucial step in enhancing the safety of your home, but it’s equally important to ensure that the gate is secure and stable after installation. Here are some essential guidelines to follow:
Test the Gate’s Security: Before allowing children or pets near the gate, perform a thorough security check. Gently push and pull the gate to assess its stability. It should withstand pressure without budging or coming loose.
Inspect Mounting Brackets: If your gate is hardware-mounted, regularly inspect the mounting brackets for any signs of loosening or shifting. Tighten any screws or bolts as needed to maintain a secure attachment. If the gate comes with a locking mechanism, make sure it’s functioning correctly.
Check Tension on Pressure-Mounted Gates: For pressure-mounted gates, periodically verify the tension. Some gates have adjustment mechanisms to ensure a snug fit against the walls or banister. If the tension loosens over time, readjust it to maintain a secure installation.
Monitor Gate Alignment: Curved stairs and banisters may introduce unique alignment challenges. Keep an eye on the gate’s alignment with the stairs and banister. If you notice any misalignment, correct it promptly to prevent potential hazards.
Regular Maintenance: Just like any other household fixture, gates require regular maintenance. Clean the gate and its components to prevent dirt or debris buildup that could affect its functionality. Lubricate moving parts as recommended by the manufacturer.
Follow Manufacturer’s Instructions: Always refer to the manufacturer’s instructions for maintenance recommendations, weight limits, and any other important details specific to your gate model.
Supervise Children and Pets: While gates provide an added layer of safety, they are not a substitute for proper supervision. Always keep an eye on children and pets near the stairs, even if the gate is installed.
Periodic Reevaluation: As children grow or the layout of your home changes, reevaluate the gate’s position and effectiveness. Adjust the gate’s height and position as needed to accommodate these changes.
By diligently following these safety and stability guidelines, you’ll help ensure that the gate remains a reliable barrier that prevents accidents and provides peace of mind for you and your family.
Maintenance and troubleshooting
Proper maintenance is essential to keep your baby or pet gate functioning optimally over time. Additionally, being prepared to troubleshoot common issues can help you address any unexpected challenges that may arise. Here’s how to maintain your gate and handle potential problems:
Regular Maintenance:
- Cleaning: Regularly clean the gate and its components to prevent dirt, dust, and grime buildup. Use a damp cloth and mild soap to wipe down the gate’s surfaces. Avoid using harsh chemicals that could damage the gate’s finish.
- Lubrication: If your gate has moving parts or hinges, apply a small amount of lubricant to ensure smooth operation. Check the manufacturer’s recommendations for suitable lubricants.
- Inspect Hardware: Periodically inspect all screws, bolts, and fasteners. Tighten any loose hardware to maintain the gate’s stability. If you notice damaged or rusted hardware, replace it promptly.
- Check Hinges and Latches: If your gate has hinges or latches, ensure they are in good condition and functioning properly. Lubricate them if necessary to prevent squeaking or sticking.
- Test Locking Mechanisms: For gates with locking mechanisms, test them regularly to make sure they engage and disengage smoothly. If you notice any difficulties in locking or unlocking, address the issue promptly.
Troubleshooting Common Issues:
- Gate Won’t Close Properly: If the gate doesn’t close smoothly or align correctly, check for any obstructions in the gate’s path. Also, make sure the gate’s mounting points are properly aligned.
- Gate Sags or Tilts: If a hardware-mounted gate starts to sag or tilt, double-check the tightness of the mounting brackets and reposition them if necessary. If the gate is pressure-mounted, ensure the tension is properly adjusted.
- Gate Sticks or Is Difficult to Open/Close: Sticky gates might be a result of dirt or debris in the hinges or tracks. Clean the hinges or tracks and apply a lubricant if needed.
- Gate Loses Tension: For pressure-mounted gates, if the tension decreases and the gate becomes loose, adjust the tension according to the manufacturer’s instructions. This is important to maintain a secure fit.
- Gate Locking Issues: If the gate’s locking mechanism becomes hard to operate or malfunctions, carefully inspect it for any debris or damage. Clean and lubricate the mechanism if needed, or contact the manufacturer for assistance.
- Banister or Wall Damage: If the gate’s installation causes any damage to your banister or walls, consider using adhesive-backed protective pads to prevent further damage.
Contact the Manufacturer: If you encounter a problem that you can’t resolve through maintenance or troubleshooting, don’t hesitate to contact the manufacturer’s customer support. They can provide guidance, replacement parts, or further assistance.
By adhering to a regular maintenance routine and knowing how to troubleshoot common issues, you’ll ensure that your gate continues to serve its purpose effectively while maintaining the safety of your loved ones and pets.
My solution to keep my pet downstairs
We opted for the Summer Infant Secure Space Extra-Wide Safety Gate, which is specifically designed for various installation types including stairs. Additionally, we used a Y spindle rod (8 mm) in place of the rods that came with the gate, to securely attach the gate to the bannister. This combination allowed us to effectively safeguard our pets while seamlessly integrating the gate with the unique structure of our staircase.
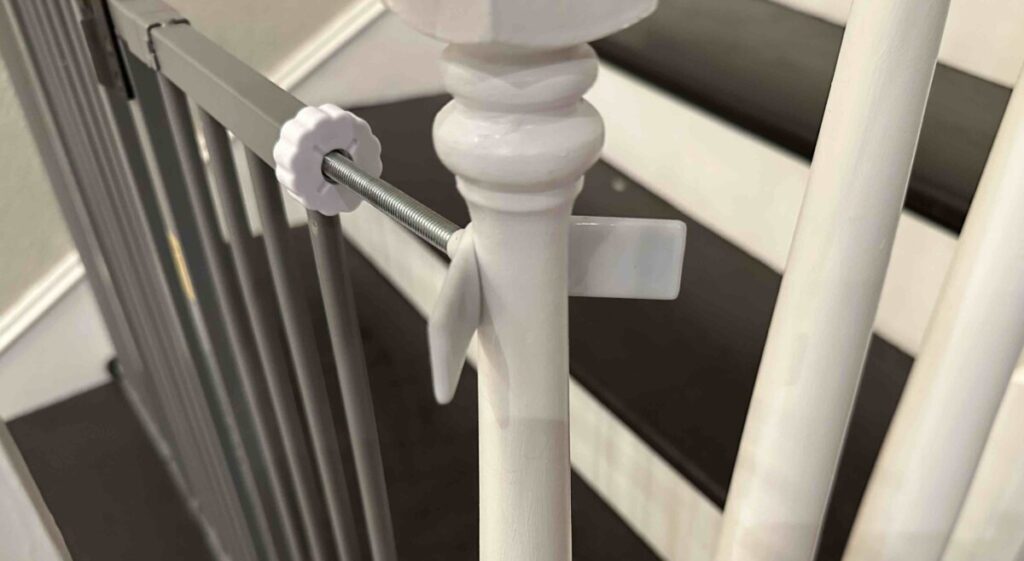
We only needed to use one of the Y spindle rods that came in the 2-pack, as the lower rod that came with the gate was able to hit the wider part of our bannister.
Installation experience
Installation was a breeze and probably took less than 30 minutes. The gate came with 3 different extension gates so that you could fit the gate to the width of your stairs.
This gate can support stairs from 28.5 inches to 52 inches wide. The width of my stairs was about 48″ at the bottom by the step. The width at the top was slightly wider due to the bannister tapering off.
I was able to use the pressure rods with the flat circle feet to press against the wall side at both the top and bottom. On the bannister side I was able to use the pressure rod that came with the gate only on the bottom and used the Y spindle rod for the top to attach to the bannister. This gate installs without any need to drill or use screws which was a key feature I was looking for.
Summary
After three months of having the gate installed on our curved stairs, we can confidently say that it has been a resounding success in keeping our pet safe. This gate has surpassed our expectations and proven to be highly effective in preventing our pet from accessing the stairs. Not only does this work to keep our young dog from going upstairs it would also work well for keeping your baby or small child from also from trying to climb the stairs. We are thrilled with how well this gate has worked, and we wholeheartedly recommend it to others seeking a reliable solution to protect their pets from stair-related hazards. I highly recommend this solution for installing a gate on curved stairs, especially if you have a banister.


Leave a Reply